How to create Audio Only Rooms
For Discounted Audio Only pricing you will need to create audio only rooms. Here is How you can create them. You can also conduct Voice calls in Video rooms, but discounted pricing will not apply when conducting voice only calls in video rooms.
You can create audio only room using Rest API as well as through dashboard:
1. Create Audio Only Rooms though Dashboard:
Go to Dashboard -> Create Room -> Audio Only Room (Switch On the Audio Only Room)
 Audio Only Rooms
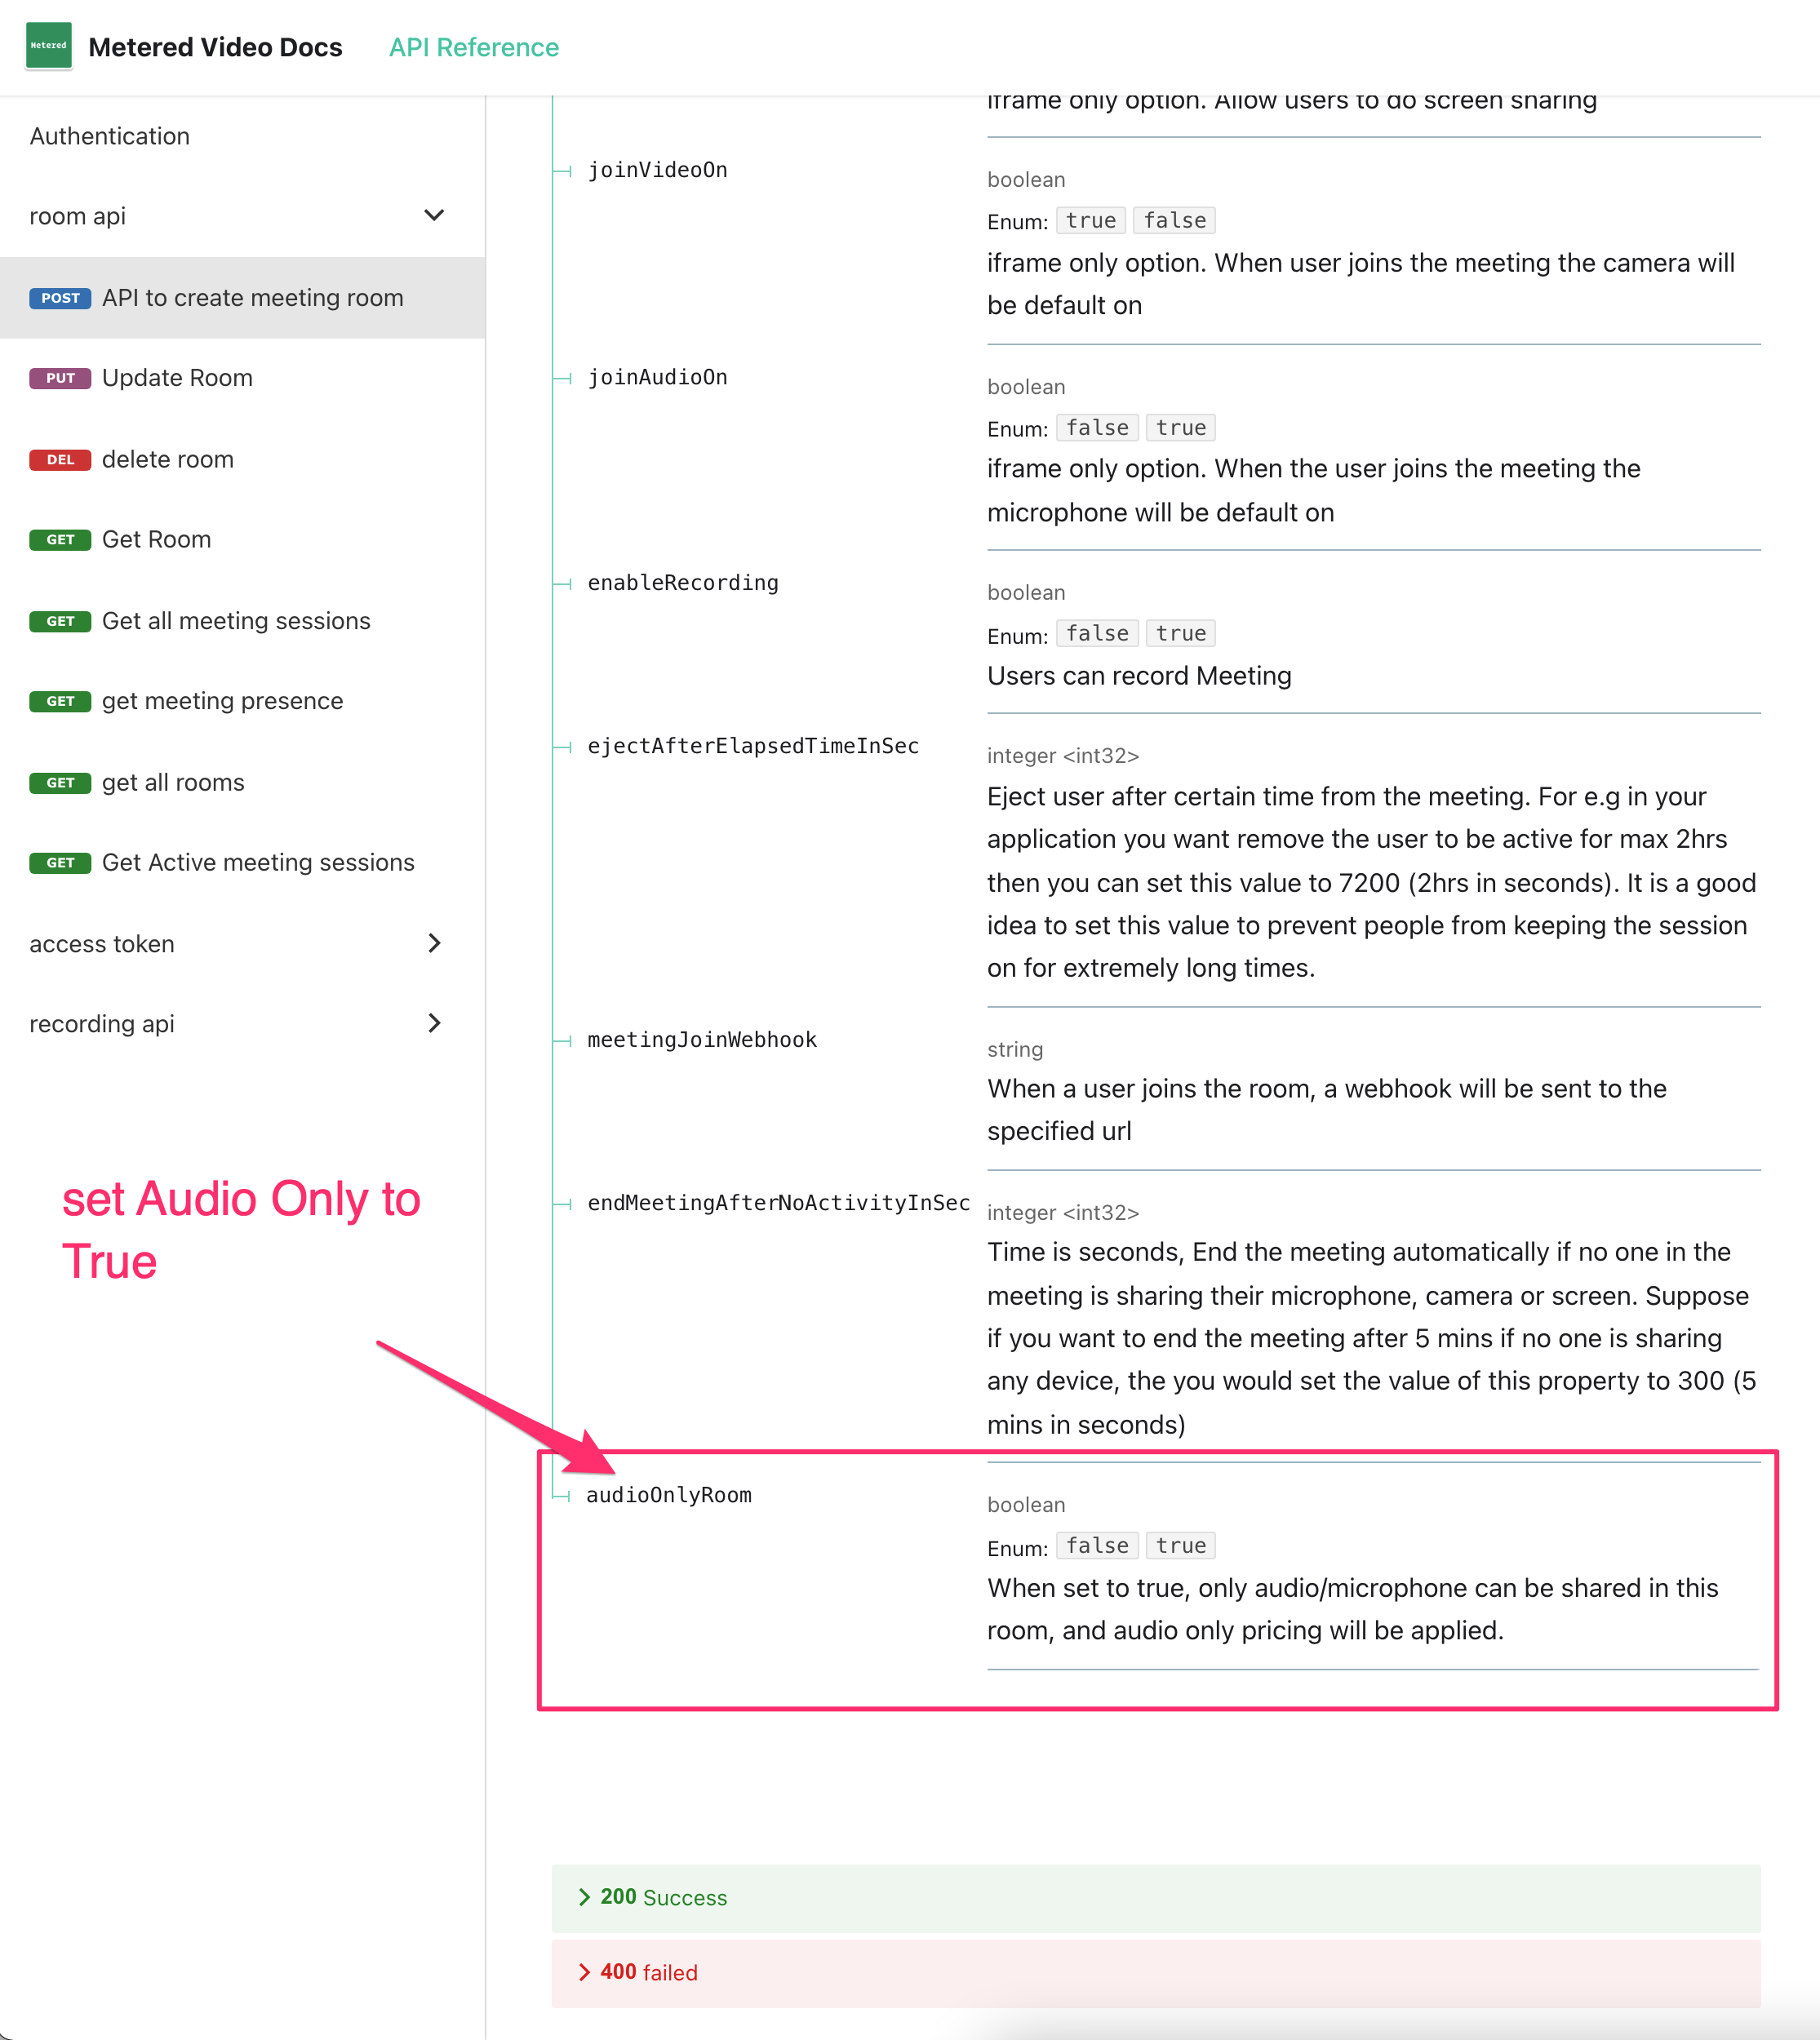
2. Create Audio Only Rooms using Rest API
When calling the Create Room API, set the Audio only parameter to true.
Here is the documentation on Create Room Api: create room
 create room
Joining a Room
To join the room we will have to create a meeting object and then call the join method of the Metered SDK.
    const meeting = new Metered.Meeting();
    const meetingInfo = await meeting.join({
    roomURL: "yourappname.metered.live/meetup",
    name: "John Doe"
    });
In the roomUrl replace yourappname with the name of your app and meetup is the name of the room that we have created in the previous step. The roomUrl is basically yourappname.metered.live/your-room-name
Sharing a Stream
To perform a voice call, you would need to share the participant's audio. When sharing the audio the browser would request the participant to allow the audio access.
You can add a button in your application, that when pressed user's audio will be shared, and in onclick event of the button, you can call this method.
try {
  meeting.startAudio();
} catch (ex) {
  console.log("Error occurred when sharing audio", ex);
}
If the user does not have a audio or the user has not approved the audio permission then an exception would occur with the error message.
When the other/remote participants share their microphone, audio, or screen remoteTrackStarteds event is emitted, and in that event, the remote participant's audio feed is sent. Continue reading and we will explain below how we will handle that.
Receive a Stream
Handling remote participants
Handling remote participants joining the meeting is quite simple. Events are emitted when other participant joins the meeting, leaves the meeting, and shares their camera, mic, or screen, we will go through all of them here.
i. Participant Joined Event
When a participant joins the room, the participantJoined event is emitted, this event can be used to indicate to other participants that a user has joined.
/**
 * participantInfo = {
 *       isAdmin: false
 *       meetingSessionId: "60fef02300f4a23904ab4861"
 *       name: "John Doe"
 *       roomId: "60fc7bcb1dc8562d6e4ab7b3"
 *       _id: "60fef02300f4a23904ab4862"
*  }
 */
meeting.on("participantJoined", function(participantInfo) {
  console.log("participant has joined the room", participantInfo);
});
Showing other/remote participants audio.
When a participant shares their microphone, camera, or screen a remoteTrackStarted event is emitted to all the other participants.
We can listen to this event to add a Audio tag to the page to view the participant's audio or screen, or to listen to the participant.
The remoteTrackStarted event is similar to localTrackStarted event as it contains the MediaStreamTrack along with the info about the participant.
/**
 * remoteTrackItem = {
 *   streamId: "eaa6104b-390a-4b0a-b8d1-66f7d19f8c1a",
 *   type: "Audio"
 *   participantSessionId: "60fef02300f4a23904ab4862"
 *   track: MediaStreamTrack,
 *   name: "Jane Smith"
 * }
 */
meeting.on("remoteTrackStarted", function(remoteTrackItem) {
    console.log("remoteTrackStarted", remoteTrackItem);
    // Converting MediaStreamTrack to MediaStream
    var track = remoteTrackItem.track;
    var stream = new MediaStream([track]);

    // Creating a AudioTag to show the remote stream
    const AudioTag = document.createElement("Audio");
    AudioTag.autoplay = true;
    AudioTag.srcObject = stream;
    AudioTag.playsinline = true;
    // We are setting the id of the AudioTag to the streamId
    // So that when this track is stopped we can remove the
    // AudioTag from the page.
    AudioTag.id = remoteTrackItem.streamId;
        // Setting the class name to participantSessionId so that when this participant
    // leaves we can easily remove all the Audio tags associated with this
    // participant.
    AudioTag.class = remoteTrackItem.participantSessionId;

    // Adding the Audio tag to container where we will display
    // All the remote streams
    $("#remoteAudioContainer").append(AudioTag);
});
Embedded Demo
Create a html page and name it
index.htmland create a<h1>and name the headingMetered Demo.create a
buttonelement and add aonclickthat calls thejoinMeeting()function. Then add another audio element withidremoteAudio. In this audio element we will be showing remote participants audioImport the metered sdk with a simple script tag.
<!DOCTYPE html>
<html>
    <head>

    </head>
    <body>
        <script src="https://cdn.metered.ca/sdk/video/1.4.6/sdk.min.js"></script>
        <h1>Hello world</h1>

        <button onclick="joinMeeting()">Join Meeting</button>

        Remote Audio:
        <audio id="remoteAudio" autoplay ></audio>
    </body>
</html>
- Click on the file to open it on the web browser of your choice. You can also run the application using
http-server.
Open the file in the browser by clicking on it or if you are rendering it through a local server always open it through localhost. Metered sdk needs https to run.
- Create a script tag and then inside the script tag create a
asyncfunction with the namejoinMeeting()
We have already created a room by going to the dashboard. The room
idof our room is:ffpyr0hc5cHere we are creating a new meeting by creating a new Meeting object, then joining the meeting room with participant name
John Doe. This has been described in the "Join the Room" section above.Then once we have joined the meeting we are calling
meeting.startAudio()to start sharing microphone.Similarly, when a remote participant joins the meeting the
remoteTrackStartedevent is emitted. We listen to this event and pass theMediaStreamto the audio element with idremoteAudio
        <script>

      async function joinMeeting(){

            const meeting = new Metered.Meeting();
            const meetingInfo = await meeting.join({
            roomURL: "aliasgher.metered.live/ffpyr0hc5c",
            name: "John Doe"
            });
            console.log("Meeting joined", meetingInfo);

        try {
            meeting.startAudio();
            } catch (ex) {
            console.log("Error occurred when sharing microphone", ex);
            alert('share microphone not working')
            }

            /**
                 * participantInfo = {
                 *       isAdmin: false
                 *       meetingSessionId: "60fef02300f4a23904ab4861"
                 *       name: "John Doe"
                 *       roomId: "60fc7bcb1dc8562d6e4ab7b3"
                 *       _id: "60fef02300f4a23904ab4862"
                *  }
                */
                meeting.on("participantJoined", function(participantInfo) {
                console.log("participant has joined the room", participantInfo);
                });


                /**
                 * remoteTrackItem = {
                 *   streamId: "eaa6104b-390a-4b0a-b8d1-66f7d19f8c1a",
                 *   type: "audio"
                 *   participantSessionId: "60fef02300f4a23904ab4862"
                 *   track: MediaStreamTrack,
                 *   name: "Jane Smith"
                 * }
                 */
                meeting.on("remoteTrackStarted", function(remoteTrackItem) {
                    console.log("remoteTrackStarted", remoteTrackItem);
                    // Converting MediaStreamTrack to MediaStream
                    var remoteTrack = remoteTrackItem.track;
                    var remoteStream = new MediaStream([remoteTrack]);

                    document.getElementById("remoteAudio").srcObject = remoteStream;
                    document.getElementById("remoteAudio").play();
                });
    }


        // use localhost to run the audio on your local server.  do not use the http ip address given by http-server because the metered audio application needs https to run


</script>
Here is what the final code looks like:
<!DOCTYPE html>
<html>
    <head>

    </head>
    <body>

        <h1>Room ID: ffpyr0hc5c</h1>

        <div>
            <button onclick="joinMeeting()">Join Meeting</button>
            <hr />

            Remote audio:
            <audio id="remoteAudio" autoplay ></audio>
        </div>


        <script src="https://cdn.metered.ca/sdk/video/1.4.6/sdk.min.js"></script>
        <script>

      async function joinMeeting(){

            const meeting = new Metered.Meeting();
            const meetingInfo = await meeting.join({
            roomURL: "aliasgher.metered.live/ffpyr0hc5c",
            name: "John Doe"
            });
            console.log("Meeting joined", meetingInfo);

        try {
            meeting.startAudio();
            } catch (ex) {
            console.log("Error occurred when sharing microphone", ex);
            alert('share microphone not working')
            }

            /**
                 * participantInfo = {
                 *       isAdmin: false
                 *       meetingSessionId: "60fef02300f4a23904ab4861"
                 *       name: "John Doe"
                 *       roomId: "60fc7bcb1dc8562d6e4ab7b3"
                 *       _id: "60fef02300f4a23904ab4862"
                *  }
                */
                meeting.on("participantJoined", function(participantInfo) {
                console.log("participant has joined the room", participantInfo);
                });


                /**
                 * remoteTrackItem = {
                 *   streamId: "eaa6104b-390a-4b0a-b8d1-66f7d19f8c1a",
                 *   type: "audio"
                 *   participantSessionId: "60fef02300f4a23904ab4862"
                 *   track: MediaStreamTrack,
                 *   name: "Jane Smith"
                 * }
                 */
                meeting.on("remoteTrackStarted", function(remoteTrackItem) {
                    console.log("remoteTrackStarted", remoteTrackItem);
                    // Converting MediaStreamTrack to MediaStream
                    var remoteTrack = remoteTrackItem.track;
                    var remoteStream = new MediaStream([remoteTrack]);

                    document.getElementById("remoteAudio").srcObject = remoteStream;
                    document.getElementById("remoteAudio").play();
                });
    }


        // use localhost to run the audio on your local server.  do not use the http ip address given by http-server because the metered audio application needs https to run


</script>
    </body>
</html>
Here is how to make a simple audio only application.