
Turn server is required to relay traffic between peers when a direct connection cannot be established between them.
WebRTC requires a direct connection between peers, but many times a direct connection cannot be established and a TURN server is required.
In this article, we will explain how you can run your own turn server using open source TURN server implementation that is coturn.
We will also provide alternative to coturn that is using a free turn server that is production ready and is supplied by the OpenRelayProject.Org
- What is coturn?
- Prerequisites for setting up Coturn
- Step 1 : Installing Coturn
- Step 2: Configuring CoTURN
- Step 3: Testing the TURN Server
- Step 4 : Setting a domain name to your turn server (Optional)
- Step 5: Encryption the COTURN server using lets encrypt (Optional)
- Step 6: Running Coturn on docker container (Optional)
- Conclusion
What is COTURN?
COTURN is a free and open source implementation of TURN and STUN server. Coturn can be easily be downloaded from its website here: https://github.com/coturn/coturn
Coturn acts as a TURN as well a STUN server as stated above and can be easily installed on cloud services like aws, google cloud, digital ocean and others.
Coturn can also be installed as a docker container.
There are some costs associated with running your own turn server these are
- Server costs (AWS, Google Cloud etc)
- Bandwidth costs (AWS, Google Cloud etc)
- Time and effort to set up Co turn
- Maintain the CoTURN instance with regular security and feature updates
Metered Global TURN servers
- API: TURN server management with powerful API. You can do things like Add/ Remove credentials via the API, Retrieve Per User / Credentials and User metrics via the API, Enable/ Disable credentials via the API, Retrive Usage data by date via the API.
- Global Geo-Location targeting: Automatically directs traffic to the nearest servers, for lowest possible latency and highest quality performance.
- Servers in 12 Regions of the world: Toronto, Miami, San Francisco, Amsterdam, London, Frankfurt, Bangalore, Singapore,Sydney
- Low Latency: less than 50 ms latency, anywhere across the world.
- Cost-Effective: pay-as-you-go pricing with bandwidth and volume discounts available.
- Easy Administration: Get usage logs, emails when accounts reach threshold limits, billing records and email and phone support.
- Standards Compliant: Conforms to RFCs 5389, 5769, 5780, 5766, 6062, 6156, 5245, 5768, 6336, 6544, 5928 over UDP, TCP, TLS, and DTLS.
- Multi‑Tenancy: Create multiple credentials and separate the usage by customer, or different apps. Get Usage logs, billing records and threshold alerts.
- Reliability: 99.999% Uptime with SLA.
- Enterprise Scale: : With no limit on concurrent traffic or total traffic. Metered TURN Servers provide Enterprise Scalability
- 20 GB/mo Free: Get 20 GB every month free TURN server usage with the Free Plan
You can create an account on Metered website and get 20GB of Free TURN usage every month
Prerequisites for setting up coturn
- A linux server with a public IP address (aws, google cloud or any other)
- A Custom domain Name (Optional)
- Docker installation (Optional)
Note: If you are installing coturn in any cloud providers, you will need to create a security group or setup firewall rules for TCP and UDP ports that COTURN will use. here is how you can do that for
- AWS: AWS TURN server: In 7 Simple Steps
- Google Cloud: Google TURN server: In 7 Simple Steps
- Azure: Azure TURN Server: The Step by Step Guide.
Step 1 Installing Coturn
Coturn is a open source STUN and TURN server implementation that can be used for NAT traversal and a general purpose network traffic TURN server and gateway
In this section we will install Coturn to your linux machine and enable the process,
First, Update the OS repo versions to the latest by running
sudo apt-get update
and
sudo apt-get upgrade
then to install coturn
sudo apt-get install coturn
If you want the Coturn to start automatically whenever you turn on the server.
Follow the below steps:
- go to file /etc/default/coturn
sudo nano /etc/default/coturn
or
sudo vim /etc/default/coturn
Open the file and find the line
TURNSERVER_ENABLED=1
uncomment it and save the file. Now, start the coturn server
systemctl start coturn
Step 2 Configuring Coturn
Let us now set up some basic configuration settings like adding
- external IP address and
- adding basic auth
Before modifying the configuration file it is recommended to make a copy of the original configuration file if we need in the future
mv /etc/turnserver.conf /etc/turnserver.conf.original
This will rename the original file name from turnserver.conf to turnserver.conf.original
Next replace the Coturn server realm and server name.
# TURN server name and realm
realm=<DOMAIN>
server-name=<SERVER_NAME>
What is realm?
It is a "key" to access a group of address that have a common "owner". A TURN server can have one "default realms" or more "named realms" in its database. And any realm has its own users and each of them have a proper login/password couple to identify access and working sessions.
If we do not edit this file it will use the default realm value. We can have a general realm where all users connect
next let us set up the TURN servers external IP and the listening IP. External IP is the IP that the TURN server is assigned (this you will get from the aws or any other cloud provider that you are using).
Listening IP is the is that the TURN server will listen to. If you want the TURN server to listen to all IP Addresses set the listening IP to 0.0.0.0
# IPs the TURN server will listen to
listening-ip=0.0.0.0

#external-ip=IP_ADDRESS
Next we need the port that our Coturn server will listen to
# Main listining port
listening-port=3478

#and for TLS (secure)
tls-listening-port=5349

#Further ports open for communication
min-port=10000
max-port=20000
Running coTURN on privileged ports
Some Linux distributions for example Ubuntu 20 LTS release and later run coTURN service as an unprivileged user like turnserver.
For this reason coturn by default cannot use privileged ports like port 443.
But, Linux configuration can be altered to overcome this limitation. Capabilitites can be associated with executable files using setcap, so you could allow the usr/bin/turnserver executable to bind sockets to privileged ports like
setcap cap_net_bind_service=+ep /usr/bin/turnserverAlternatively you can configure coturn service to be executed by root like a SSL certificate for TLS connections by
systemctl edit coturnand set the following configuration
[Service]
User=root
Group=root
You need the following ports open to run the coturn server.
| Ports | Protocol | Description |
|---|---|---|
| 3478 | TCP/UDP | coturn listening port |
| 443 | TCP/UDP | TLS listening port |
Now we can also enable verbose logging mode to get a clearer idea of what's going on behind the wraps
# Use fingerprint in TURN messages
fingerprint

# log the file
log-file=/var/log/turnserver.log

#enable verbose logging
verbose
Lastly lets enable auth for Turn server using user and lt-cred-mech keys
# Specify the user for the turn authentication
user=turnuser:turnuser456

# Enable long term credential mechanism
lt-cred-mech
final file will look something like this:
# TURN server name and realm
realm=DOMAIN
server-name=turnserver

# Use fingerprint in TURN message
fingerprint

# IPs the TURN server listens to
listening-ip=0.0.0.0

# External IP-Address of the TURN server
external-ip=IP_ADDRESS

# Main listening port
listening-port=3478

# Further ports that are open for communication
min-port=10000
max-port=20000

# Log file path
log-file=/var/log/turnserver.log

# Enable verbose logging
verbose

# Specify the user for the TURN authentification
user=turnuser:turn456

# Enable long-term credential mechanism
lt-cred-mech

# If running coturn version older than 4.5.2, uncomment these rules and ensure
# that you have listening-ip set to ipv4 addresses only.
# Prevent Loopback bypass https://github.com/coturn/coturn/security/advisories/GHSA-6g6j-r9rf-cm7p
#denied-peer-ip=0.0.0.0-0.255.255.255
#denied-peer-ip=127.0.0.0-127.255.255.255
#denied-peer-ip=::1
After finishing the configuration restart the server using
sudo service coturn restartConfigure log rotation
To rotate logs install the following configuration file to
/etc/logrotate.d/coturn/var/log/turnserver/*.log
{
rotate 7
daily
missingok
notifempty
compress
postrotate
/bin/systemctl kill -s HUP coturn.service
endscript
}and the associated directory:
$ sudo mkdir -p /var/log/turnserver
$ sudo chown turnserver:turnserver /var/log/turnserver
restart the coturn server
$ sudo systemctl daemon-reload           # Ensure the override file is loaded
$ sudo systemctl restart coturn          # Restart
Metered TURN server
Step 3 Testing the TURN server
There are three methods of testing the TURN server
- Metered TURN /STUN Test
- Trickle ICE
- ICE Test
- Using Javascript
Metered TURN server Test
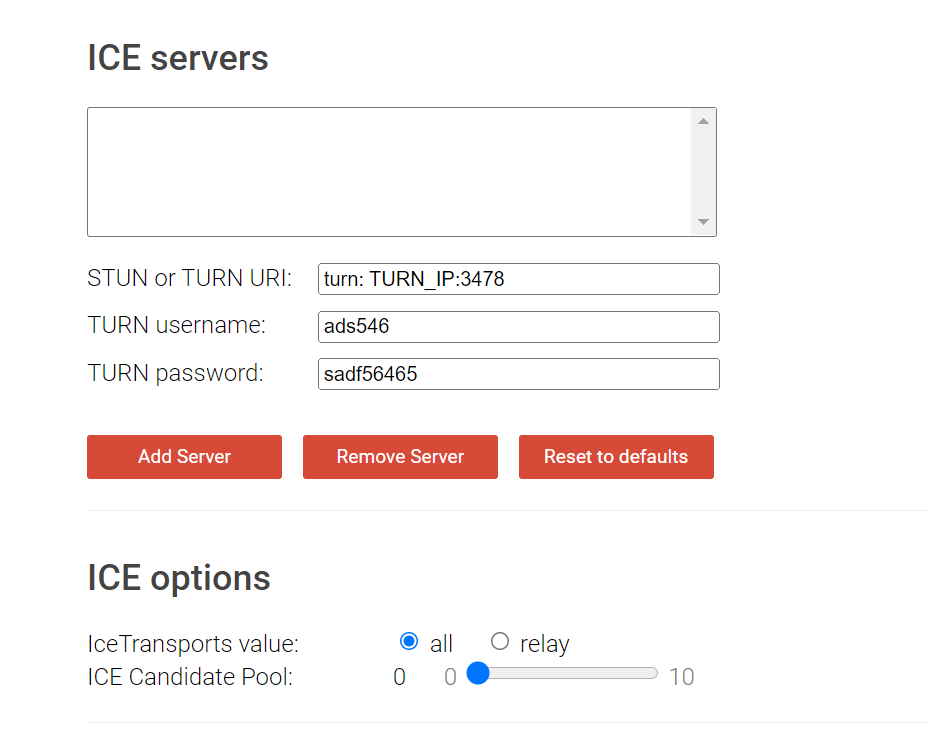
go to website: https://www.metered.ca/turn-server-testing
add your credentials and click on the add server button
If you need a TURN and STUN server you can create a free account on the metered website to get one: https://www.metered.ca/stun-turn
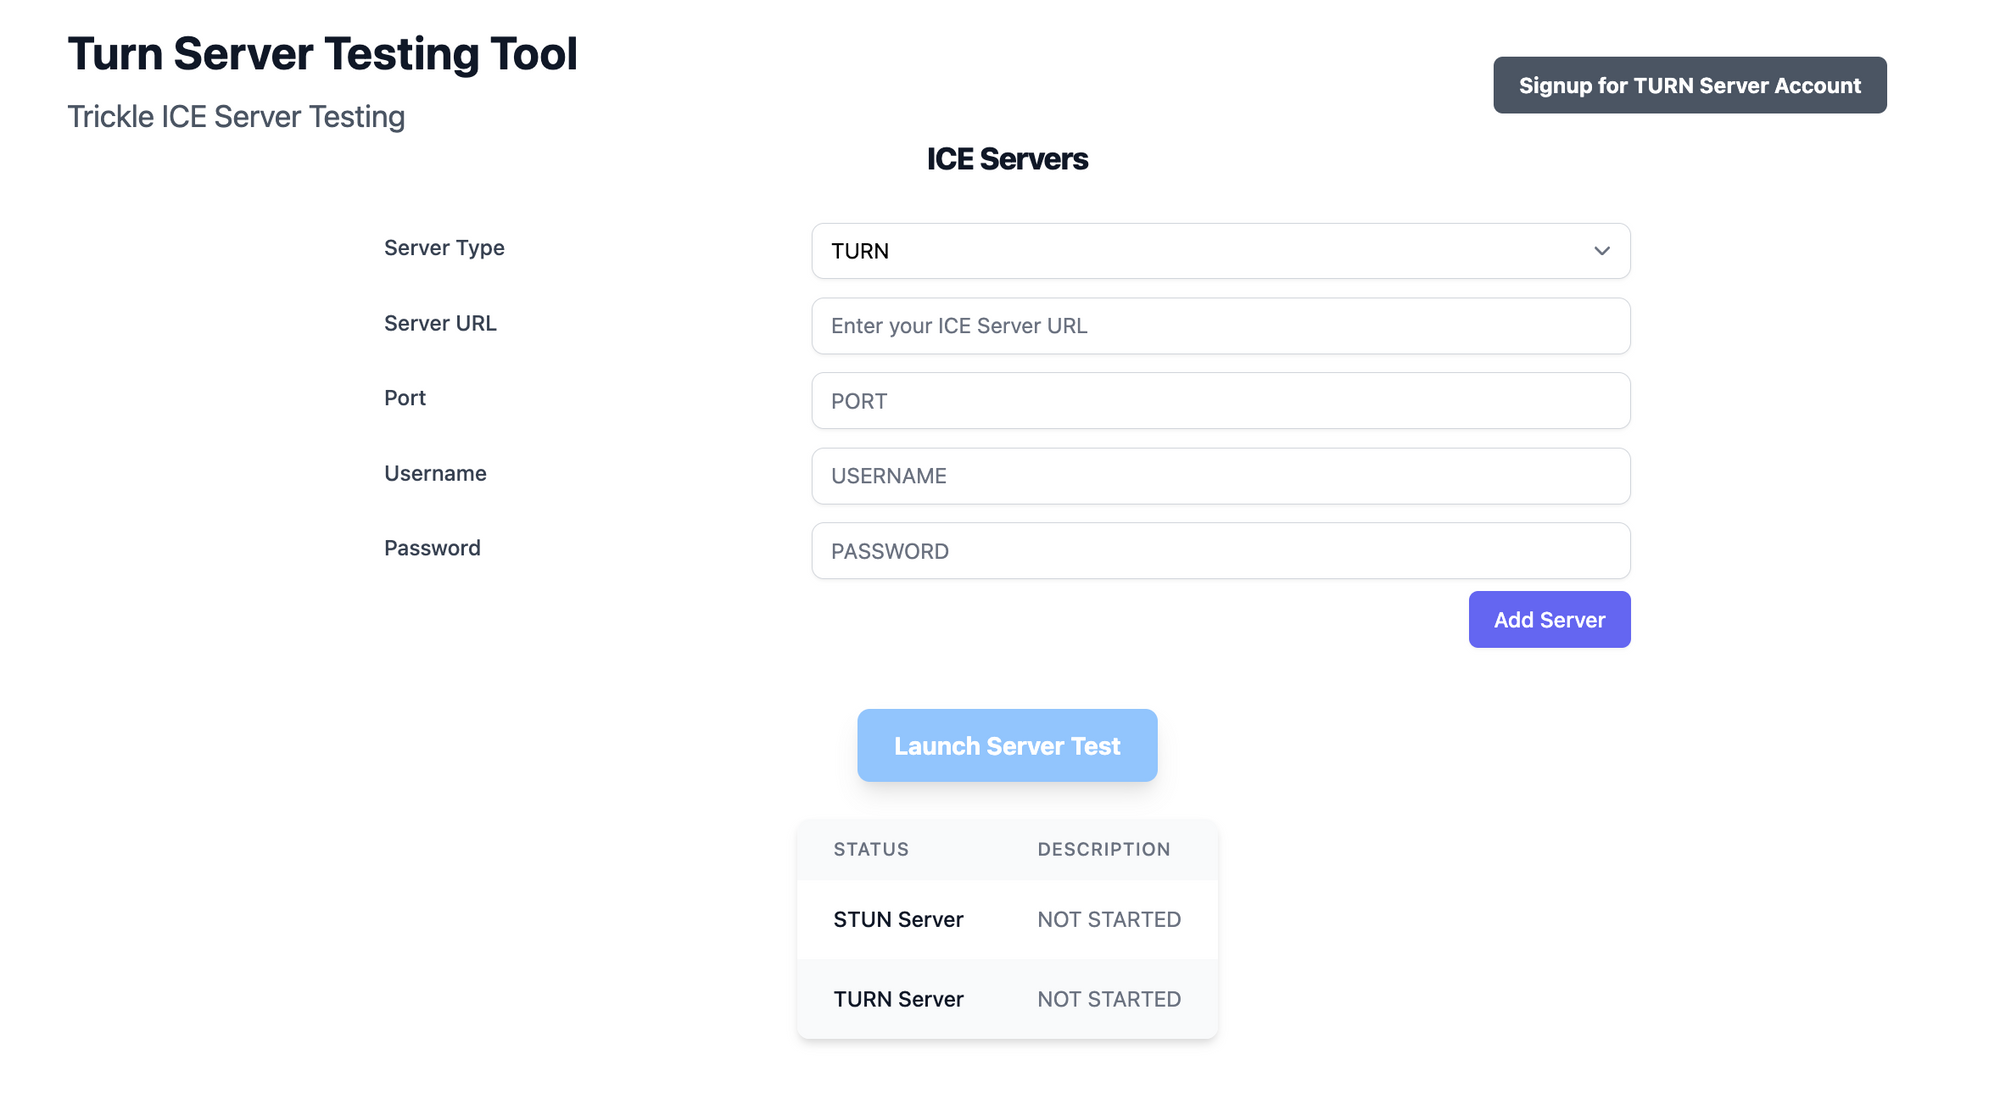

step 1: Select the type of Server you want to add
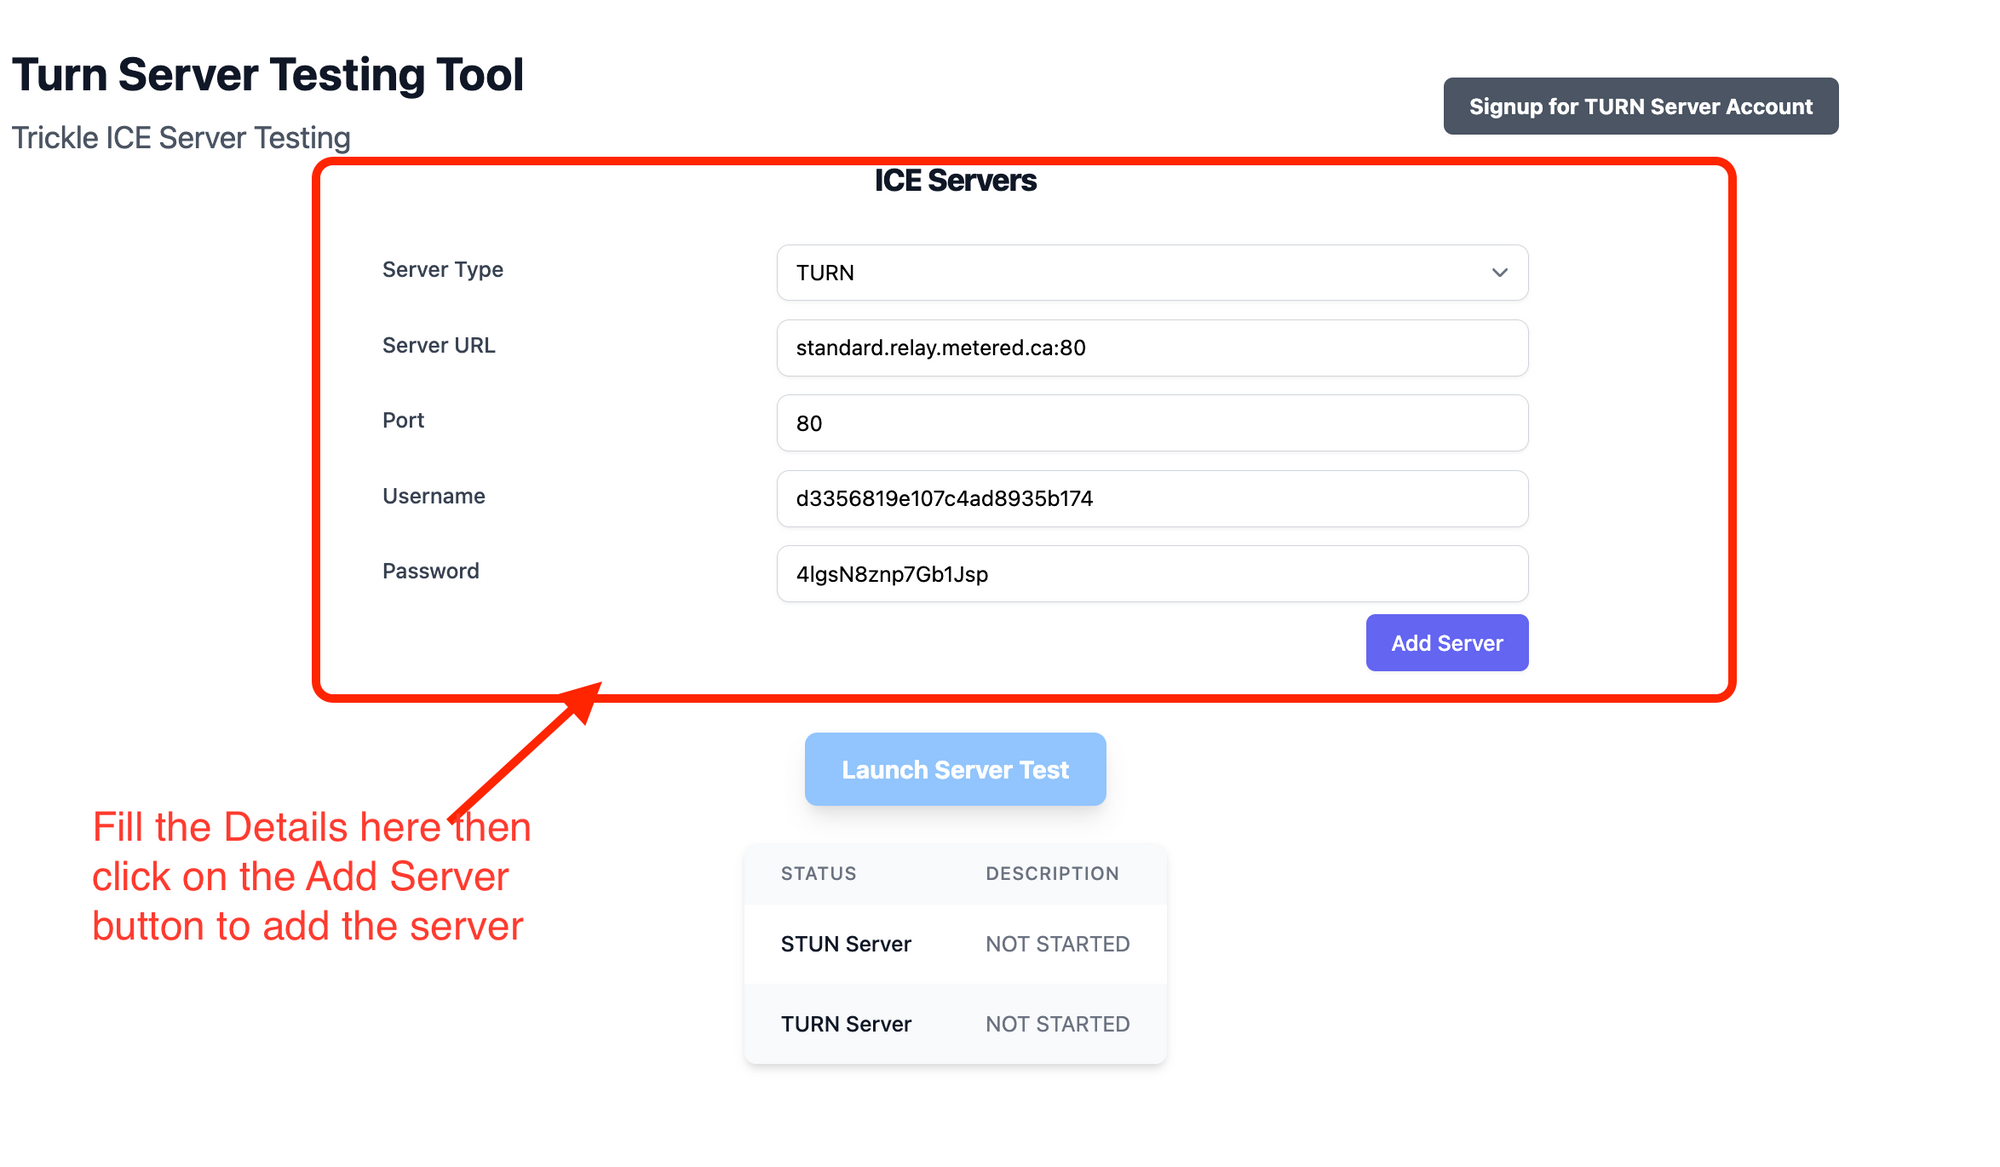
Step 2: Add the server to the list to test
The turn server test will test all the servers in the list, you can stun as well as turn servers.
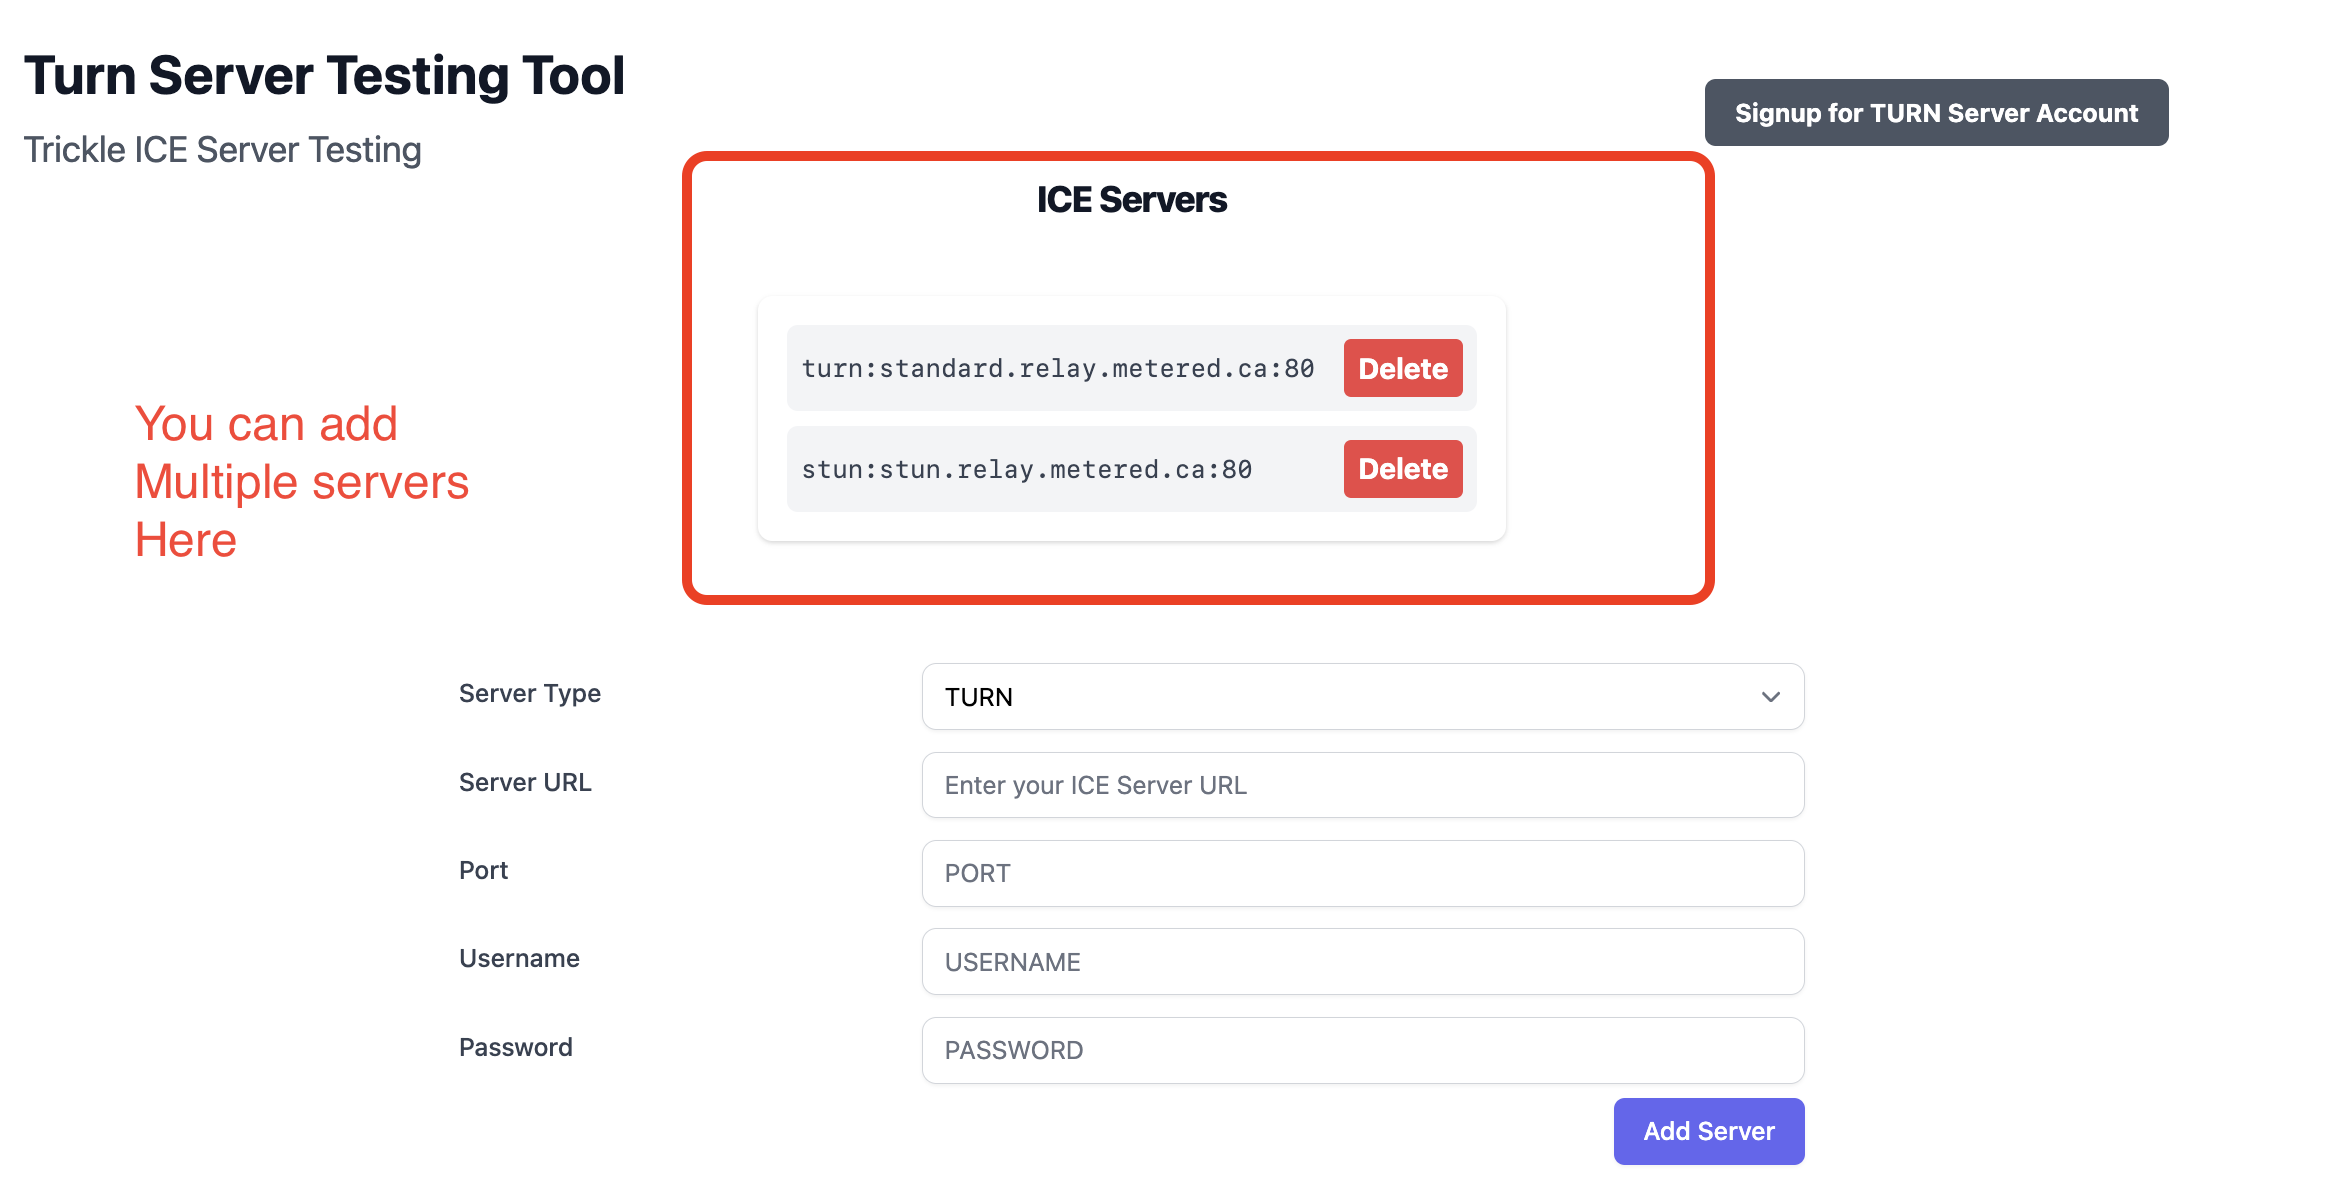
Step 3 Add multiple servers to the list
Multiple servers in the iceServers array can be added to the list
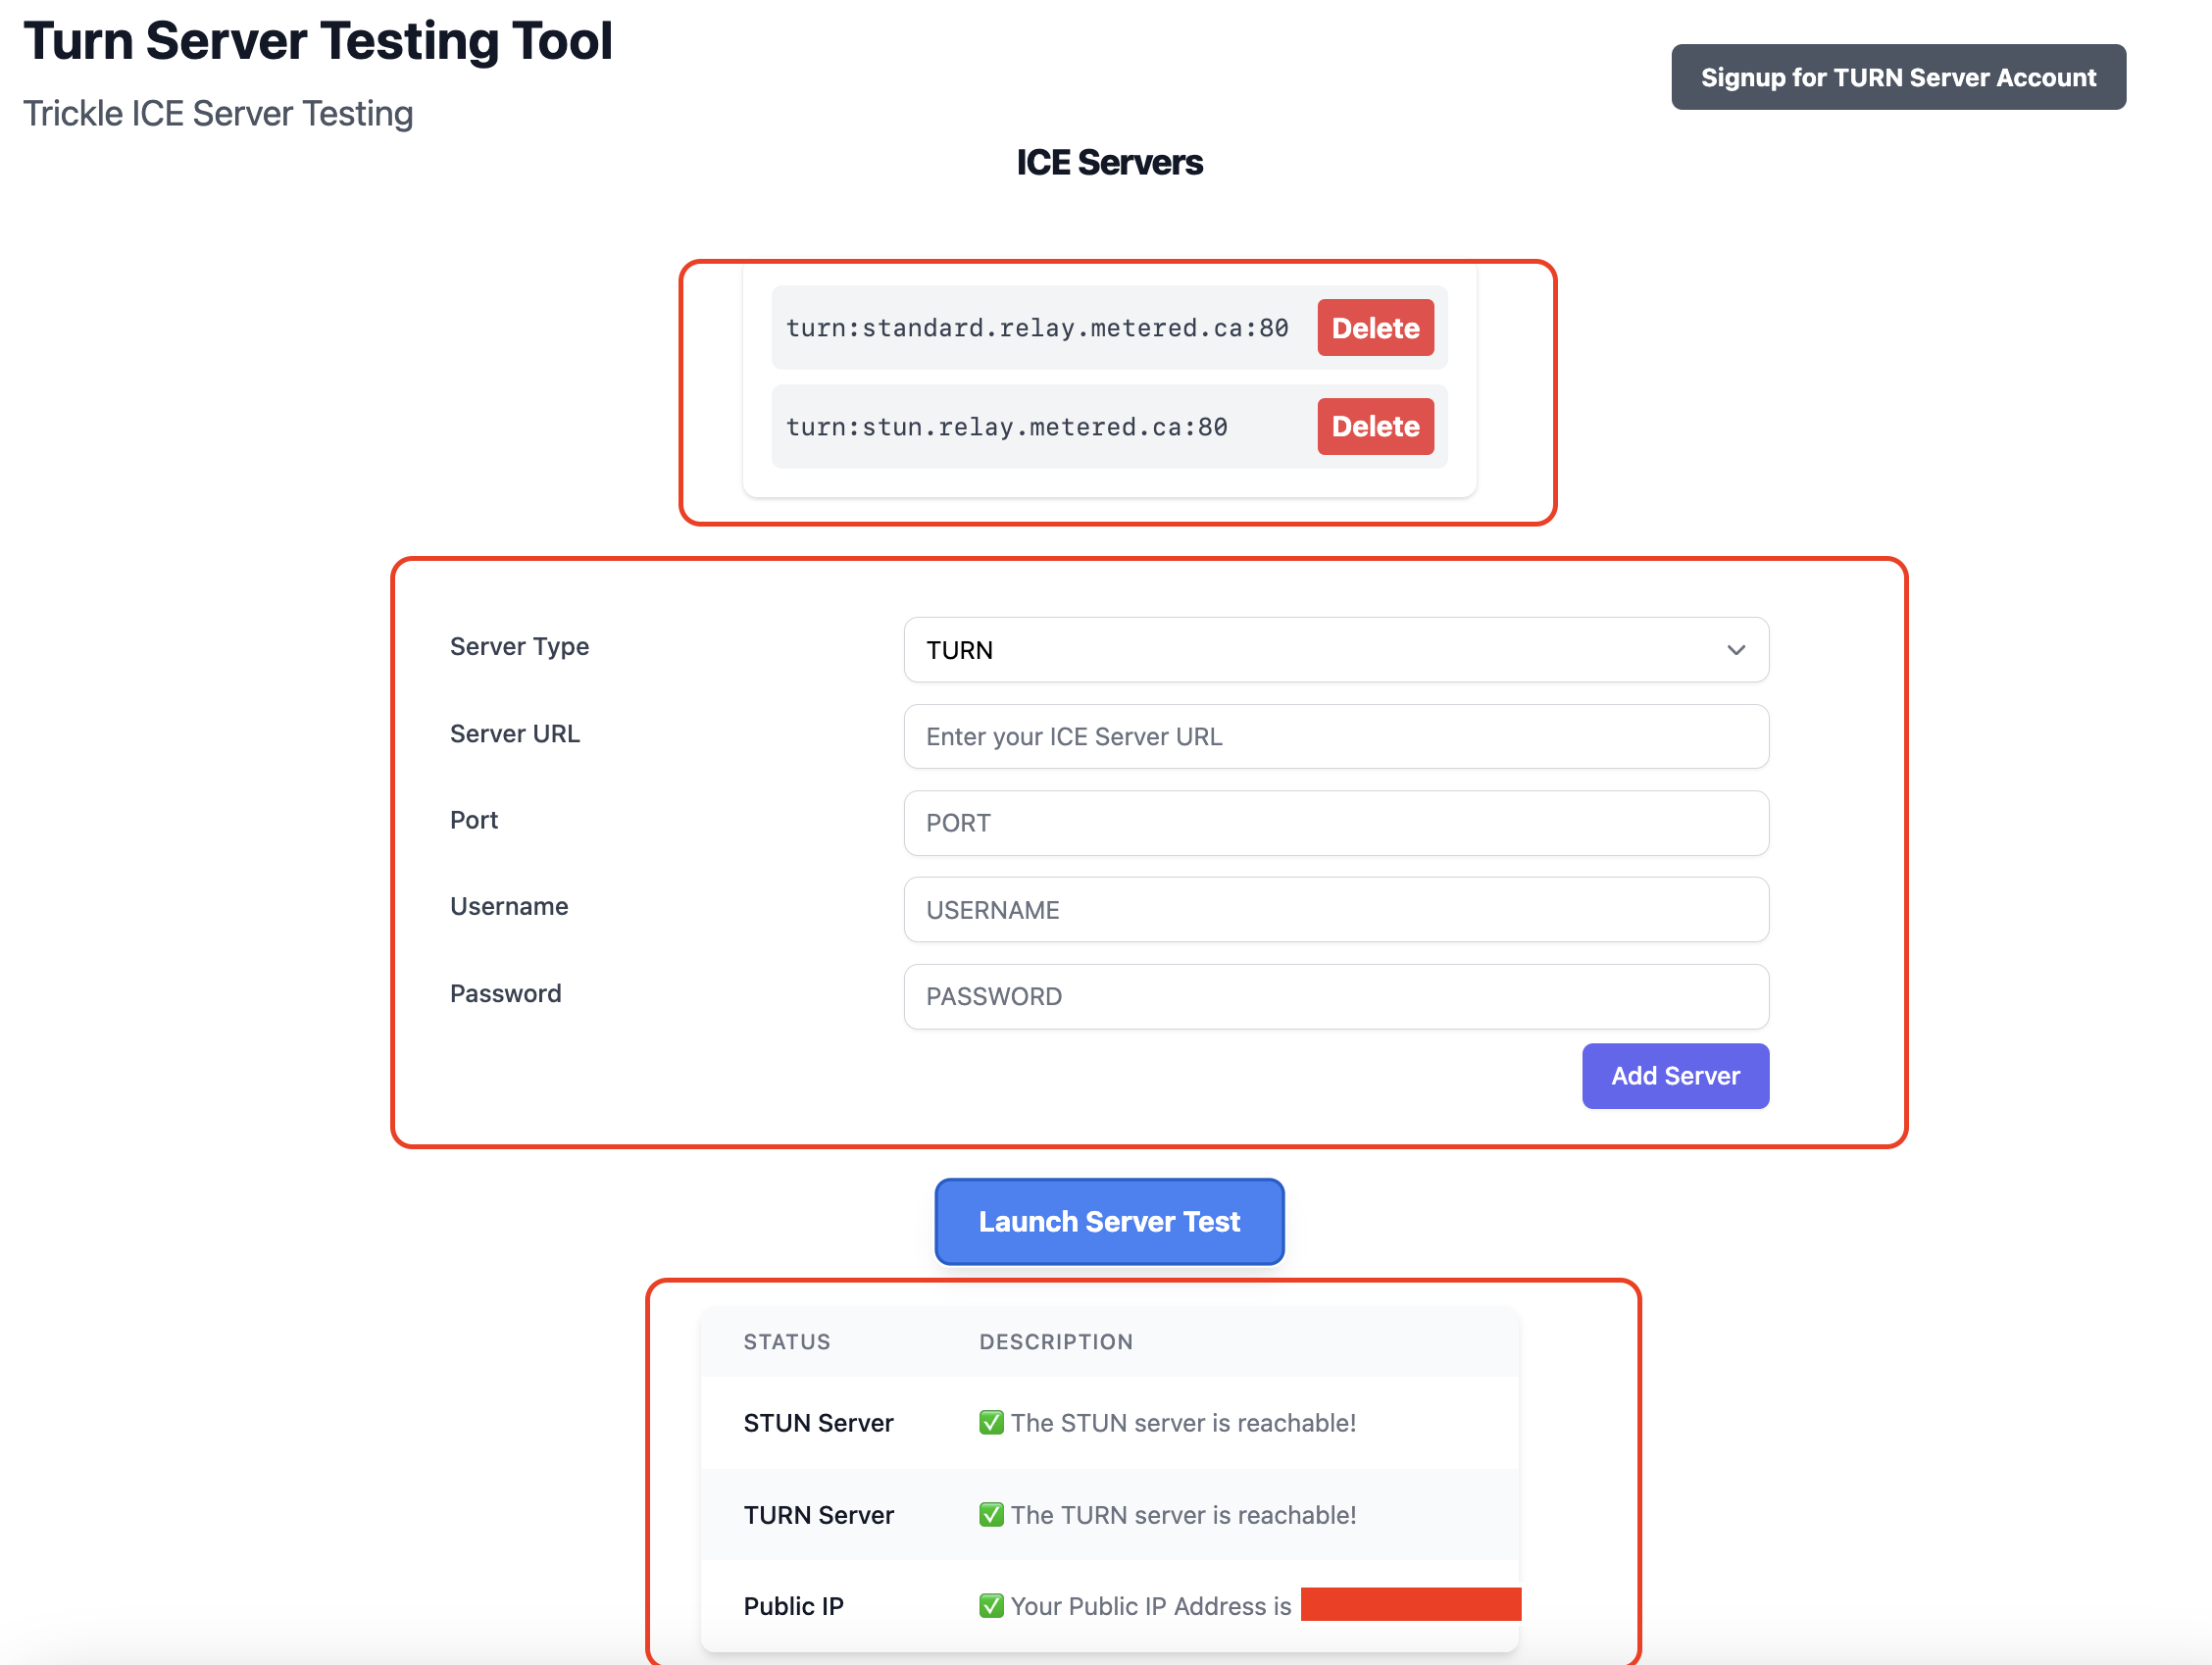
Step 4: Start the test
You can start the Test by clicking on the "Launch Server Test" button.
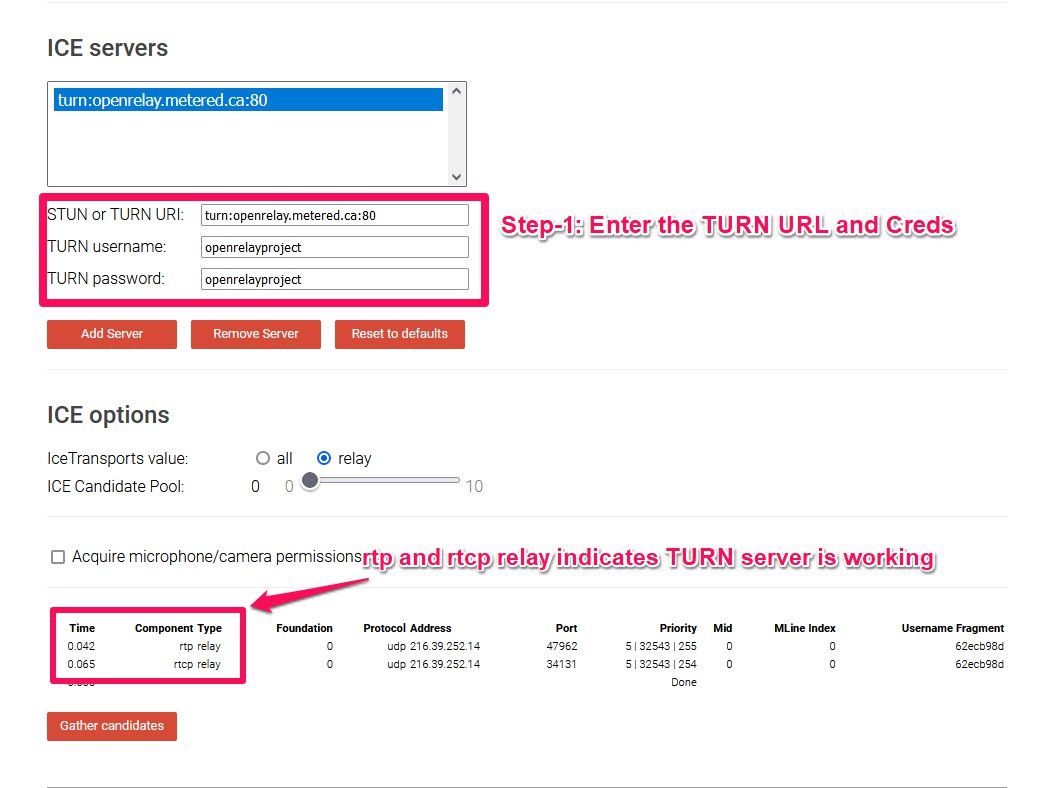
Trickle ICE
then click on the "Launch Server Test" Button to launch the TURN server test. In this tool you can test TURN servers, STUN servers and a combination of both
go to the website at: https://webrtc.github.io/samples/src/content/peerconnection/trickle-ice/
add your credentials and click on the add server button to add your TURN server
Then click on the "Gather Candidates" button to run the test
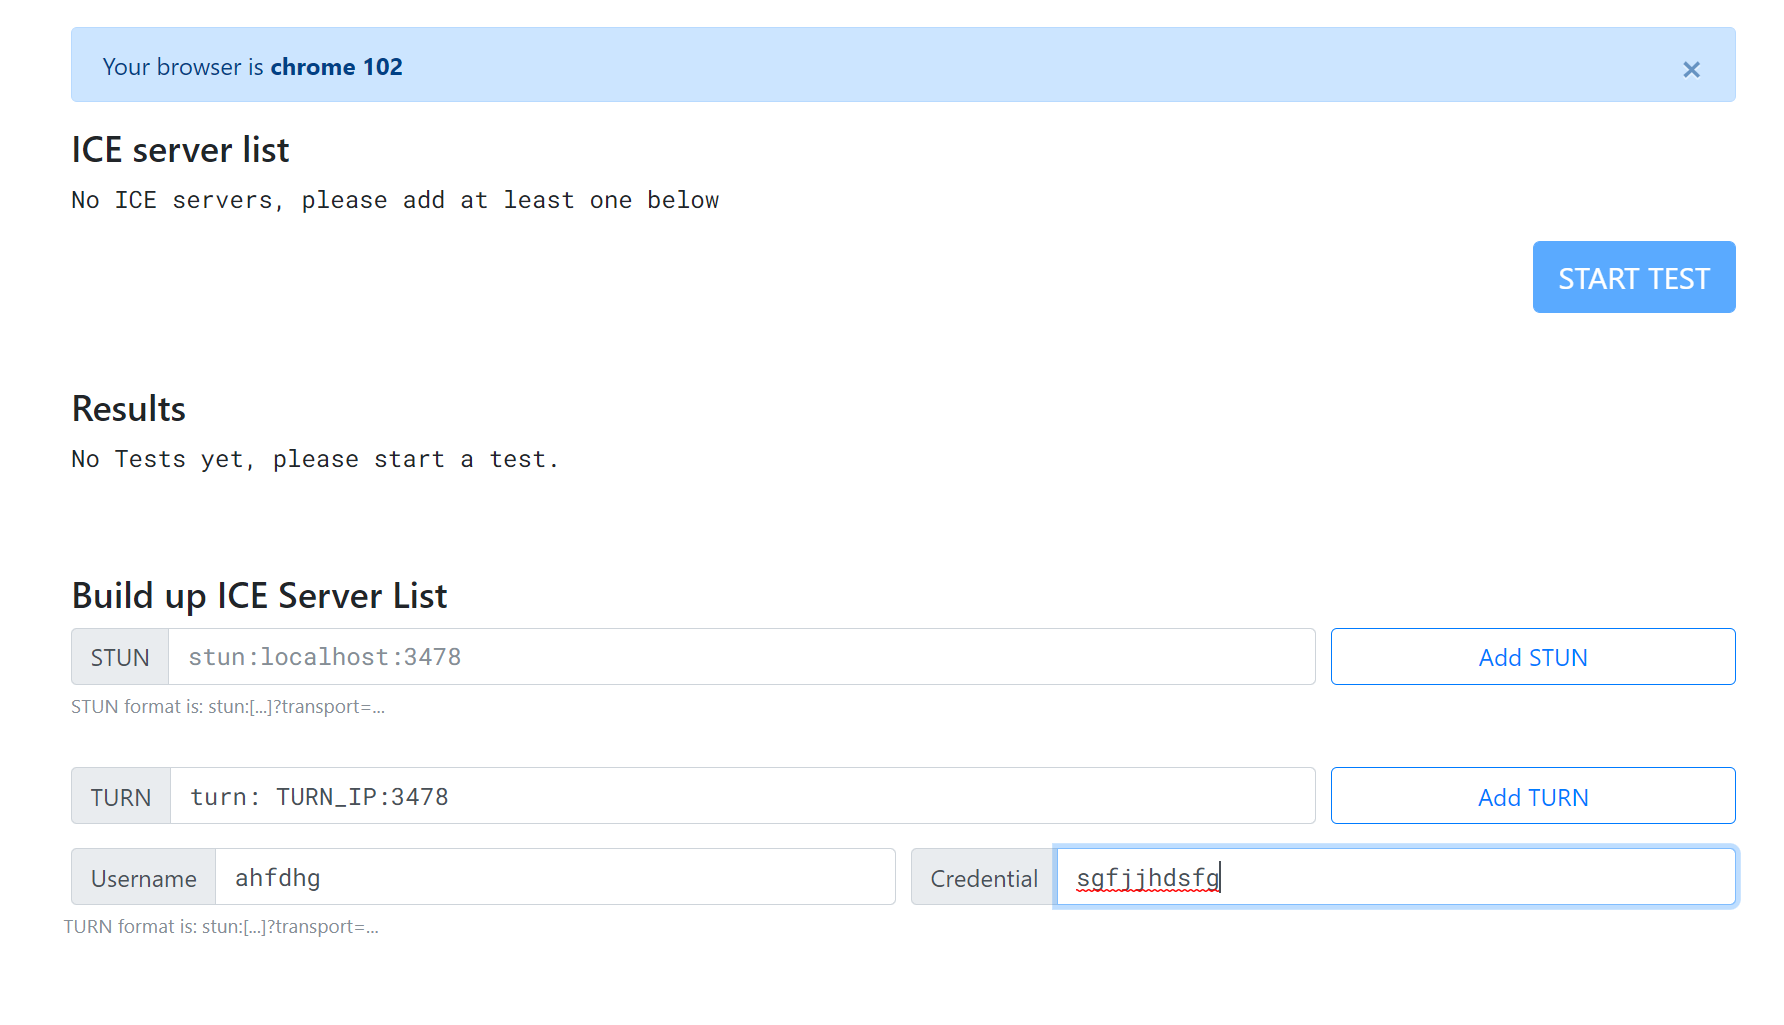
ICE Test
Go to the ICE test website: https://icetest.info/ and enter your turn server credentials to test the TURN server
Using Firefox
Using firefox you can test your coturn server. You can disable direct connections in Firefox and require fallback to TURN server.
Start Firefox and open
about:configand search for relay. You will see a parameter
media.peerconnection.ice.relay_only #set this value to trueThis configures Firefox to use only the Turn server. Now try to run your service.
Open the
about:webrtcClick on the show details to see the ICE stats. A successful connection will have
(relay-tcp)at the top of the stack in the Local Candidate column
If the connection fails then you have:
WebRTC: ICE failed, your TURN server appears to be broken, see about:webrtc for more detailsYou can check the coturn is running on your turn server by
systemctl status coturn.servicecheck logs using
tail -f /var/log/turnserver/coturn.loStep 4 : Setting a domain name to your turn server (Optional)
you can set up a domain name to your Turn server. To do this you will need your DNS records.
Go to your Domain name registrar and create the DNS records. Domain name registrar is the website where you purchased your domain name from.
and add the DNS record and wait until they are found by the service.
Metered TURN servers
Step 5: Encryption the COTURN server using lets encrypt (optional)
We can use certbot from Let's Encrypt to easily generate free TLS certificate.
Enter the following commands on your TURN server:
$ sudo add-apt-repository ppa:certbot/certbot
$ sudo apt-get update
$ sudo apt-get install certbot
You can then run a certbot command like the following to generate the certificate, replacing <turn.example.com> with the domain name of your TURN server like
$ sudo certbot certonly --standalone --preferred-challenges http \
    -d <turn.example.com>
Be aware that the TCP port 80 needs to be temporarily open to allow that to happen.
Current versions of the certbot command set up automatic renewal by default.
To ensure that the certificates are readable by the coturn which in turn runs the service turnserver lets add a renewable hook to the let's Encrypt.
First let us create a directory
$ sudo mkdir -p /etc/letsencrypt/renewal-hooks/deployNext create the file
$ sudo mkdir -p /etc/letsencrypt/renewal-hooks/deploywith the following contents. Replace with the hostname of your TURN server
#!/bin/bash -e
for certfile in fullchain.pem privkey.pem ; do
	cp -L /etc/letsencrypt/live/<turn.example.com>/"${certfile}" /etc/turnserver/"${certfile}".new
	chown turnserver:turnserver /etc/turnserver/"${certfile}".new
	mv /etc/turnserver/"${certfile}".new /etc/turnserver/"${certfile}"
done
systemctl kill -sUSR2 coturn.service
Make this file executable
$ sudo chmod 0755 /etc/letsencrypt/renewal-hooks/deploy/coturnand that's it we have added the encryption to the TURN server
Step 6 Optional Running COTURN in Docker
If you want to run coturn in docker instead of running it directly on the server. type the following command to start the server
docker run -d -p 3478:3478 -p 3478:3478/udp -p 5349:5349 -p 5349:5349/udp -p 49152-65535:49152-65535/udp coturn/coturnthen
docker run -d --network=host coturn/coturnThe default Coturn configuration and CLI options provided int eh CMD Dockerfile instruction are used
- You can specify your own configuration file like
docker run -d --network=host \
           -v $(pwd)/my.conf:/etc/coturn/turnserver.conf \
       coturn/coturn
2. Specify command line options directly
docker run -d --network=host coturn/coturn \
           -n --log-file=stdout \
           --min-port=49160 --max-port=49200 \
           --lt-cred-mech --fingerprint \
           --no-multicast-peers --no-cli \
           --no-tlsv1 --no-tlsv1_1 \
           --realm=my.realm.org \
3. Even specify another config file like
docker run -d --network=host  \
           -v $(pwd)/my.conf:/my/coturn.conf \
       coturn/coturn -c /my/coturn.conf
Automatic detection of external IP
detect-external-ip
binary may be used to automatically detect the externalip of TURN server in runtime. It is okay to use it multiple times as the value will be evaluated only once
docker run -d --network=host coturn/coturn \
           -n --log-file=stdout \
           --external-ip='$(detect-external-ip)' \
           --relay-ip='$(detect-external-ip)'
Persistence
By default the docker image persists the data in
/var/lib/coturndirectory. You can speed up Coturn simply by using tmfs for that
docker run -d --network=host --mount type=tmpfs,destination=/var/lib/coturn coturn/coturnMetered STUN TURN servers
Conclusion
In this article I have explained how you can set up and run your own TURN server using the open source COTURN project.
You can also use the Public TURN server provided by the OpenRelayProject.Org and save yourself time, effort and cost by using a publicly available free turn server
If you have any questions with regards to setting up the coturn server in your project, please comment in the comment section below and I will reply as soon as possible