In this post we will go through the steps on how you can build a WebRTC Live Streaming solution, through which you can broadcast to thousands to viewers.
In this post I will show you how you can:
We will also go through advantages of WebRTC Live Streaming over other methods like HLS and RTMP and the limitation of plain WebRTC and why it is not possible to build a live streaming solution using plain WebRTC, and a centralized server is required for WebRTC broadcasting.
If you are looking for live streaming chat or Virtual Event Chat than we suggest going with DeadSimpleChat
Advantages of WebRTC Live Streaming
The key advantage of WebRTC Live Streaming over other methods like HLS and RTMP is low latency.
There is huge delay in RTMP and HLS streams ranging from 10seconds to minutes, whereas in WebRTC the delay is less than 300ms.
Another advantage of WebRTC is that it is more widely supported, than RTMP. It works natively in most modern browser and in iOS and Android without installing any plugins.
The wide platform support along with ultra-low latency make WebRTC and ideal choice for broadcasting or livestreaming in use cases where very low delay/latency is required.
WebRTC is a truly Real Time Live Streaming solution.
How WebRTC Works?
WebRTC was designed to work peer-to-peer, where only for signaling and NAT transversal centralized server was required.
The transmission of audio, video and data is done peer-to-peer i.e each participant in a WebRTC session sends their audio and video data to every other participant in the session.
This is called as Mesh Architecture. Here for transmission of audio, video and data no centralized server is required, thus reducing cost, and each peer directly connect to every other peer.
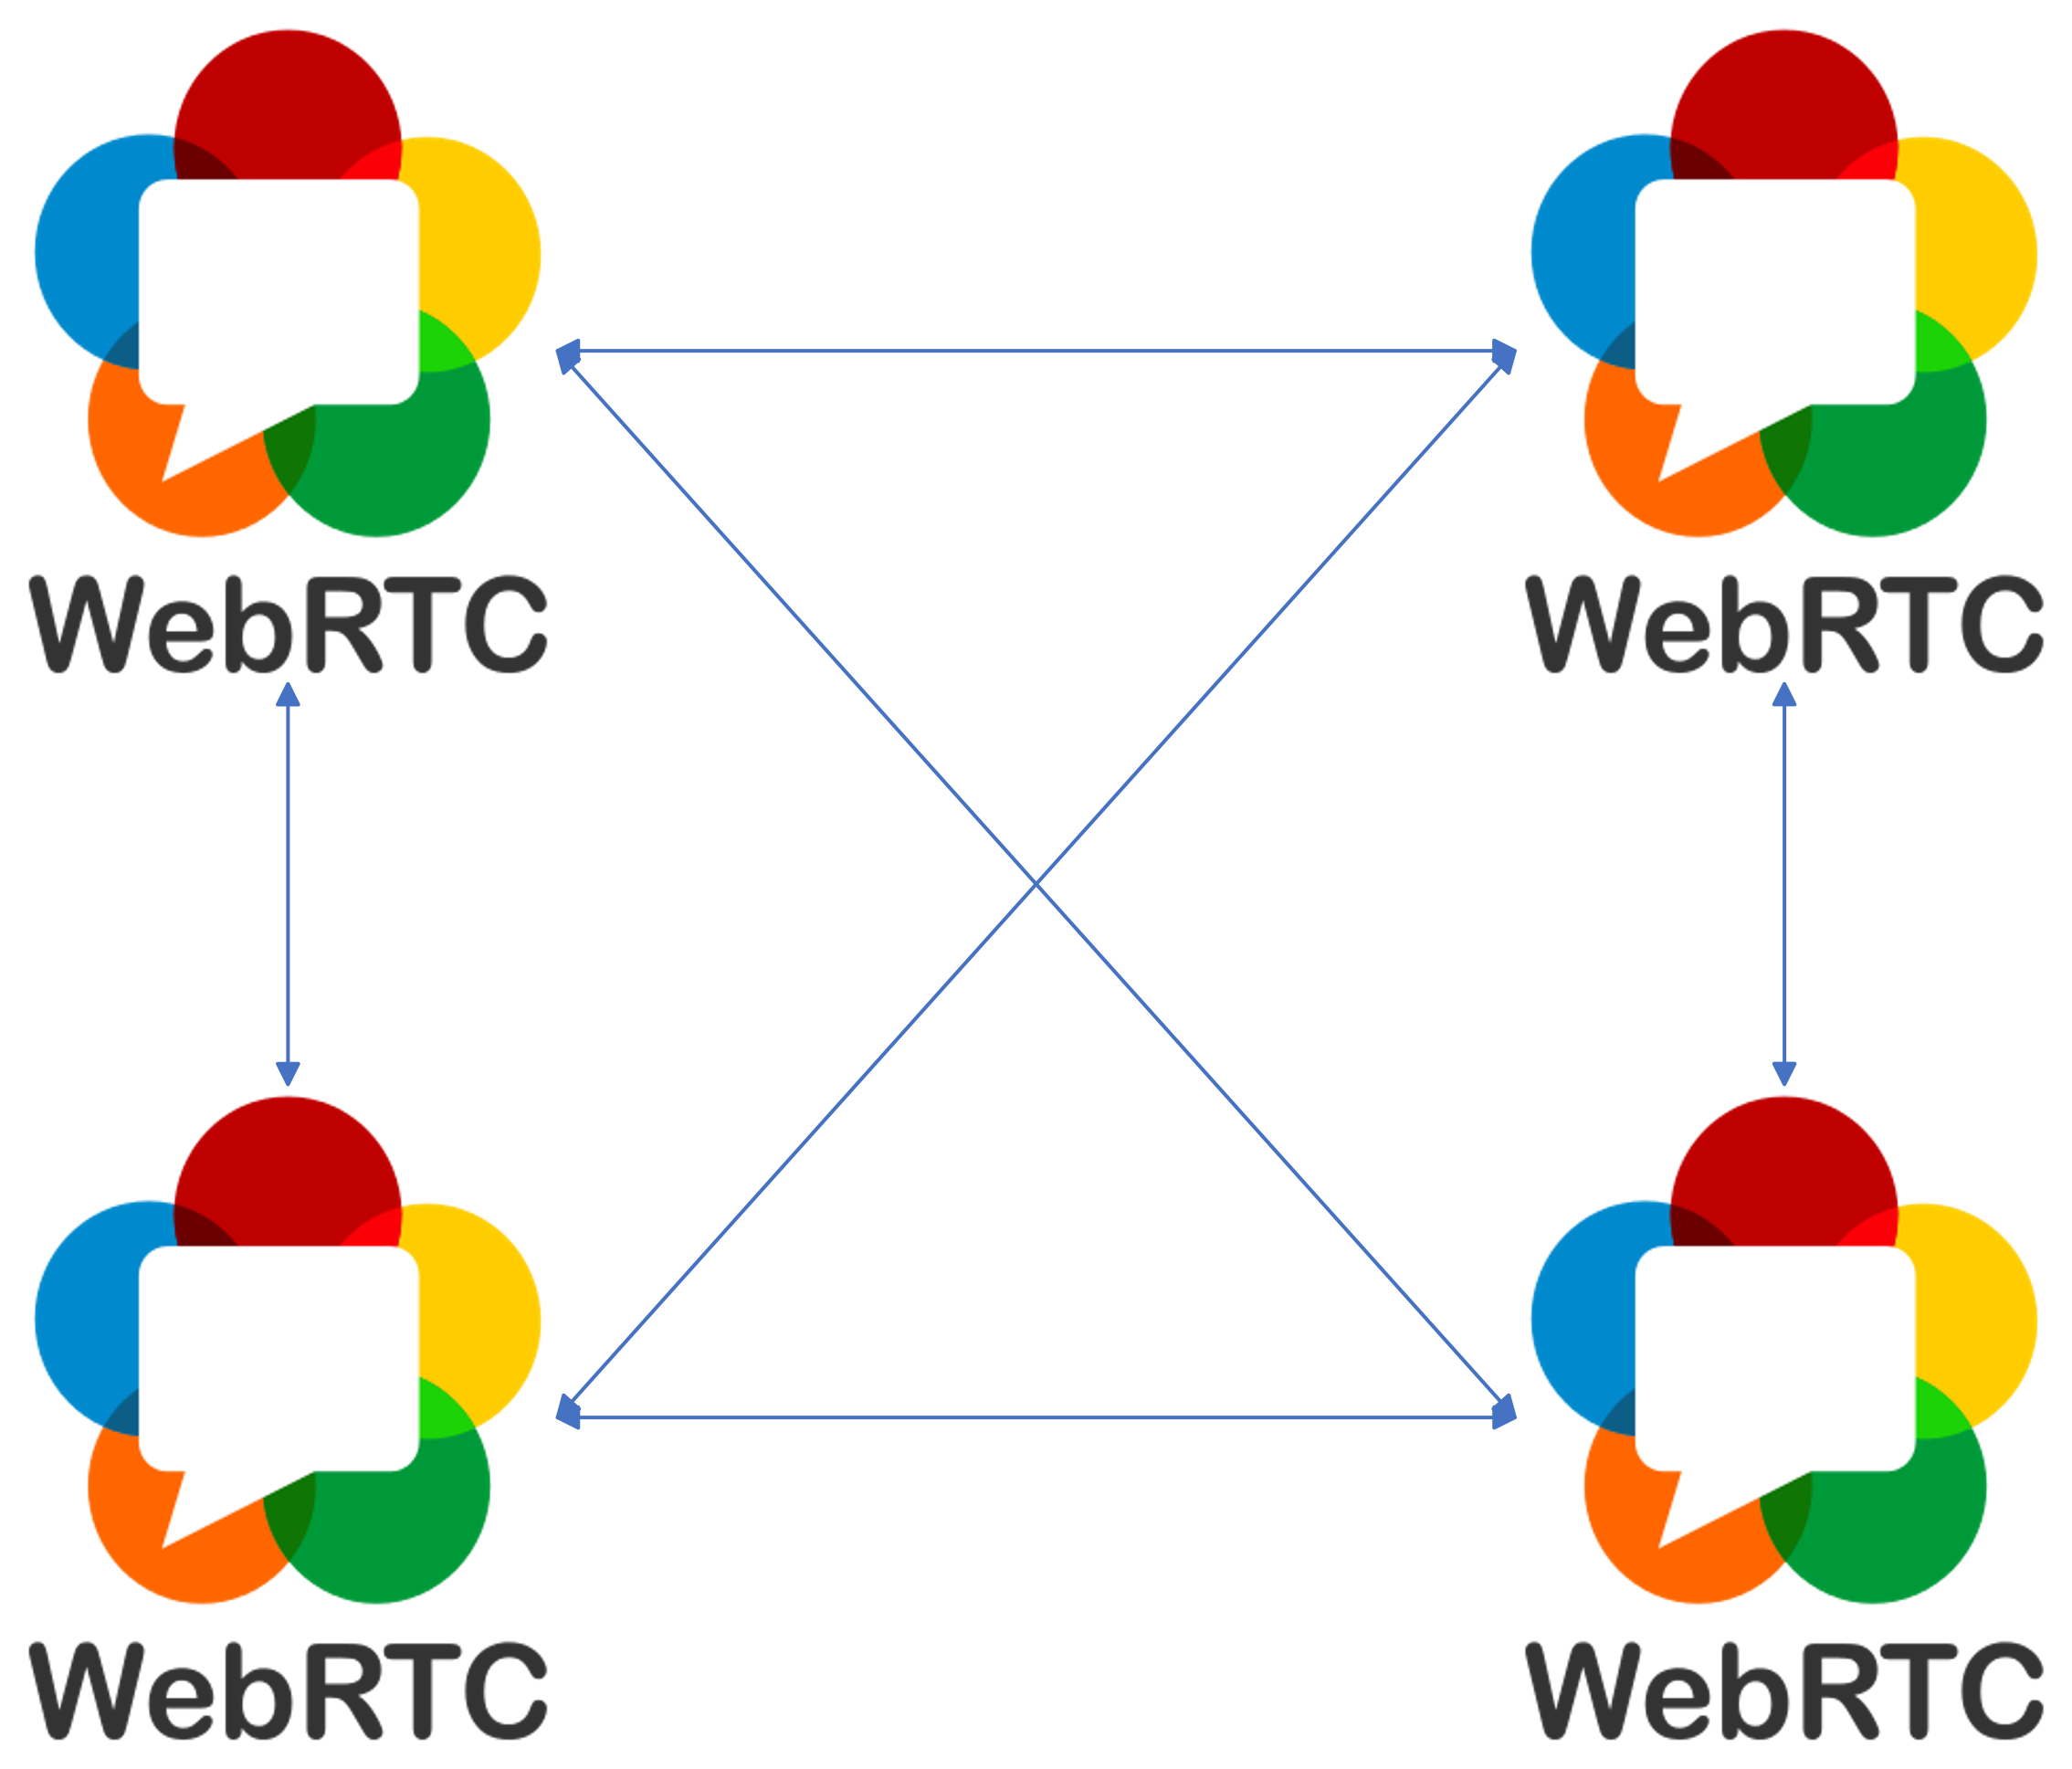
In the above mesh architecture each peer is sharing the audio and video stream with every other peer in the meeting.
But for our broadcasting scenario there will be a presenter and viewers, and one presenter will broadcast the video+audio to many viewers.
So for our broadcasting use case the architecture would look something like the image below.
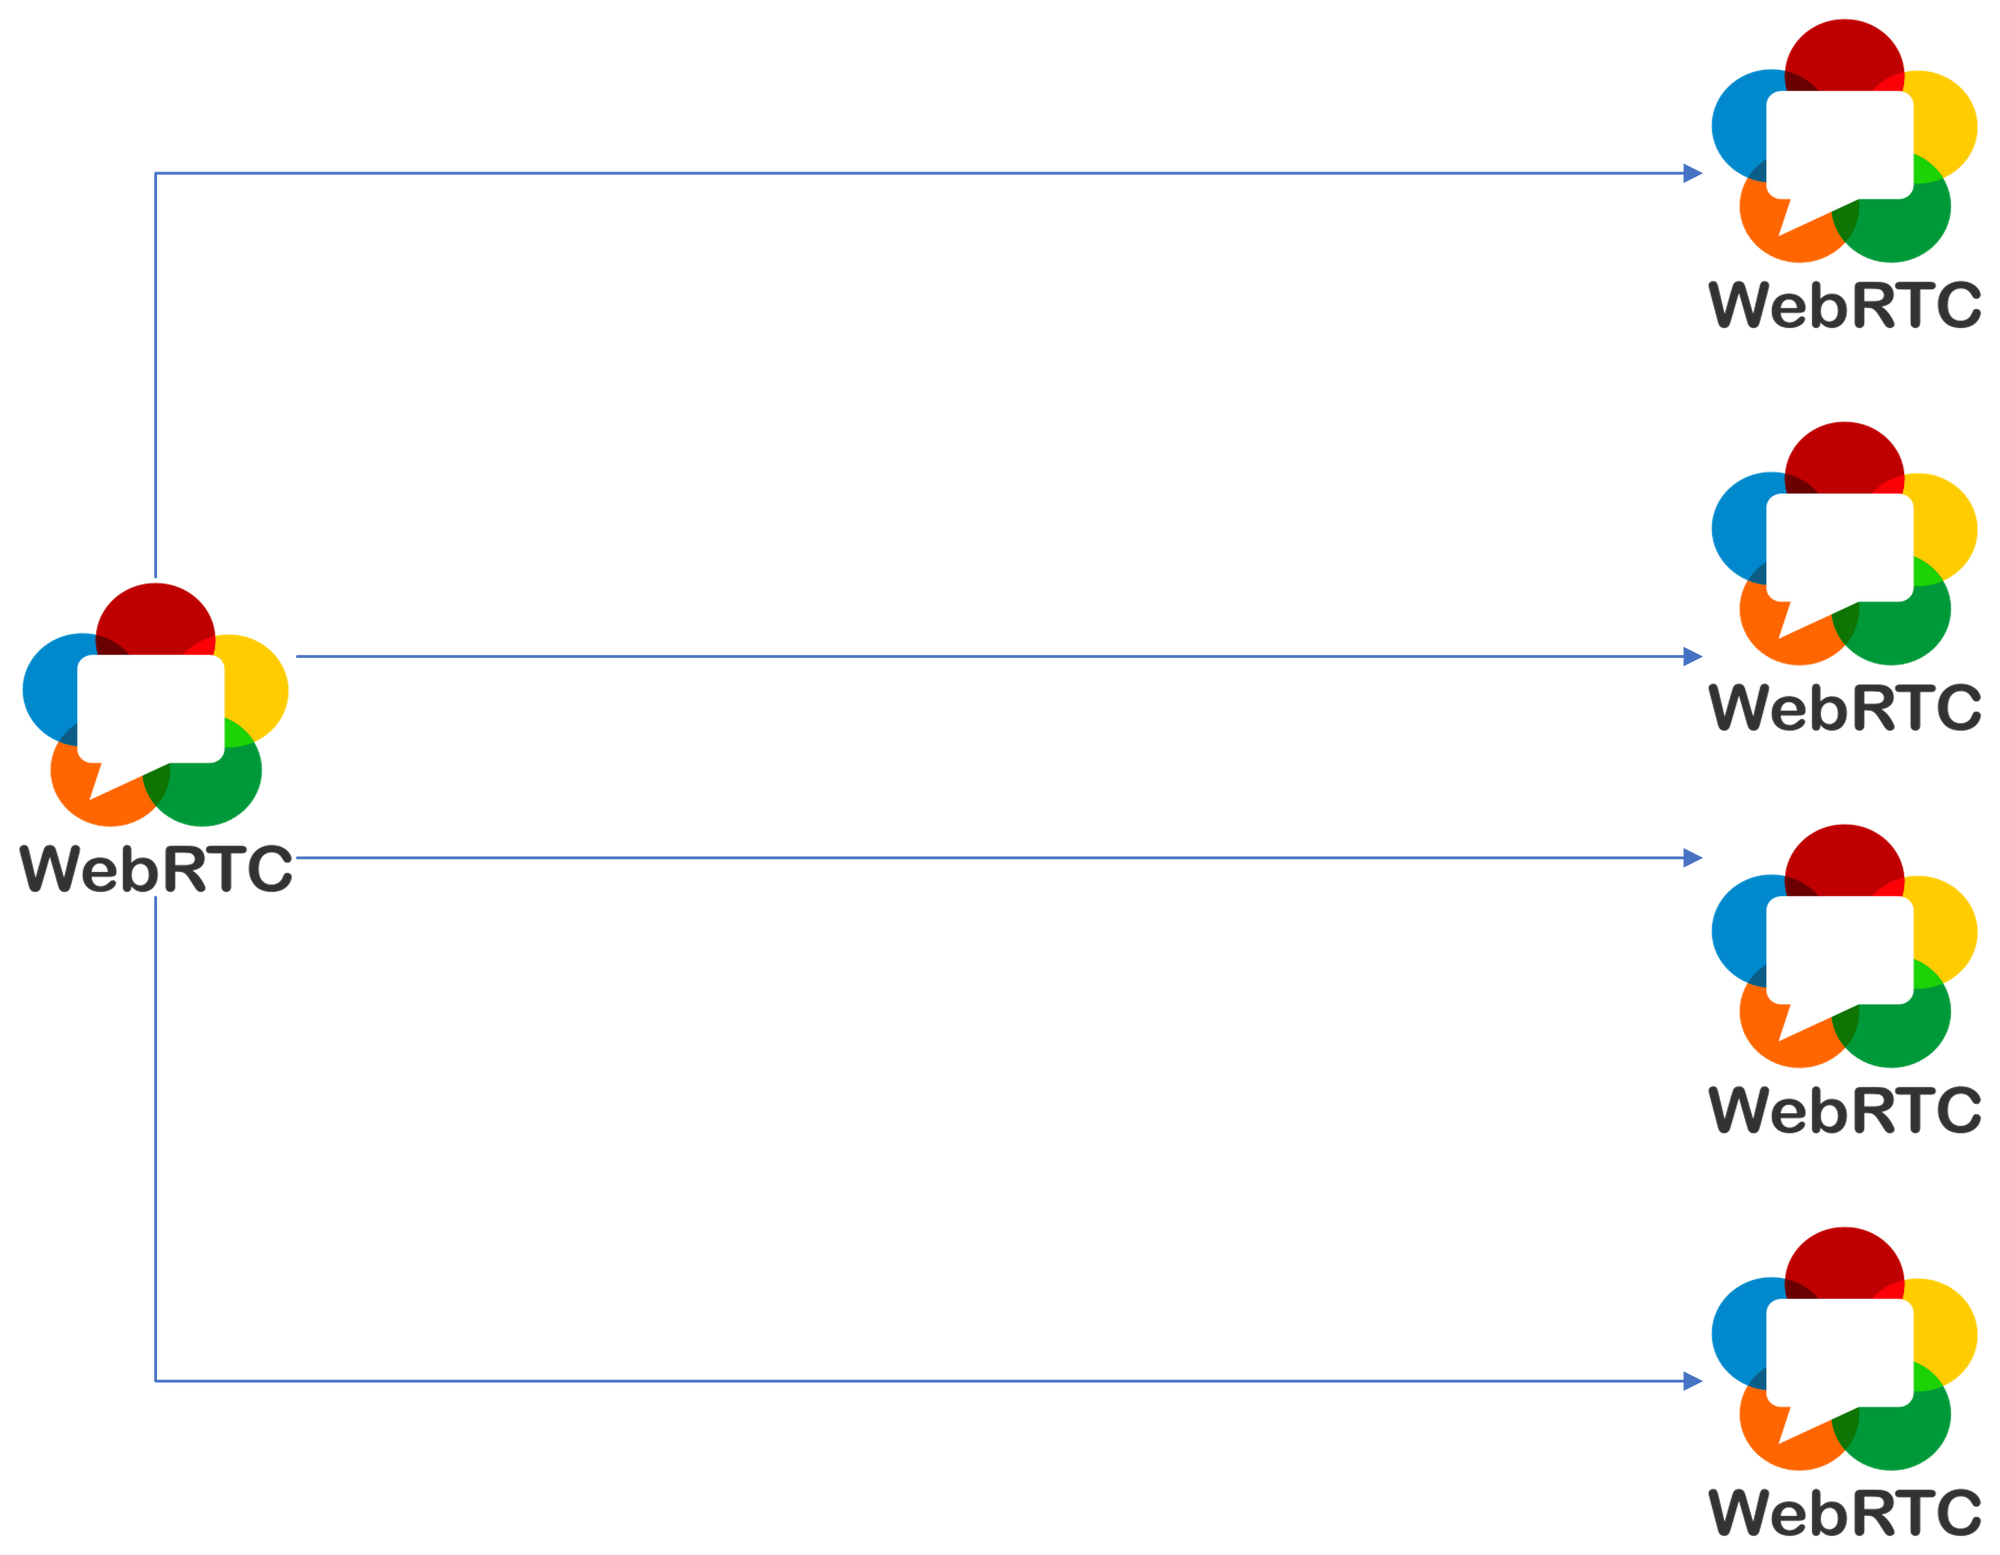
Here one presenter will broadcast the audio+video stream to many viewers. The viewers will not broadcast their stream to the presenter or to each other.
The viewers will only receive the video+audio stream from the presenter.
Limitation of P2P WebRTC
Based on the architecture we have described above, it apparent that this architecture is good for broadcast with small number of viewers, but will not scale well for broadcast with hundreds or thousands of viewers.
Consider a scenario where presenter is broadcasting a HD 1080p video to 1000 viewers.
Based on the p2p architecture of WebRTC the presenter from his/her computer would have to send the video stream to 1000 viewers.
Bandwidth required for HD 1080p is around ~5 Mbps, and broadcasting it to 1000 viewers would required 5 * 1000 = 5000 Mbps or 5 Gbps.
5 Gbps upload speed would be required to stream out to 1000 viewers.
Moreover it would be limiting for a single computer to able to handle connections to 1000 participants, as they will be directly connected to the presenter.
Hence, it is not practical to use plain WebRTC for broadcasting.
Scaling WebRTC
The good news is that WebRTC can be scaled by using a centralized server, that will receive the video stream from the presenter and then forward it to the viewers.
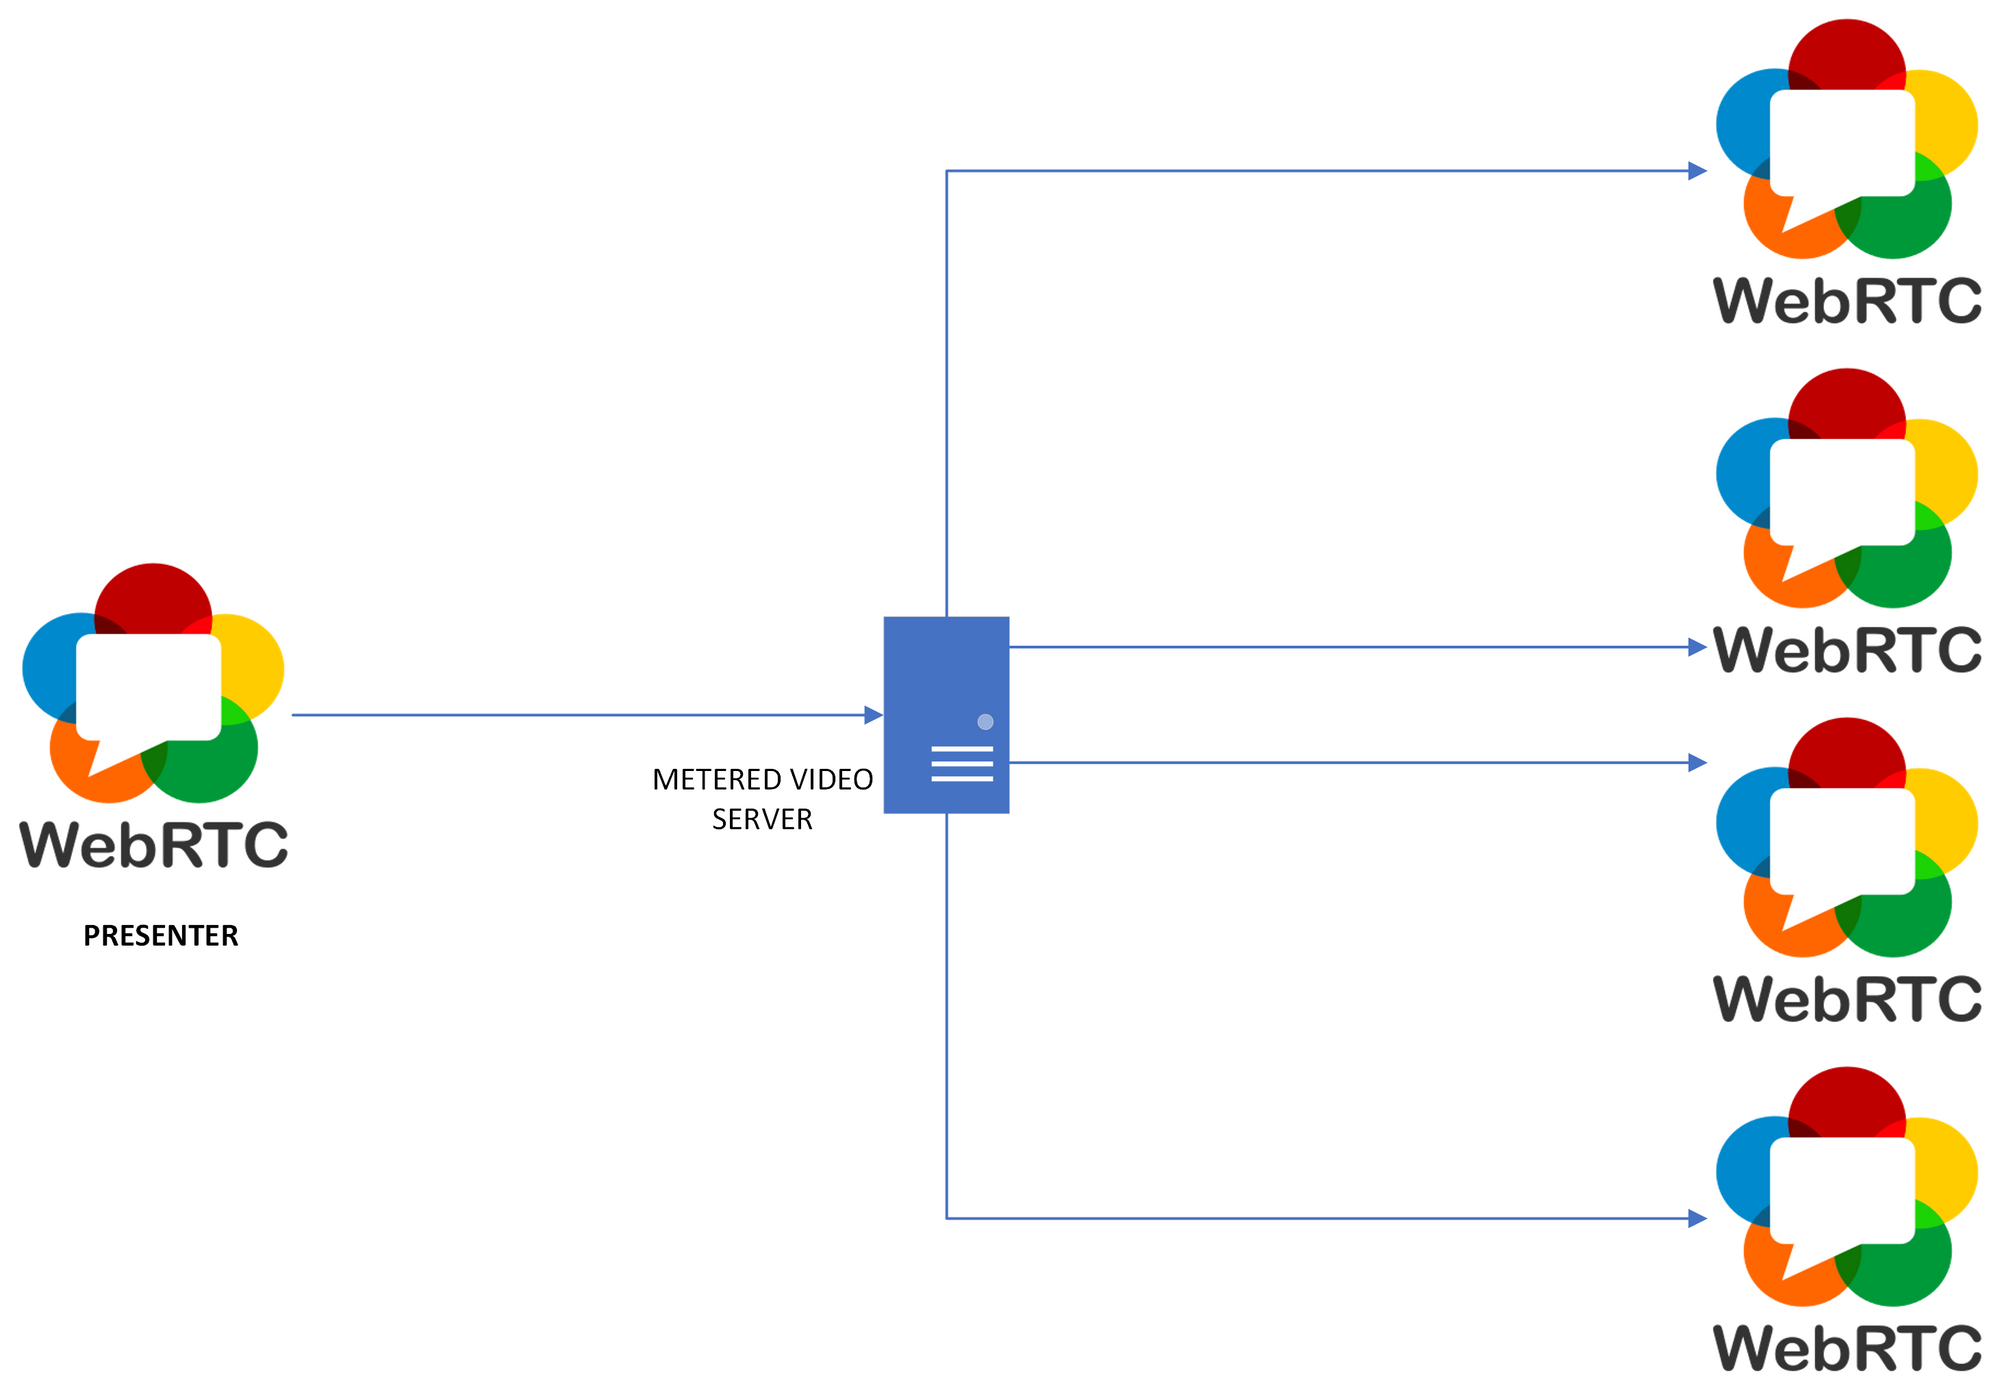
You can use Metered Video Cloud WebRTC Server to scale your one to many broadcast.
Metered Video WebRTC Server would accept the video stream from presenter and it would forward it to thousands viewers.
The Metered Video WebRTC is highly scalable and automatically scales up to accommodate to any number to viewers in the broadcast.
The presenter would have to send/upload just one video stream to the Metered Video Server and then the Metered Video server would send it all the participants in the broadcast.
So, if we revisit our previous scenario of broadcasting to 1000 viewers a 1080p video, using the Metered Video WebRTC Server then:
The presenter would stream the 1080p video to Metered WebRTC server and 5 Mbps bandwidth would be required and would connect to only one peer i.e the Metered Video Server.
The Metered Video Server would connect to 1000 viewers and would forward the video stream to them, so Metered Video server would consume 5 Gbps bandwidth to transmit the video.
Metered Video server is highly scalable and can automatically scale up to accommodate the CPU and bandwidth requirements.
Building your own highly scalable WebRTC to Many Broadcasting Solution
Let's build our own highly scalable WebRTC Live streaming solution. For this we will use the Metered Video SDK, and code up our solution.
Our solution would allow the user to broadcast his/her:
- Camera
- Microphone
- Screen
We will build two views:
- The presenter view
- The viewer view
In the presenter view we will have controls to share user's camera, microphone and screen.
In the viewer view we will show the video stream of the presenter.
Let's start building our broadcasting application.
Pre-requisite
To build this application you should have knowledge of basic Javascript and HTML.
You also need to have a Metered Video account, if you don't have an account then go https://www.metered.ca and click "Signup and Start Building" to signup for a free account.
Once you have created a free account, come back here and follow the rest of the tutorial.
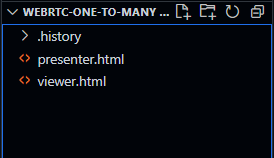
Project Directory structure
We will create two files presenter.html and viewer.html , the presenter.html file would contain code for the presenter and the viewer.html would contain the code for the viewer.
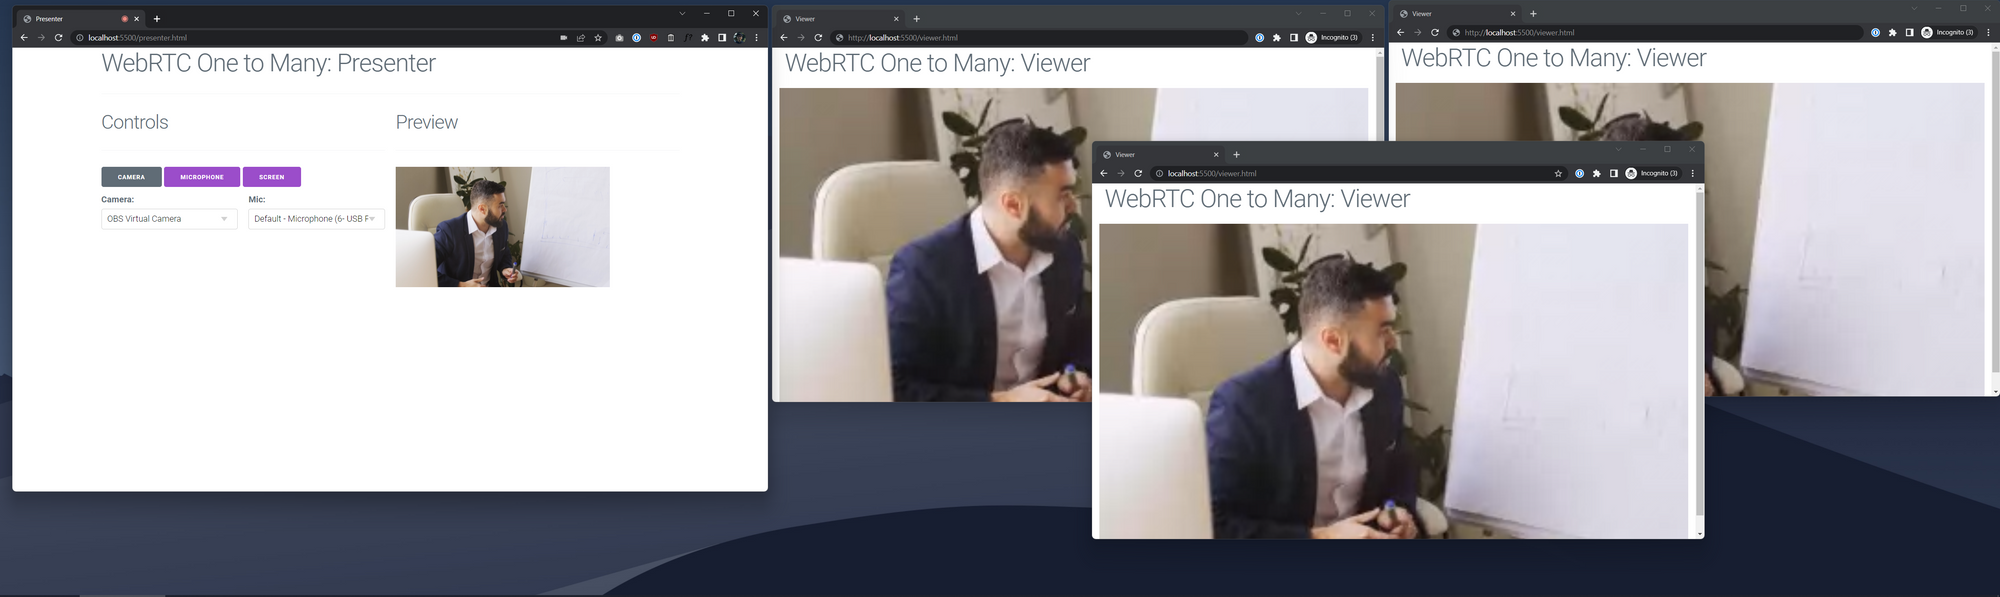
Building the Presenter
Let's first build the presenter view. The presenter view would have controls to share camera, microphone and screen.
It will also have a preview to show the presenter what they are sharing.
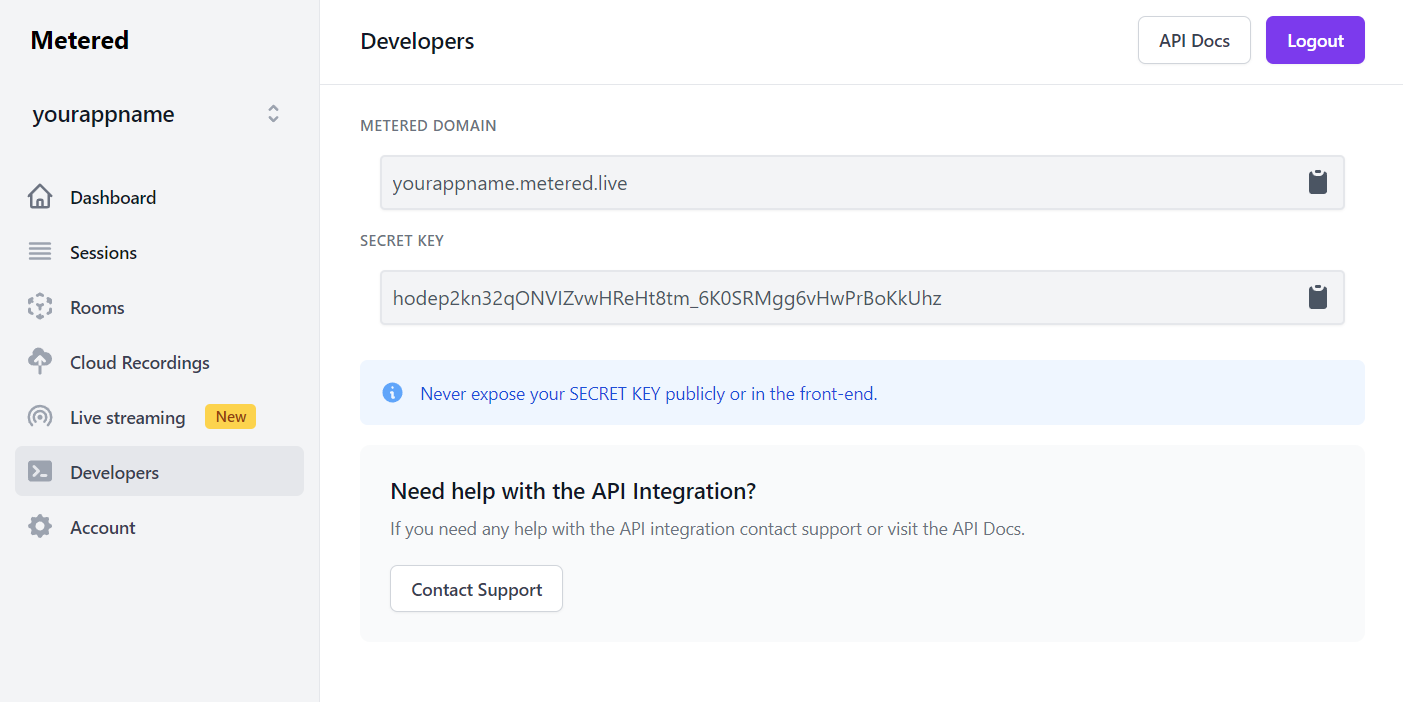
Step 1: Obtaining your Metered Domain and Secret Key
Once you have signed up Metered Video account, go to Dashboard -> Developers from there you will get the Metered Domain and Secret Key.
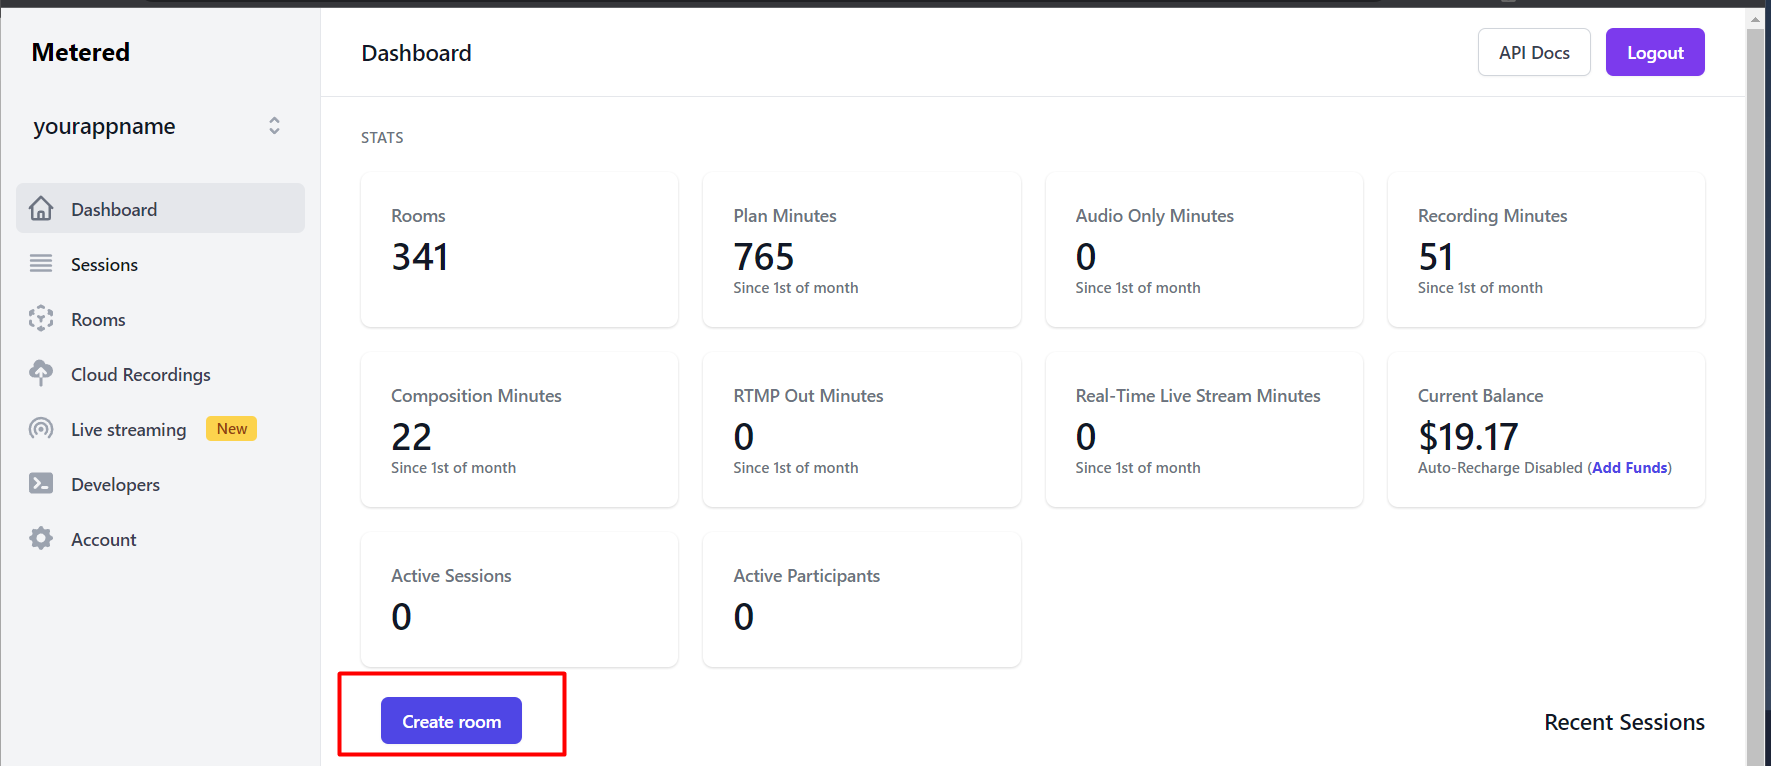
Step 2: Create a Room for one to many broadcast
Now click on the Dashboard -> Create Room Button
On the create room page, enter the room name, for our tutorial we will enter "broadcast-room" you can enter whatever room name you like.
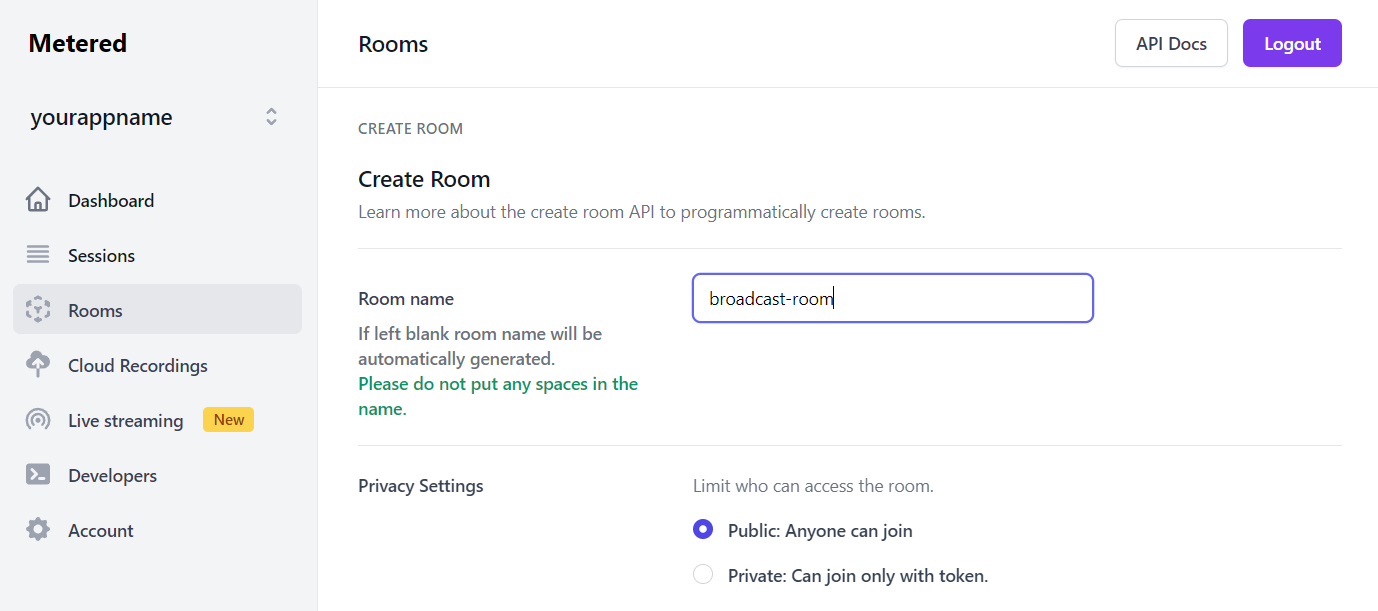
Scroll down to the bottom of the page and press the "Create Room" button.
Step 4: Building Presenter UI
We will open the fille presenter.html and code the presenter front-end
<html lang="en">
<head>
    <meta charset="UTF-8">
    <meta http-equiv="X-UA-Compatible" content="IE=edge">
    <meta name="viewport" content="width=device-width, initial-scale=1.0">
    <title>Presenter</title>
        <!-- Google Fonts -->
    <link rel="stylesheet" href="https://fonts.googleapis.com/css?family=Roboto:300,300italic,700,700italic">

    <!-- CSS Reset -->
    <link rel="stylesheet" href="https://cdnjs.cloudflare.com/ajax/libs/normalize/8.0.1/normalize.css">

    <!-- Milligram CSS -->
    <link rel="stylesheet" href="https://cdnjs.cloudflare.com/ajax/libs/milligram/1.4.1/milligram.css">
</head>
<body>
    <div class="container">
        <h1>WebRTC One to Many: Presenter</h1>
        <hr>
        <div class="row">
            <div class="column">
                <h2>Controls</h2>
                <hr>

                <div class="row">
                    <div class="column">
                        <button id="share-camera">Camera</button>
                        <button id="share-mic">Microphone</button>
                        <button id="share-screen">Screen</button>
                    </div>

                </div>
                <div class="row">
                    <div class="column">
                        <label for="camera">Camera:</label>
                        <select name="camera" id="camera-list">
                            <option value=""></option>
                        </select>
                    </div>

                    <div class="column">
                        <label for="mic">Mic:</label>
                        <select name="mic" id="mic-list">
                            <option value=""></option>
                        </select>
                    </div>

                </div>
            </div>
            <div class="column">
                <h2>Preview</h2>
                <hr>
                <video id="video" src=""></video>
            </div>
        </div>
    </div>

    <script>

    </script>
</body>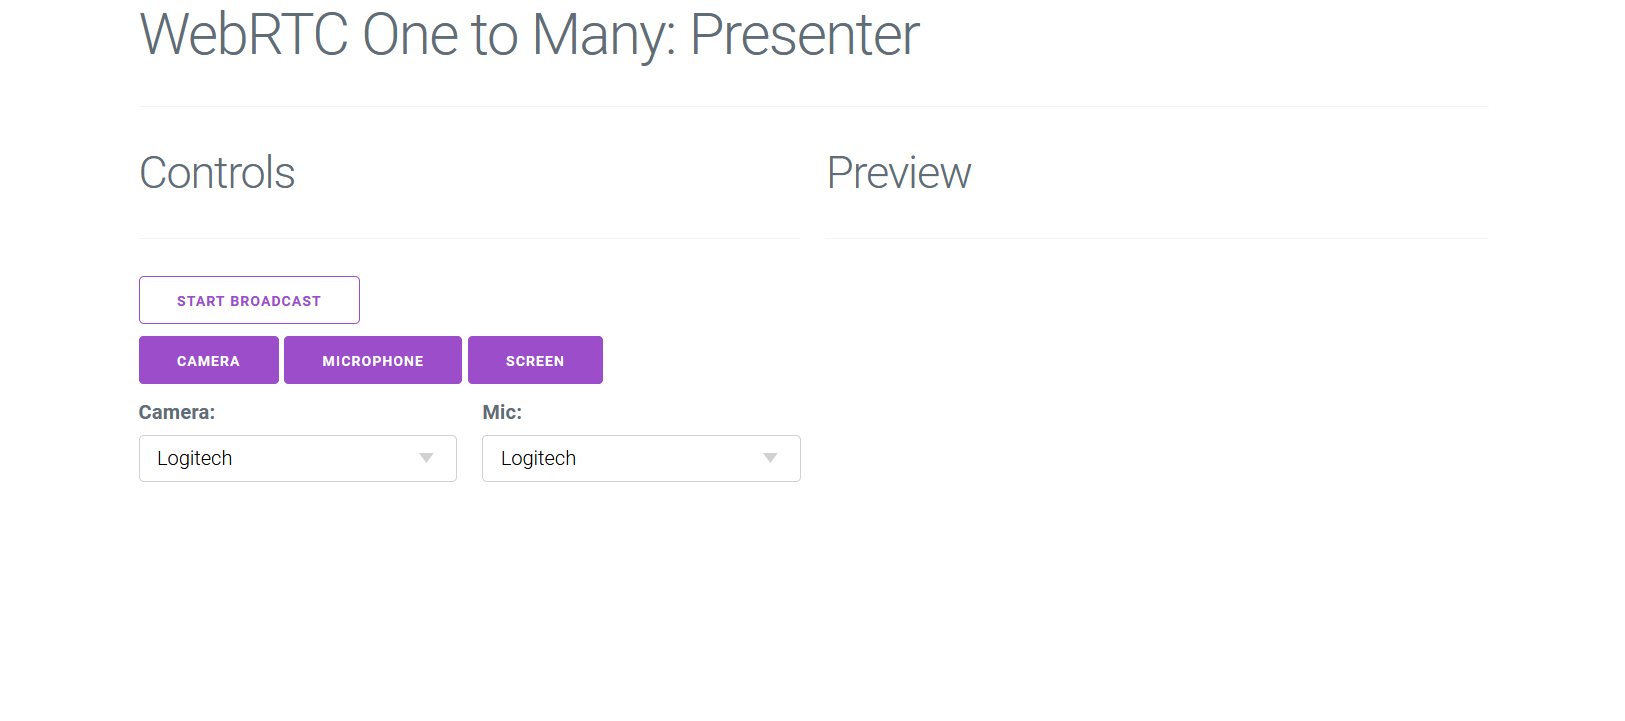
</html>We have scaffolded the UI of our presenter interface.
Pressing the Camera button would share the user's camera, microphone button would share the user's microphone and screen button would share the user's screen.
Camera and Mic select boxes will contain the list of available cameras and microphones on the presenter's computer or mobile device.
Step 5: Implementing Logic for Presenter
We will import the Metered Video SDK. Add the line below before closing of the head tag.
<script type="text/javascript" src="https://cdn.metered.ca/sdk/video/1.4.5/sdk.min.js"></script>Now let's build the logic to share camera, screen and microphone.
With Metered Video SDK, it gets very simple, we just need to call:
First we will join the Metered Room that we have created, to join the room we will call the join() method of the Metered Video SDK
const meeting = new Metered.Meeting();
async function joinMeeting() {
    const response = await meeting.join({
        roomURL: "your-app-name.metered.live/broadcast-demo"
    });
}
joinMeeting();
Then we will create methods to handle the click event of the #share-camera #share-mic and share-screen buttons.
Inside the methods we will call the startVideo(), startAudio() and startScreenShare() methods of the Metered Video SDK.
async function shareCamera() {
    await meeting.startVideo();
}

async function shareMic() {
    await meeting.startAudio();
}

async function shareScreen() {
    await meeting.startScreenShare();
}
Adding the DOM click event handlers and calling the methods that we have created.
document.querySelector("#share-camera").addEventListener("click", shareCamera);
document.querySelector("#share-mic").addEventListener("click", shareMic);
document.querySelector("#share-screen").addEventListener("click", shareScreen);
Now we also want to show the preview video of the camera or screen the user is currently broadcasting.
To show the preview we will listen to the localTrackStarted and localTrackUpdated events.
In both the events we will check if the track is of type video, and if the track is of type video then we will add it to the srcObject attribute of the video tag.
meeting.on("localTrackStarted", function(trackItem) {
    if (trackItem.type === "video") {
        const stream = new MediaStream();
        stream.addTrack(trackItem.track);
        document.querySelector("#video").srcObject = stream;
    }
});

meeting.on("localTrackUpdated", function(trackItem) {
    if (trackItem.type === "video") {
        const stream = new MediaStream();
        stream.addTrack(trackItem.track);
        document.querySelector("#video").srcObject = stream;
    }
});
If the user has multiple cameras or microphones in the computer then we want to ability to be able to switch between the cameras and microphones.
To do this we will update our joinMeeting() method and add the logic to fetch the list of available cameras and microphones and populate the #mic-list and #camera-list select boxes.
async function joinMeeting() {
    const response = await meeting.join({
        roomURL: "your-app-name.metered.live/broadcast-demo"
    });

    const microphones  = await meeting.listAudioInputDevices();
    const cameras = await meeting.listVideoInputDevices();

    let cameraList = [];
    for (let camera of cameras) {
        cameraList.push(`<option value=${camera.deviceId}>${camera.label}</option>`);
    }
    let micList = [];
    for (let mic of microphones) {
        micList.push(`<option value=${mic.deviceId}>${mic.label}</option>`);
    }
    document.getElementById("camera-list").innerHTML = cameraList.join("");
    document.getElementById("mic-list").innerHTML = micList.join("");
}
joinMeeting();
Now we need to add event handlers to the #camera-list and #mic-list select boxes, and when the camera or microphone is changed in the select box we also need to update the video stream.
To do this we have chooseVideoInputDevice() and chooseAudioInputDevice() from the Metered Video SDK. Both the methods accept the deviceId.
We have set the deviceId as the value of the option of the select box.
async function selectCamera(event) {
    await meeting.chooseVideoInputDevice(event.target.value);
}

async function selectMic(event) {
    await meeting.chooseAudioInputDevice(event.target.value);
}
document.querySelector("#camera-list").addEventListener("change", selectCamera);
document.querySelector("#mic-list").addEventListener("change", selectMic);
Putting it all together here is our final presenter.html code
<html lang="en">
<head>
    <meta charset="UTF-8">
    <meta http-equiv="X-UA-Compatible" content="IE=edge">
    <meta name="viewport" content="width=device-width, initial-scale=1.0">
    <title>Presenter</title>
        <!-- Google Fonts -->
    <link rel="stylesheet" href="https://fonts.googleapis.com/css?family=Roboto:300,300italic,700,700italic">

    <!-- CSS Reset -->
    <link rel="stylesheet" href="https://cdnjs.cloudflare.com/ajax/libs/normalize/8.0.1/normalize.css">

    <!-- Milligram CSS -->
    <link rel="stylesheet" href="https://cdnjs.cloudflare.com/ajax/libs/milligram/1.4.1/milligram.css">

    <script type="text/javascript" src="https://cdn.metered.ca/sdk/video/1.4.5/sdk.min.js"></script>
</head>
<body>
    <div class="container">
        <h1>WebRTC One to Many: Presenter</h1>
        <hr>
        <div class="row">
            <div class="column">
                <h2>Controls</h2>
                <hr>

                <div class="row">
                    <div class="column">
                        <button id="share-camera">Camera</button>
                        <button id="share-mic">Microphone</button>
                        <button id="share-screen">Screen</button>
                    </div>

                </div>
                <div class="row">
                    <div class="column">
                        <label for="camera">Camera:</label>
                        <select name="camera" id="camera-list">
                            <option value=""></option>
                        </select>
                    </div>

                    <div class="column">
                        <label for="mic">Mic:</label>
                        <select name="mic" id="mic-list">
                            <option value=""></option>
                        </select>
                    </div>

                </div>
            </div>
            <div class="column">
                <h2>Preview</h2>
                <hr>
                <video style="max-width: 400px" id="video" src="" autoplay muted></video>
            </div>
        </div>
    </div>

    <script>
        const meeting = new Metered.Meeting();
        async function joinMeeting() {
            const response = await meeting.join({
                roomURL: "your-app-name.metered.live/broadcast-demo"
            });

            const microphones  = await meeting.listAudioInputDevices();
            const cameras = await meeting.listVideoInputDevices();

            let cameraList = [];
            for (let camera of cameras) {
                cameraList.push(`<option value=${camera.deviceId}>${camera.label}</option>`);
            }
            let micList = [];
            for (let mic of microphones) {
                micList.push(`<option value=${mic.deviceId}>${mic.label}</option>`);
            }
            document.getElementById("camera-list").innerHTML = cameraList.join("");
            document.getElementById("mic-list").innerHTML = micList.join("");
        }
        joinMeeting();


        async function selectCamera(event) {
            await meeting.chooseVideoInputDevice(event.target.value);
        }

        async function selectMic(event) {
            await meeting.chooseAudioInputDevice(event.target.value);
        }

        async function shareCamera() {
            await meeting.startVideo();
        }

        async function shareMic() {
            await meeting.startAudio();
        }

        async function shareScreen() {
            await meeting.startScreenShare();
        }

        document.querySelector("#share-camera").addEventListener("click", shareCamera);
        document.querySelector("#share-mic").addEventListener("click", shareMic);
        document.querySelector("#share-screen").addEventListener("click", shareScreen);
        document.querySelector("#camera-list").addEventListener("change", selectCamera);
        document.querySelector("#mic-list").addEventListener("change", selectMic);


        meeting.on("localTrackStarted", function(trackItem) {
            if (trackItem.type === "video") {
                const stream = new MediaStream();
                stream.addTrack(trackItem.track);
                document.querySelector("#video").srcObject = stream;
            }
        });

        meeting.on("localTrackUpdated", function(trackItem) {
            if (trackItem.type === "video") {
                const stream = new MediaStream();
                stream.addTrack(trackItem.track);
                document.querySelector("#video").srcObject = stream;
            }
        });
    </script>
</body>
</html>
Building the Viewer
Now let's build the viewer, the viewer will receive the remote video stream, and play it.
Step 1: Scaffolding the UI
Here is the html code for the viewer UI. It is very simple, we just add a video tag.
<!DOCTYPE html>
<html lang="en">
<head>
<meta charset="UTF-8">
<meta http-equiv="X-UA-Compatible" content="IE=edge">
<meta name="viewport" content="width=device-width, initial-scale=1.0">
<title>Viewer</title>
<!-- Google Fonts -->
<link rel="stylesheet" href="https://fonts.googleapis.com/css?family=Roboto:300,300italic,700,700italic">
<!-- CSS Reset -->
<link rel="stylesheet" href="https://cdnjs.cloudflare.com/ajax/libs/normalize/8.0.1/normalize.css">
<!-- Milligram CSS -->
<link rel="stylesheet" href="https://cdnjs.cloudflare.com/ajax/libs/milligram/1.4.1/milligram.css">
<script type="text/javascript" src="https://cdn.metered.ca/sdk/video/1.4.5/sdk.min.js"></script>
<script type="text/javascript" src="https://cdn.metered.ca/sdk/video/1.4.5/sdk.min.js"></script>
</head>
<body>
<div class="container">
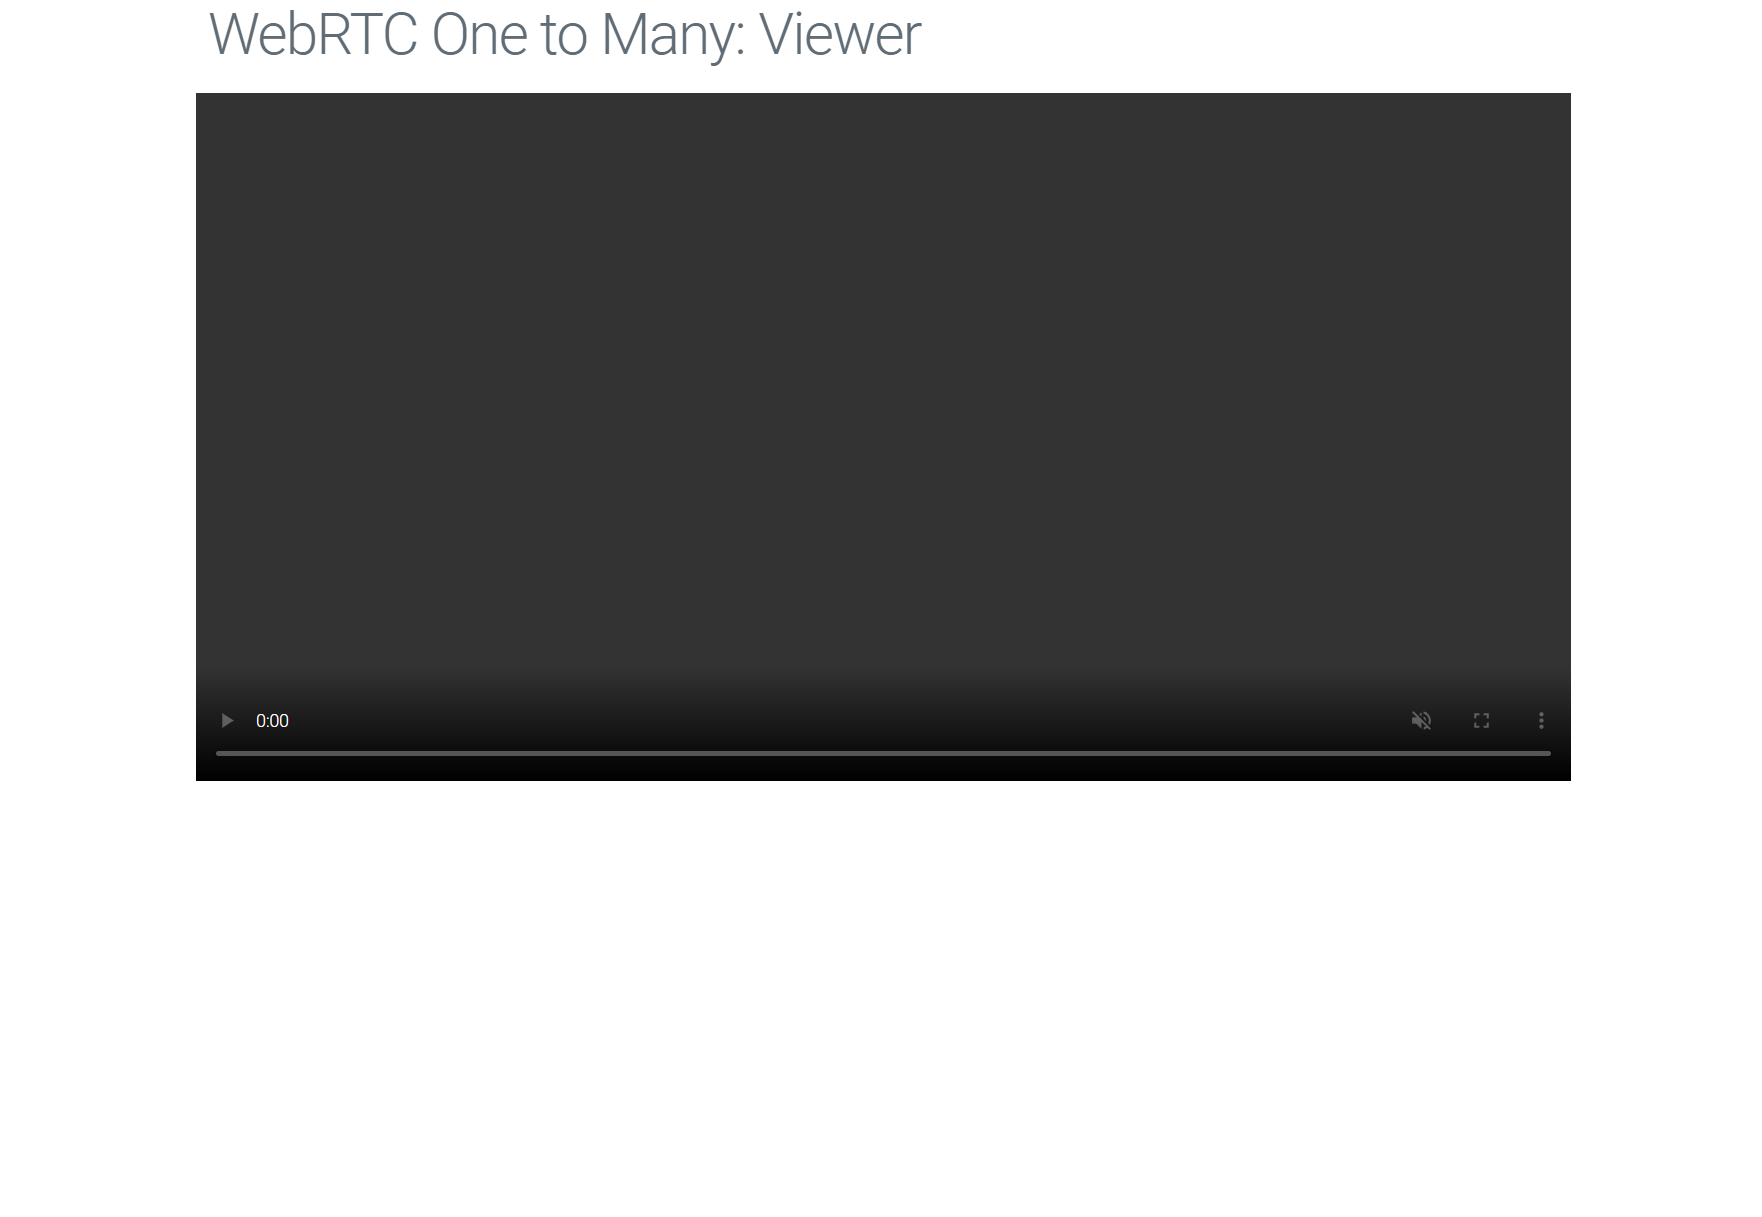
<h1>WebRTC One to Many: Viewer</h1>
<div class="row">
<video style="width: 100%" id="video" src="" autoplay muted controls></video>
</div>
</div>
<script>
</script>
</body>
</html>We have set the video tag attributes to autoplay and muted, we have also added controls attribute to allow the viewer to view the video player controls to adjust the volume and un-mute the video.
We have to add the muted attribute to the video player, but we cannot autoplay unmuted videos in the browser, and we want the video to autoplay as soon as the presenter starts the broadcast.
Hence we have to add the muted attribute, and the viewer would have to manually unmute the video from the player controls.
Step 2: Implementing logic for Viewer
The logic for viewer is very simple, we will join the same room as the presenter, and listen to the remoteTrackStarted event of Metered Video SDK.
When this event is emitted we will update the srcObject attribute of the video tag.
const meeting = new Metered.Meeting();
async function joinMeeting() {
    const response = await meeting.join({
        roomURL: "your-app-name.metered.live/broadcast-demo"
    });
}
joinMeeting();

let stream = new MediaStream();
meeting.on("remoteTrackStarted", function(remoteTrack) {
    // Checking if the remoteTrack is video
    // If it is video then removing the old video tracks from the media stream
    // and adding the new video track
    if (remoteTrack.type === "video") {
        stream.getVideoTracks().forEach((track) => {
            stream.removeTrack(track);
        });
        stream.addTrack(remoteTrack.track);
    }
    // Checking if the remoteTrack is audio
    // If it is audio then removing the old audio tracks from the media stream
    // and adding the new audio track
    if (remoteTrack.type === "audio") {
        stream.getAudioTracks().forEach((track) => {
            stream.removeTrack(track);
        });
        stream.addTrack(remoteTrack.track);
    }
    document.getElementById("video").srcObject = stream;
});
Check the code above, we are joining the meeting, and listening to the remoteTrackStarted event and updating the media stream with the tracks, and assigning the media stream to the srcObject attribute of the video tag.
Step 4: Done
That's it, our application is now complete.
Using Pre-built WebRTC Live Streaming Solution
We can use Metered Real Time Live Streaming, which is a complete video live streaming solution with less than 300ms latency.
It has completely pre-built broadcasting solution with complete presenter and embeddable viewer that can be added to any existing website or application.
The presenter UI allows to live stream your camera, screen as well as video files to the viewers, and has a count for how many viewers are currently viewing the live stream.
Let's get started to how to live stream using Metered Real Time Live Streaming.
Prerequsite
You need to have a Metered Video account, if you do not have an account go https://www.metered.ca and click "Signup and Start Building" and signup for a free account.
Step 1: Create a Live Streaming Room
Go to your Metered Dashboard and click on "Live streaming" option from the sidebar.
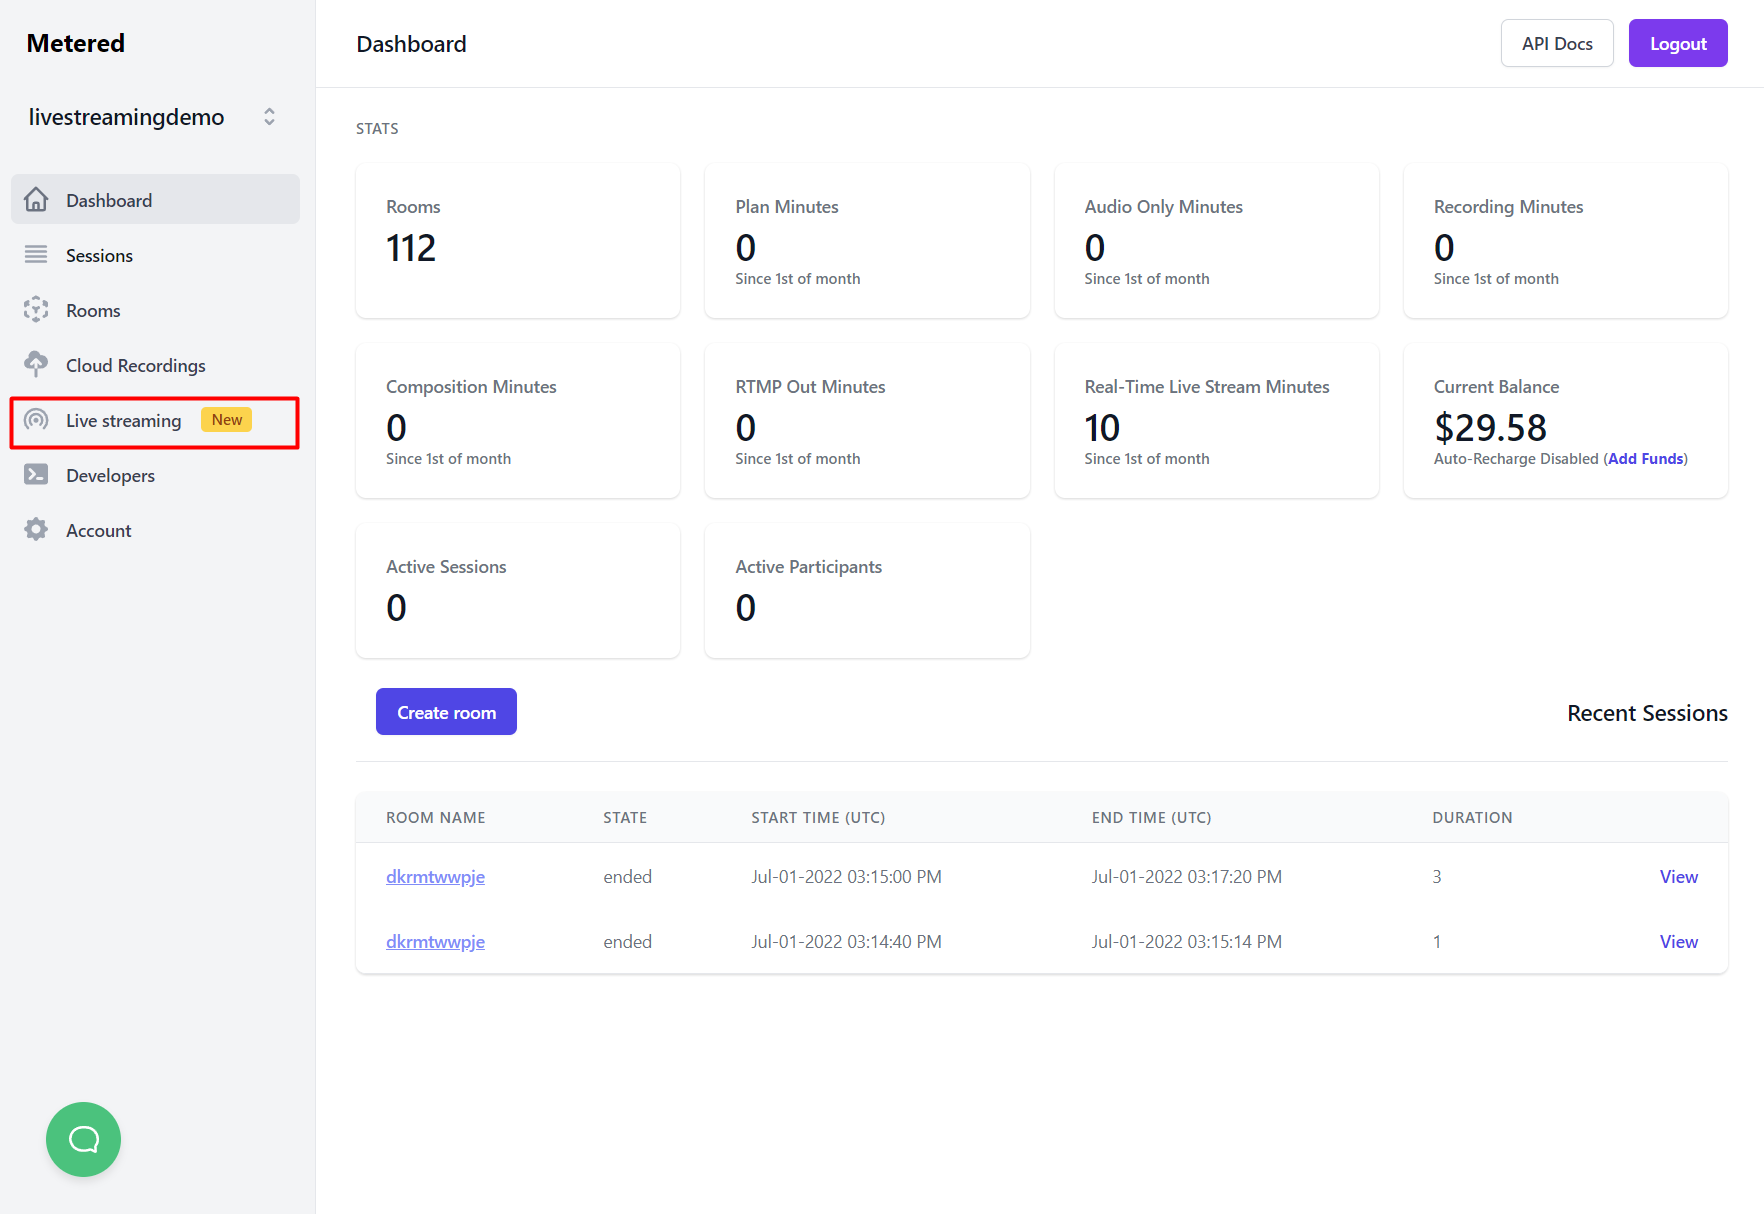
Then Click on "Create Live Stream Room" button, it will take you to the "Create a Live Stream Room" page, here you can name the room whatever you live, but for this tutorial we will call it "live-broadcast"
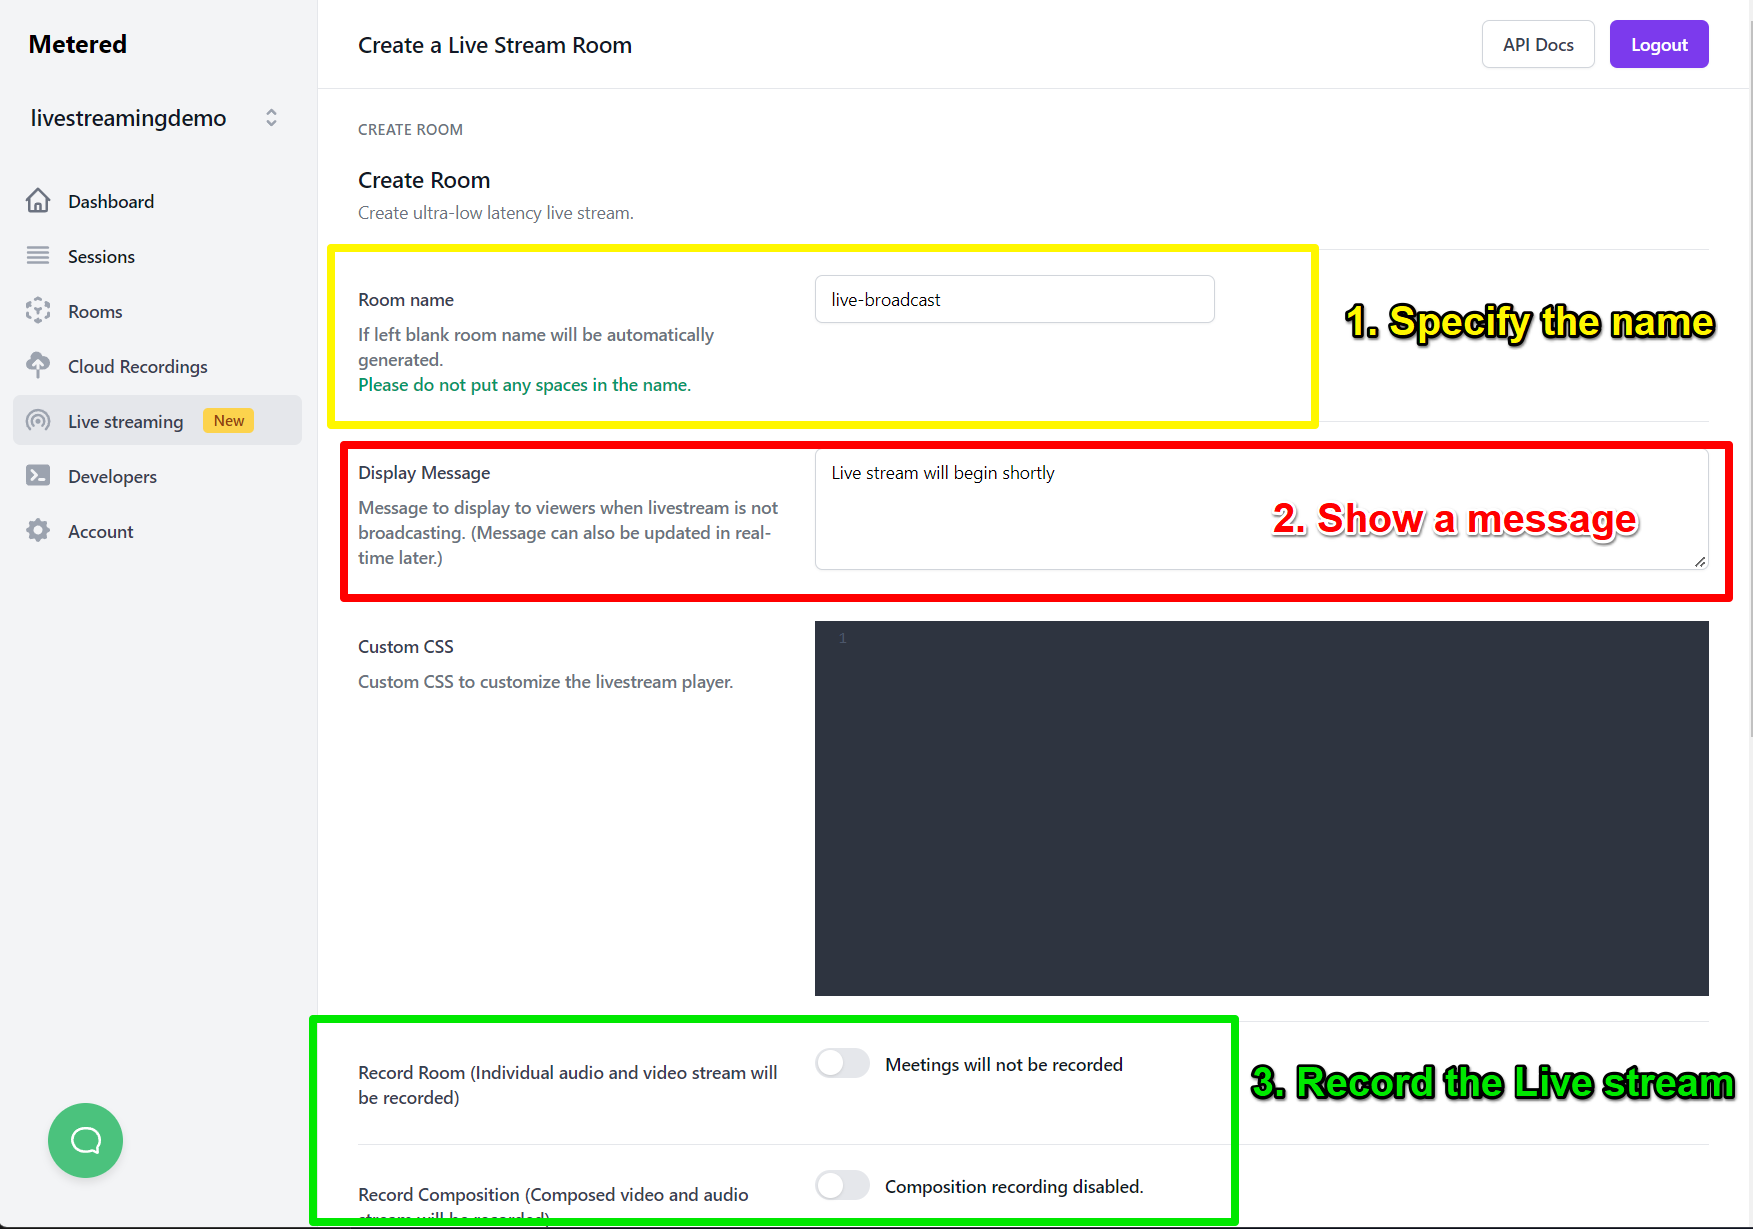
On the Create Live Stream Room page you can:
- Specify the name of the live-stream room, it can be anything you like.
- Show a message: Add a Display Message when the live streaming is not running. This will be visible to the live stream viewers, when the live stream is not broadcasting, the message can be updated instantly without requiring the viewers to refresh their page.
- Record the Live Stream: Optionally you can also keep the recording of the live stream
Then scroll down and click on "Create Room" button.
Step 2: Launching the Broadcast Manager
After you have clicked the "Create Room" button, you will be taken to the Room Details page.
On the details page there is a button to "Launch the Broadcast Manager", the broadcast Manager allow you to live stream you camera, screen or a video file to the viewers.
There is also a link to the Viewer URL, and below that embed info for the viewer.
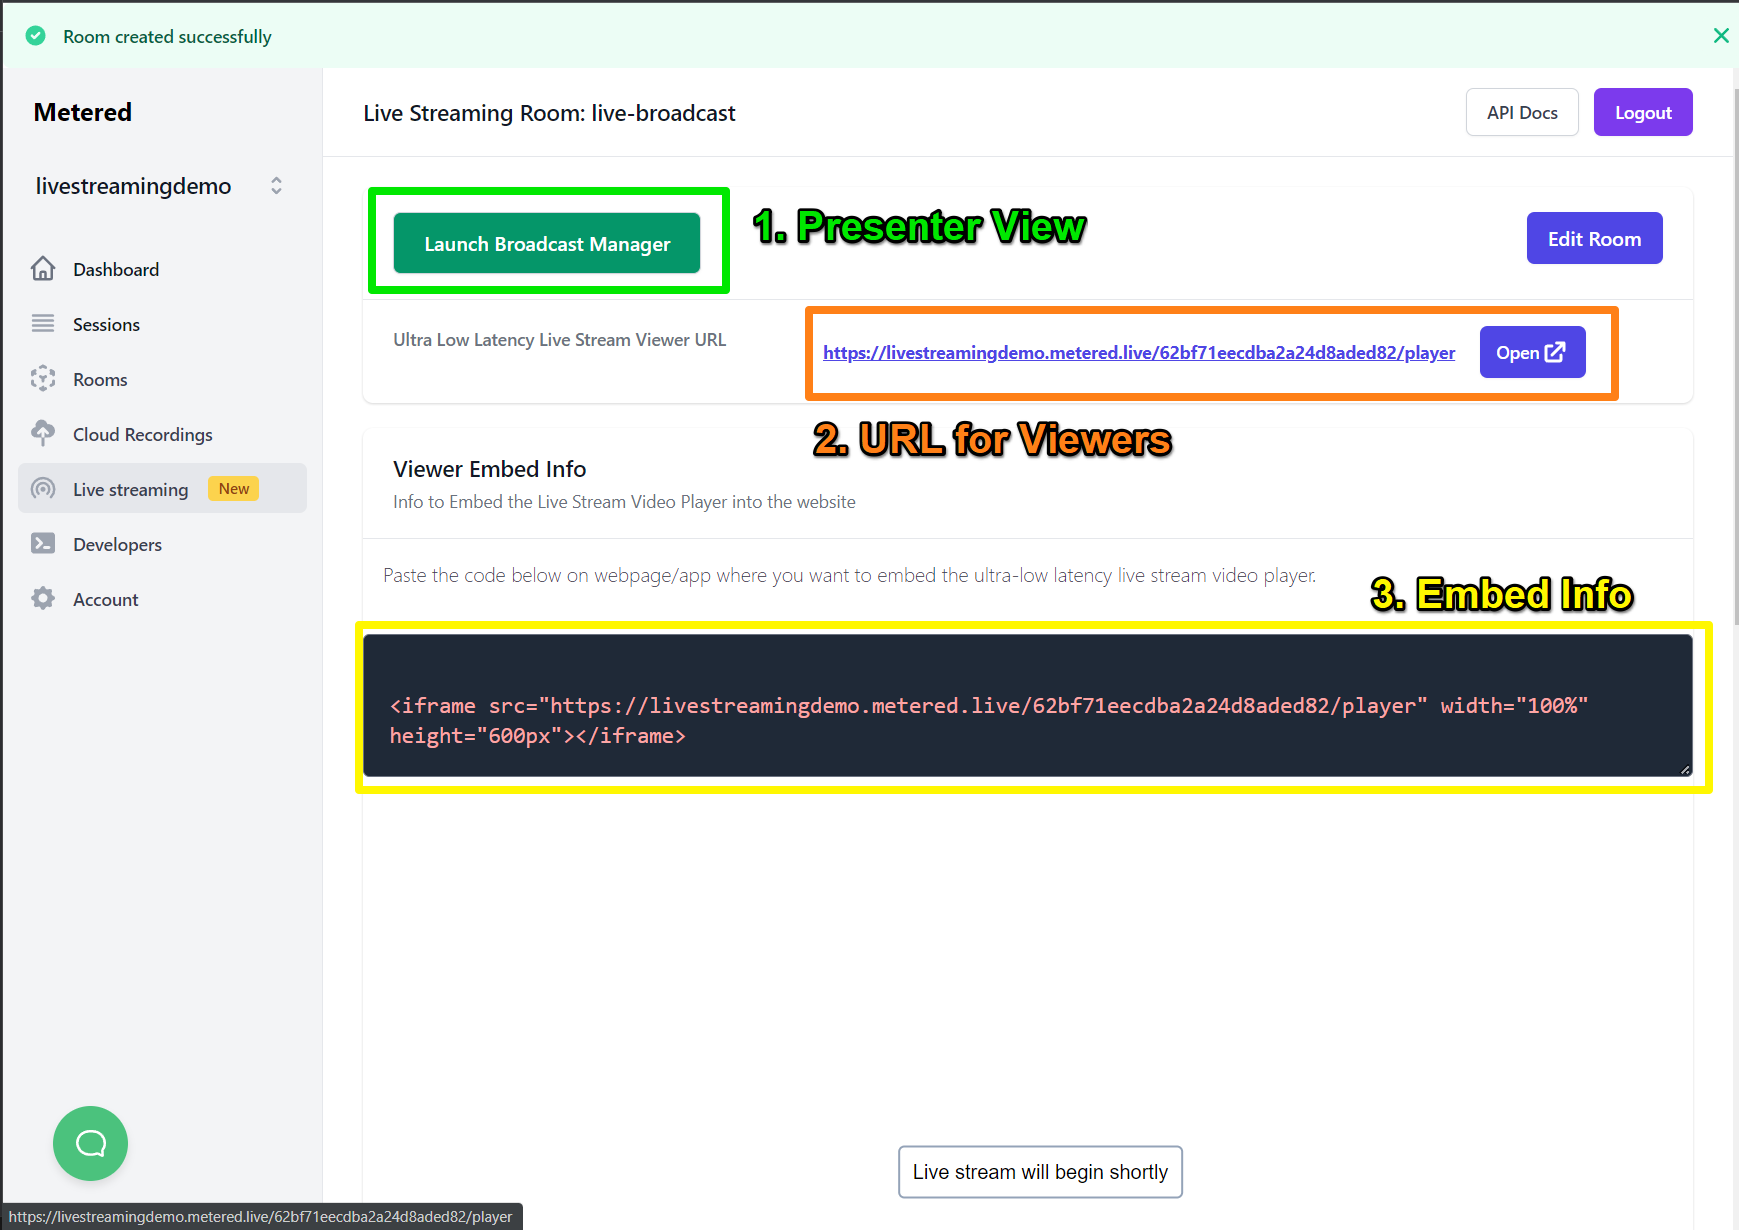
Click on "Launch Broadcast Manager" button to launch the broadcast manager.
Step 3: Live streaming
When you click on "Launch Broadcast Manager" it will launch the broadcast viewer.
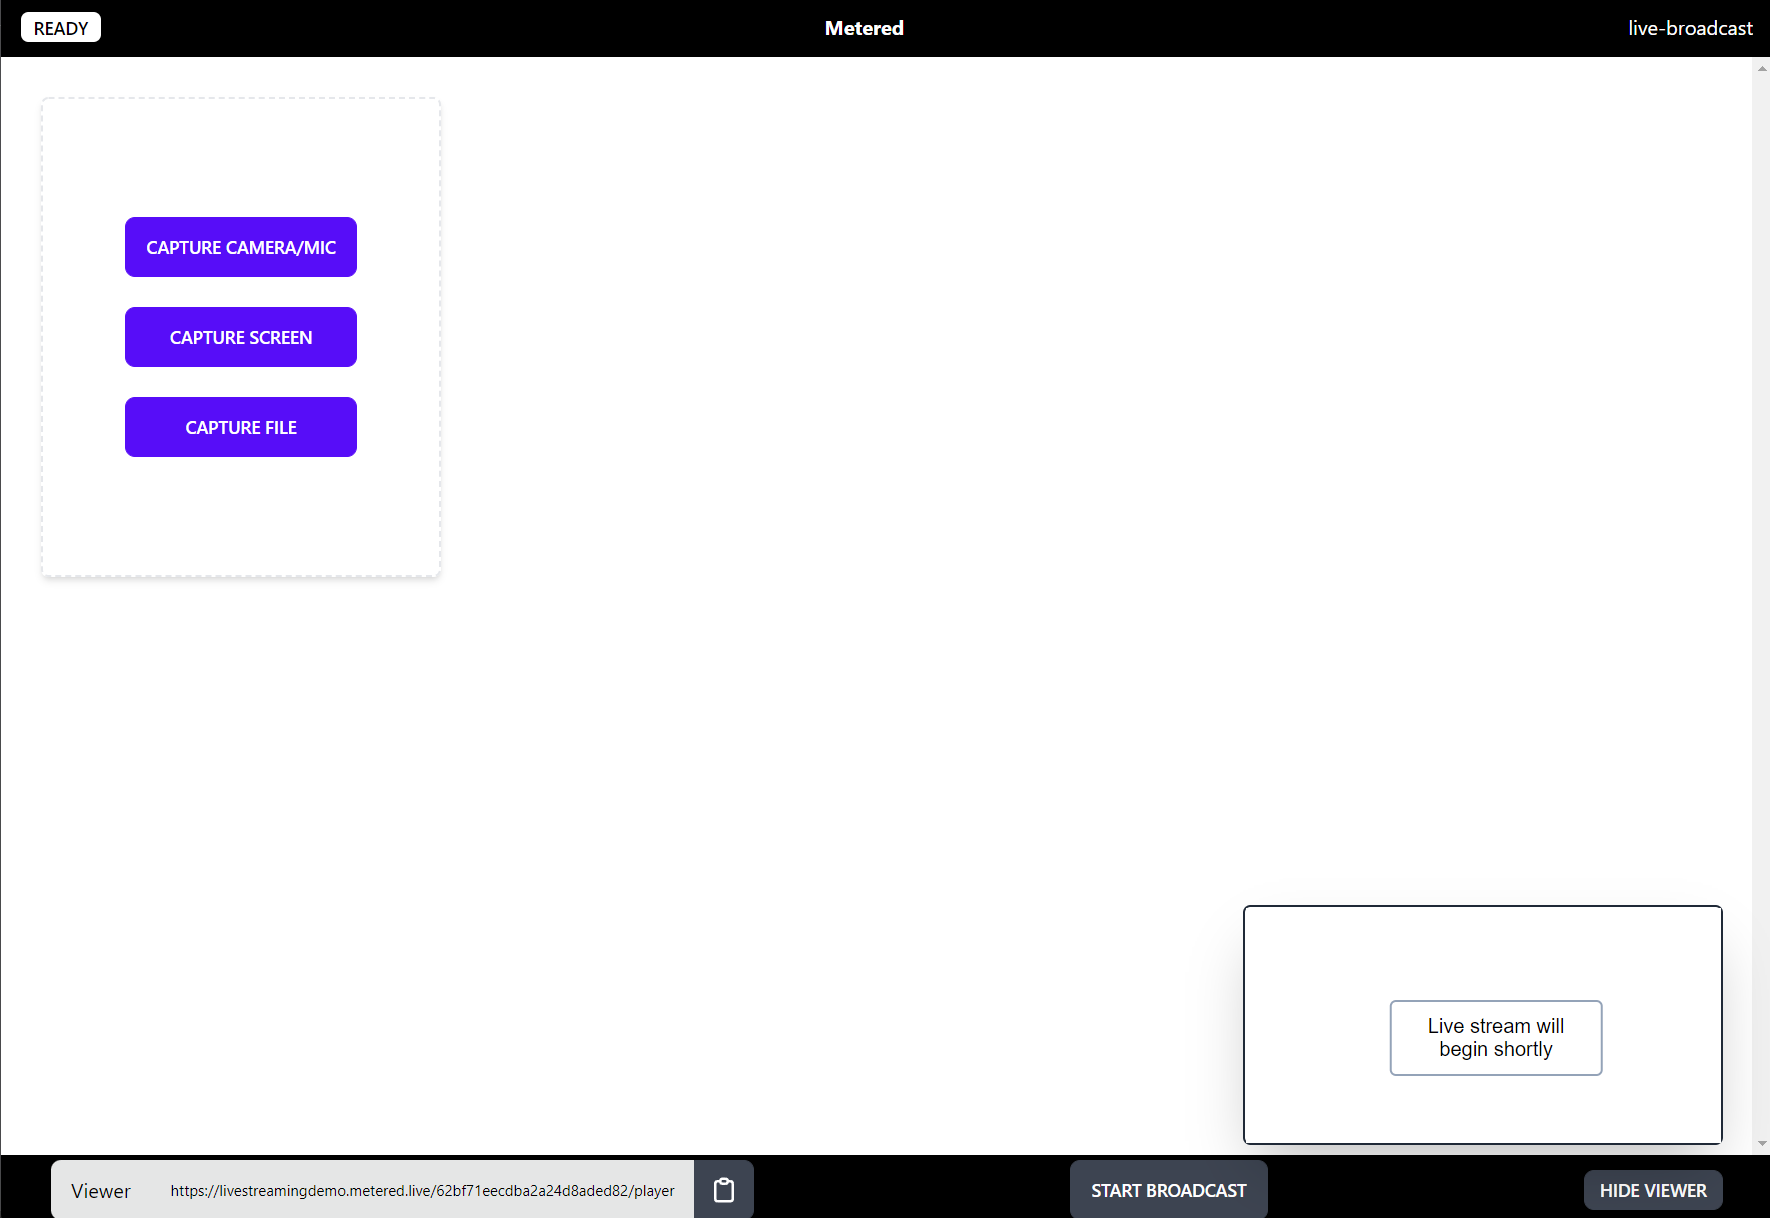
Here you will have controls to live stream your camera, screen or a video file.
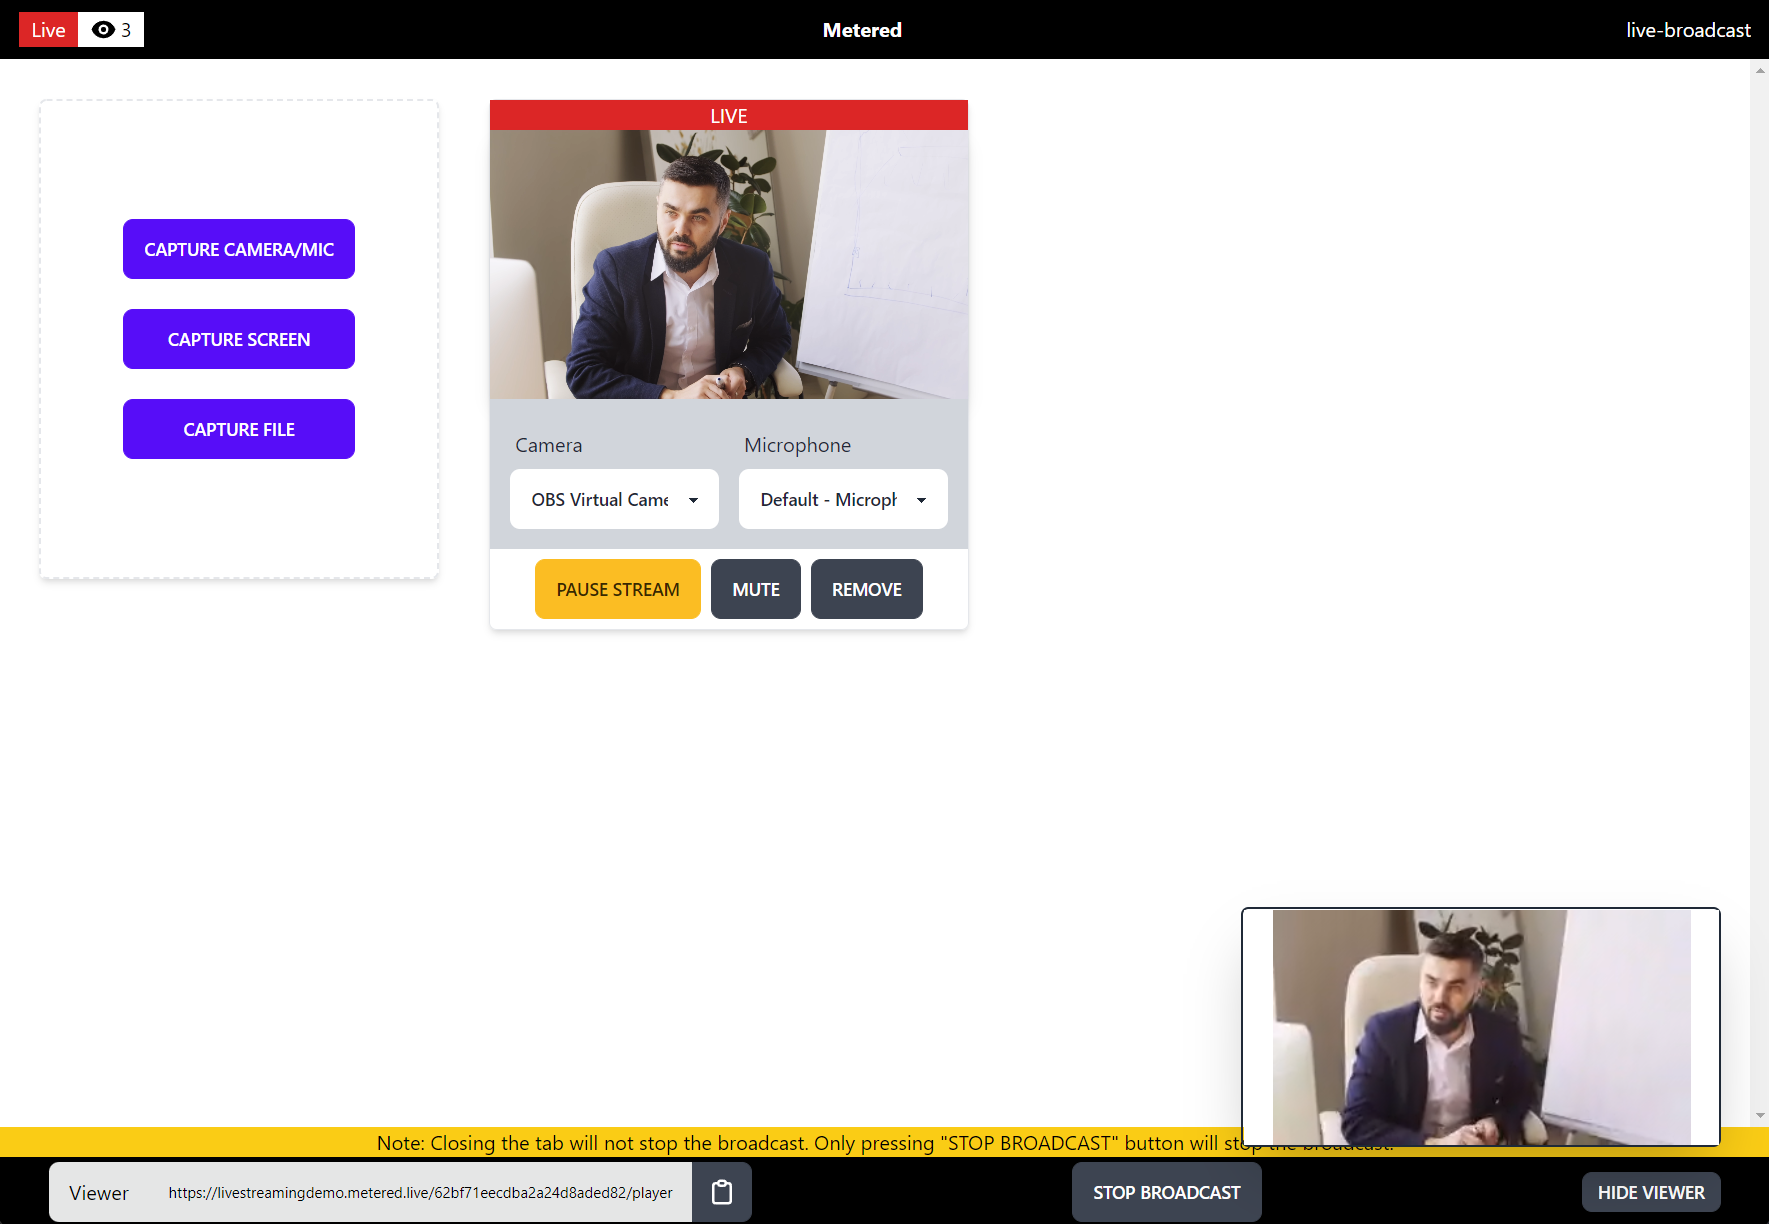
You can click on "Capture Camera/Mic" button to add a control to broadcast the camera.
Then click the Start Stream button to start the broadcast.
You can also click on "Capture Screen" or "Capture File" button to add the block to stream the screen or file.
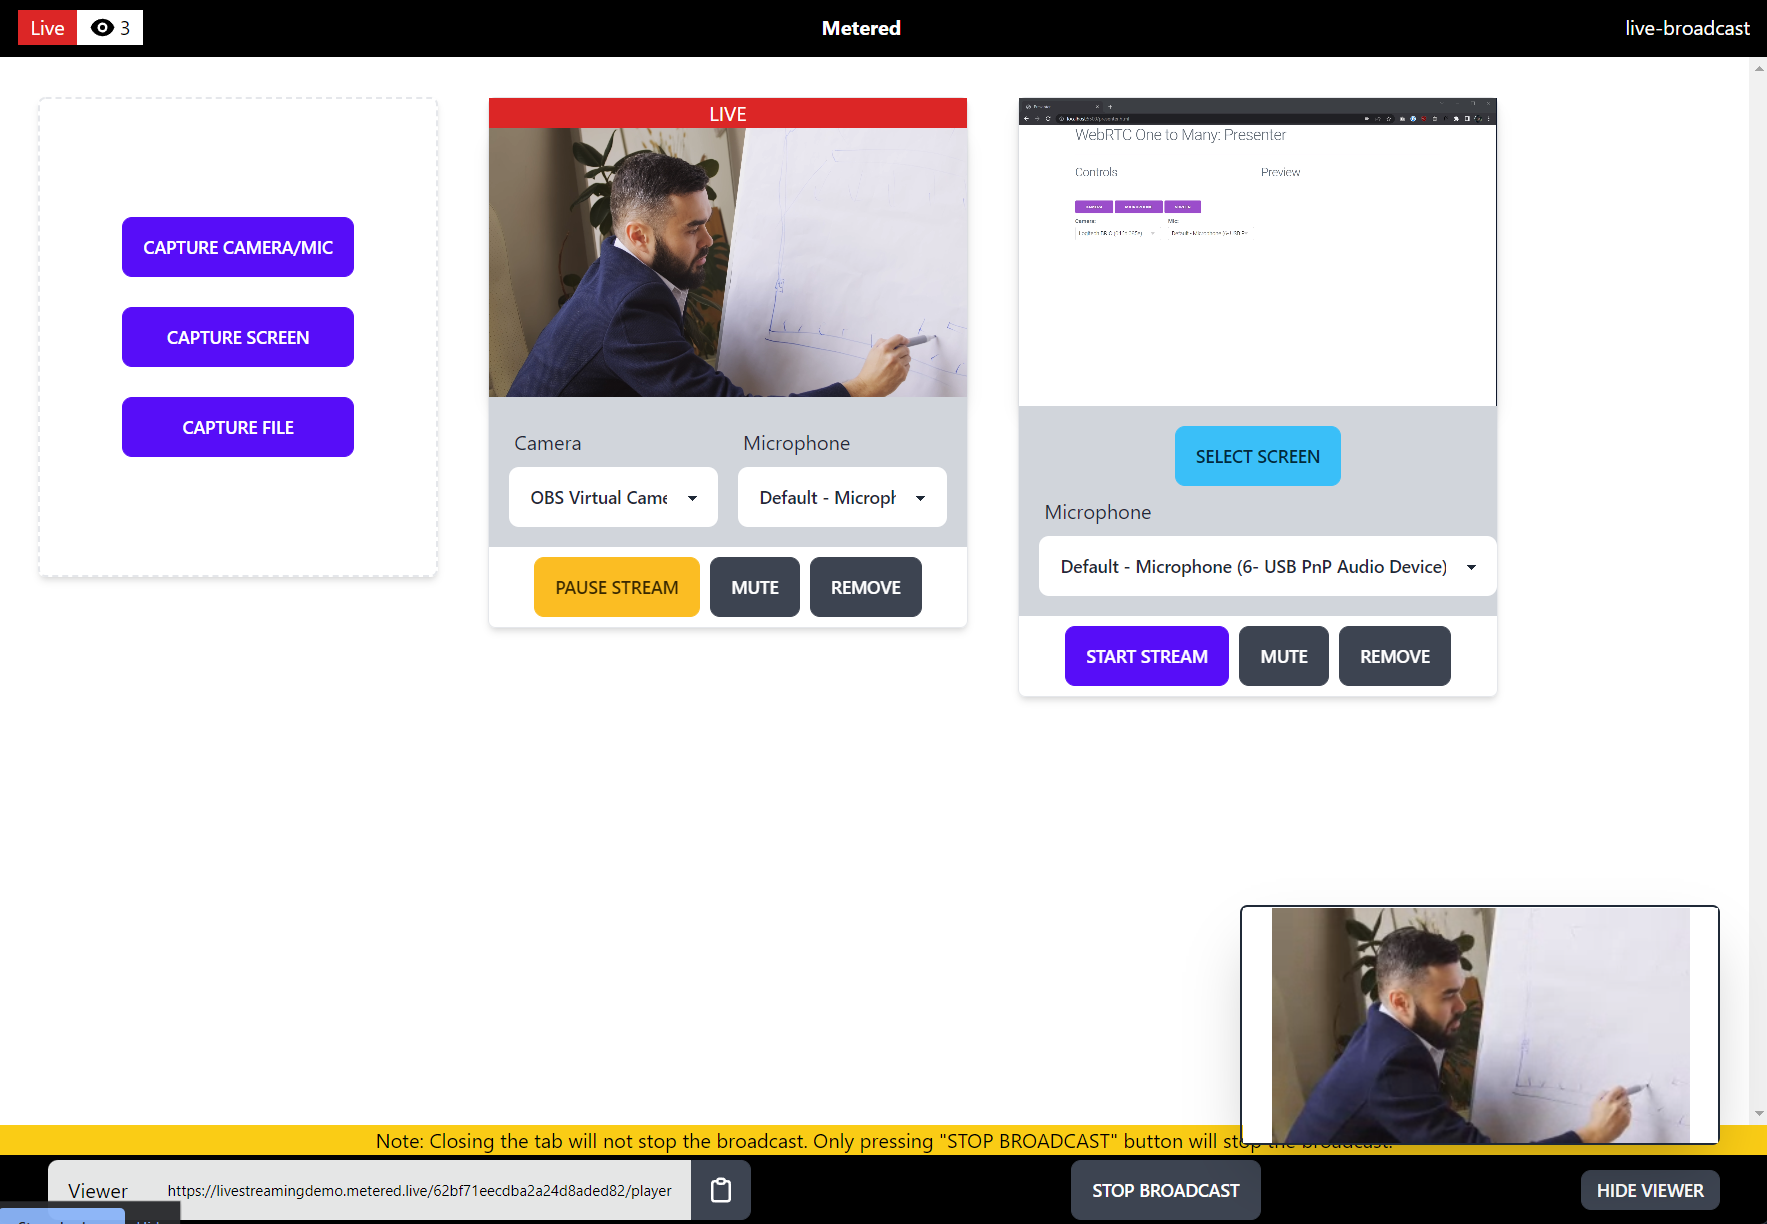
Pressing the "Start Stream" button would allow you switch instantly between the Camera and the Screen.
Once you are done, pressing the "Stop Broadcast" button would terminate the broadcast.
Step 4: Embedding the Live Stream Player
If we go back to the live stream detail page, there you will see the embed code for the live streaming room.
You can paste the embed code into you website to add the live stream player to your site.
You can customize the width and height of the embed by setting the width and height property.
<iframe src="https://livestreamingdemo.metered.live/62bf71eecdba2a24d8aded82/player" width="100%" height="600px"></iframe>Step 5: Done
It is just simple 4 step process, using the pre-built Broadcasting interface to live stream to thousands of viewers in Real Time in ultra-low latency.
Github
The code for the project is also available on Github, you can find the repo here: https://github.com/metered-ca/webrtc-live-streaming-demo
Conclusion
In this post we have gone through the process of developing our custom WebRTC live streaming solution, as well as using pre-built live streaming solution to broadcast the live stream in ultra low latency.