We will build a WebRTC Screen Sharing application in Javascript, that will allow you to share your desktop or window without requiring extension.
We will first learn how to use the getDisplayMedia method to capture the entire desktop or an application, and display it locally in a video tag.
In the WebRTC Screen Sharing Example we will build a complete screen sharing application. The application will allow the user to share the screen with multiple remote participants.
Overview
Through WebRTC we can build web application that allow plugin-free screen sharing, with just Javascript.
The WebRTC getDisplayMedia API allows us get a the video stream of user's desktop.
The getDisplayMedia method is supported by Chrome, Edge, Firefox and Safari in Window, MacOS and Linux.
The getDisplayMedia method allows the user to capture the entire screen, if multiple monitors are connected, then user can select which monitor to share.
It also allows the user to share only an application window or a browser tab.
WebRTC screen sharing with desktop audio is also supported but on Chrome and Firefox only on Windows Operating System. Sharing desktop audio is not supported in Linux and MacOS.
Capturing contents of the screen
Here is a sample method to capture the contents of the screen, calling this method will show a pop-up that would allow you to select the desktop, application or tab you would like to share.
async function captureScreen() {
    let mediaStream = null;
    try {
        mediaStream = await navigator.mediaDevices.getDisplayMedia({
            video: {
                cursor: "always"
            },
            audio: false
        });
    } catch (ex) {
        console.log("Error occurred", ex);
    }
}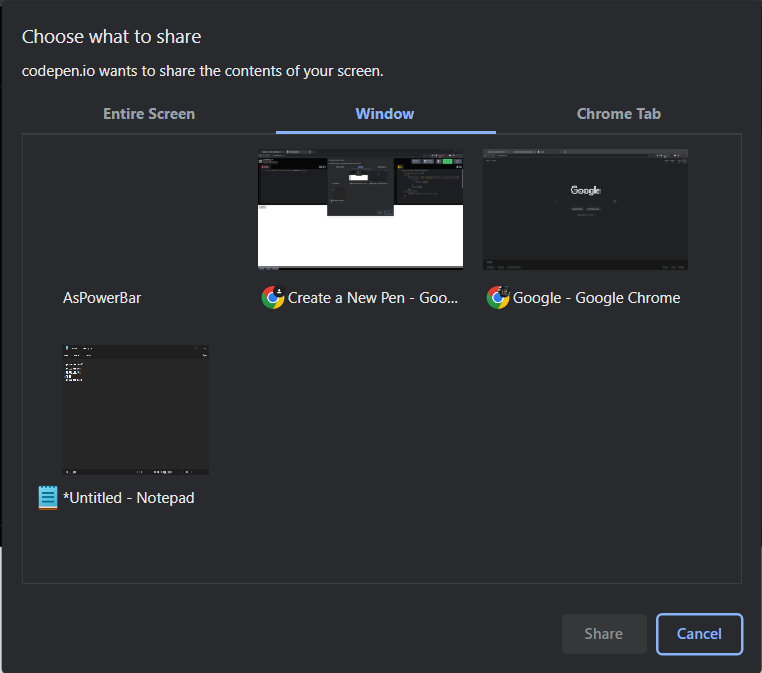
Calling the captureScreen() method will show a popup like the image above, with all options.
You can click on "Entire Screen" tab to select your entire screen. If you have multiple monitors then all the monitors will appear in the Entire Screen tab.
To share an application window, click on the "Window" tab, to share a chrome tab click on the "Chrome Tab" option.
Let's understand the code that we have written, if just focus on the method navigator.mediaDevices.getDisplayMedia
await navigator.mediaDevices.getDisplayMedia({
            video: {
                cursor: "always"
            },
            audio: false
});
Here we are passing audio false and for video we are setting cursor to "always",
By setting audio to false we will not be capturing the audio (in the later section we will discuss about capturing audio) and for video by setting cursor to "always" will show our mouse cursor in the media stream.
Displaying contents of the screen
Now we have captured the contents of the screen in the mediaStream variable, it contains the MediaStream.
We can play the MediaStream in an html video tag, we just need to set the MediaStream value of the srcObject attribute of the video tag.
<video id="local-video" muted autoplay></video>
<button onclick="captureScreen()">Capture</button>
<script>
    async function captureScreen() {
    let mediaStream = null;
    try {
        mediaStream = await navigator.mediaDevices.getDisplayMedia({
            video: {
                cursor: "always"
            },
            audio: false
        });

        document.getElementById("local-video").srcObject = mediaStream;
    } catch (ex) {
        console.log("Error occurred", ex);
    }
}
</script>
Check the above code snippet, here we have updated our caputreScreen() and added a button to call the captureScreen() method and also added a video tag to display the captured screen.
We have updated the captureScreen() method and assigning srcObject attribute of the local-video tag to the mediaStream.
WebRTC Screen Sharing with Audio
As we had discussed in the overview section of this article, sharing entire desktop audio is only supported under Windows Operating System.
But if you choose to share a tab or window then sharing audio from the tab is supported under all operating systems.
Instead of sharing the desktop audio, you can also share your microphone's audio, we will go through the steps for sharing microphone audio as well.
<video id="local-video" muted autoplay></video>
<button onclick="captureScreen()">Capture</button>
<script>
async function captureScreen() {
let mediaStream = null;
try {
mediaStream = await navigator.mediaDevices.getDisplayMedia({
video: {
cursor: "always"
},
audio: true
});
document.getElementById("local-video").srcObject = mediaStream;
} catch (ex) {
console.log("Error occurred", ex);
}
}
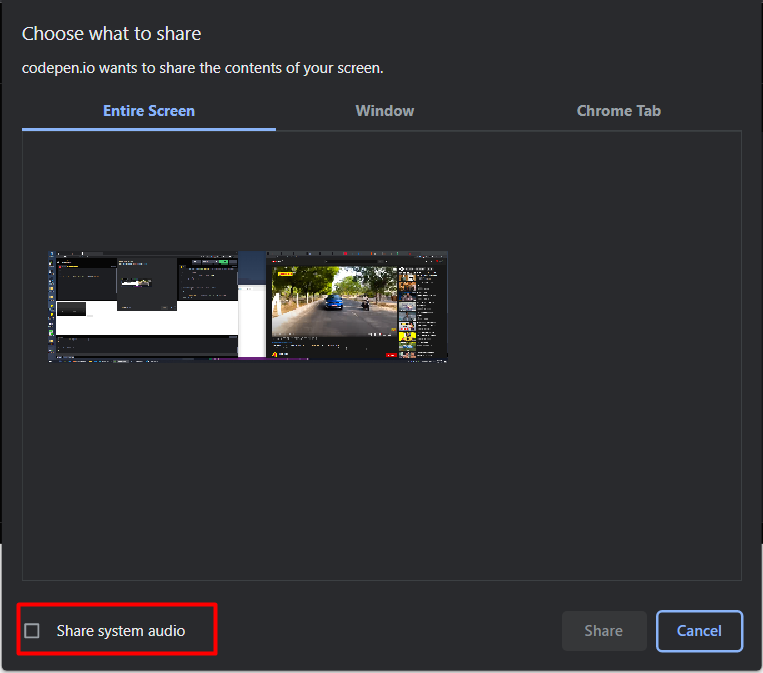
</script>We will modify our captureScreen() method and add audio: true, doing this will show a check box "Share system audio" in the screen selector window, you have check the checkbox to allow sharing of desktop audio.
Sharing microphone
Instead of sharing desktop audio, if you want to share the user's microphone, then we will grab the mediaStream for the users microphone separately using the getUserMedia() method.
<video id="local-video" muted autoplay></video>
<button onclick="captureScreen()">Capture</button>
<button onclick="captureAudio()">Capture Audio</button>

<script>
async function captureScreen() {
    let mediaStream = null;

    try {
        /**
         * We are setting audio: false here because we don't want desktop audio,
         * we want audio from user's microphone
         * */
        mediaStream = await navigator.mediaDevices.getDisplayMedia({
            video: {
                cursor: "always",
                displaySurface: "monitor",
                logicalSurface: false
            },
            audio: false
        });

        document.getElementById("local-video").srcObject = mediaStream;
    } catch (ex) {
        console.log("Error occurred", ex);
    }
}

async function captureAudio() {
    let audioStream = null;
    try {
        /**
        Getting audio from microphone
        **/
         audioStream = await navigator.mediaDevices.getUserMedia({
            audio: true,
            video: false
        });
    } catch (ex) {
        console.log("Error occurred", ex);
    }
}
</script>
We have created a new method called captureAudio() to get the audioStream. We call the getUserMedia() method with video: false and audio: true as we just want to capture the microphone.
In the next section, we will go through the process of building a complete screen sharing application, where user can share his/her screen with the remote participants.
We will use the Metered Video SDK to build this application.
WebRTC Screen Sharing Example
Let's build a WebRTC Screen Sharing application using the Metered Video SDK.
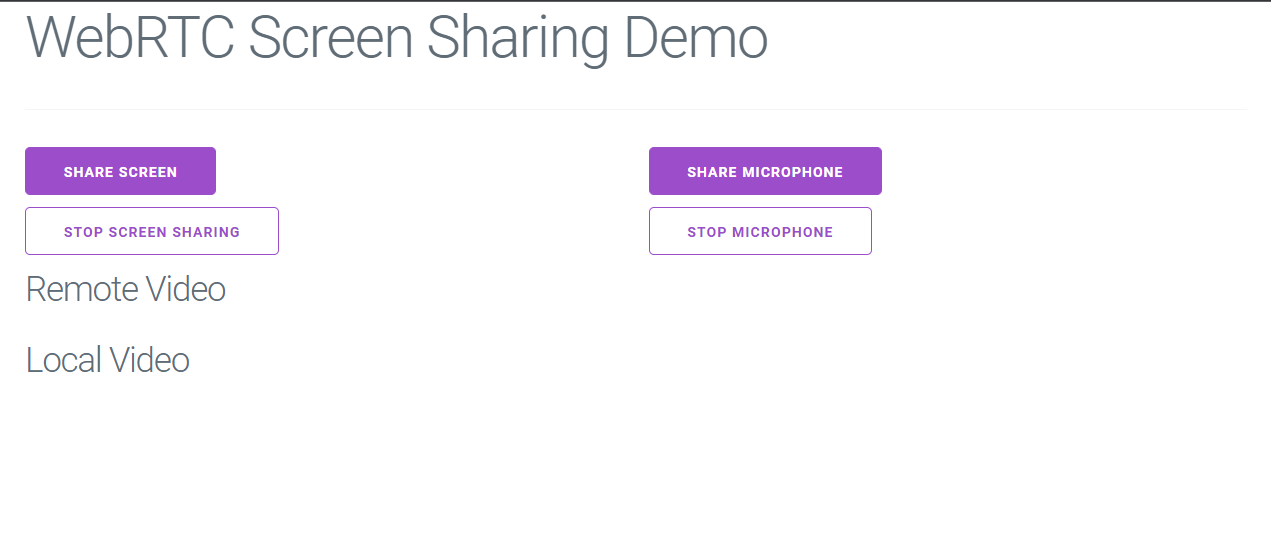
We will create a simple application, that would look like the image above.
Below the heading "Remote Video" we will show the screen of the remote participants, and under "Local Video" we will show the video stream the user is currently sharing.
The "Share Screen" button will share the user's screen, and the "Share Microphone" button will share the user's microphone.
Similarly the "Stop Screen Sharing" button will stop the screen sharing, and "Stop Microphone" button will mute the user's microphone.
Pre-requisite
We will use the Metered Screen Sharing API to build our screen sharing application. Metered makes it very easy to add to build screen sharing and video chat applications.
If you don't have an account, then signup for a free account at https://www.metered.ca and click "Signup and Start Building", once you have created the account then come back here for the rest of the tutorial.
Scaffolding the basic UI
Here is the basic UI of the application in HTML, we are using a basic css framework called milligram.css to style our UI
<!DOCTYPE html>
<html lang="en">
<head>
    <meta charset="UTF-8">
    <meta http-equiv="X-UA-Compatible" content="IE=edge">
    <meta name="viewport" content="width=device-width, initial-scale=1.0">
    <title>WebRTC - Screen Sharing Demo</title>
    <!-- Google Fonts -->
    <link rel="stylesheet" href="https://fonts.googleapis.com/css?family=Roboto:300,300italic,700,700italic">

    <!-- CSS Reset -->
    <link rel="stylesheet" href="https://cdnjs.cloudflare.com/ajax/libs/normalize/8.0.1/normalize.css">

    <!-- Milligram CSS -->
    <link rel="stylesheet" href="https://cdnjs.cloudflare.com/ajax/libs/milligram/1.4.1/milligram.css">

    <script type="text/javascript" src="https://cdn.metered.ca/sdk/video/1.4.5/sdk.min.js"></script>
</head>
<body>
   <div class="container">
        <h1>WebRTC Screen Sharing Demo</h1>
        <hr>
        <div class="row">
            <div class="column">
                <button id="share-screen">Share Screen</button>
            </div>
            <div class="column">
                <button id="share-microphone">Share Microphone</button>
            </div>
        </div>
        <div class="row">
            <div class="column">
                <button id="stop-screen-share" class="button-outline">Stop Screen Sharing</button>
            </div>
            <div class="column">
                <button id="stop-microphone" class="button-outline">Stop Microphone</button>
            </div>
        </div>
        <div class="row">
            <div class="column">
                <h3>Remote Video</h3>
                <div id="remote-video-container">

                </div>
            </div>
        </div>
        <div class="row">
            <div class="column">
                <h3>Local Video</h3>
                <video src="" muted autoplay id="local-video" style="max-width: 800px"></video>
            </div>
        </div>
    </div>

    <script>

    </script>
</body>
</html>In the remote-video-container we will add the remote video and audio stream, and our code will be contained in the script tags.
We have also imported the Metered Video SDK in the head tag
<script type="text/javascript" src="https://cdn.metered.ca/sdk/video/1.4.5/sdk.min.js"></script>Creating the room
We will use the following methods of the Metered Screen Share API in our application:
join()startScreenShare()startVideo()
The join() method requires roomURL, and the roomURL has to be same for all the participants who want to join the same meeting.
To get the roomURL we will create a new room, to create a room go to https://dashboard.metered.ca and click on the create room button on the dashboard.
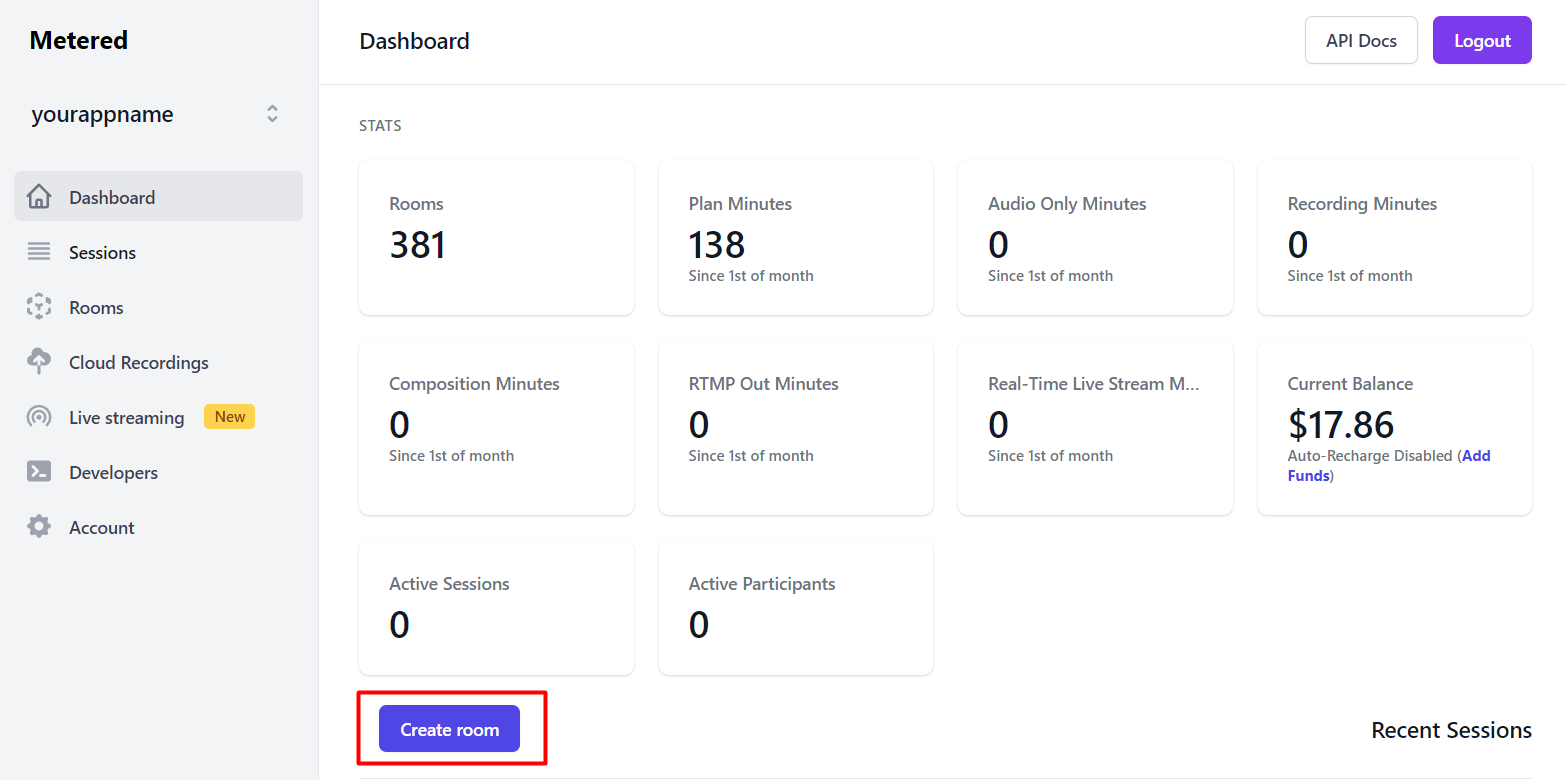
On the create room page, enter the "Room name" to anything you like, for this tutorial we will name the room screensharing-demo.
We will keep everything as-is and create the room, once the room is created our roomURL is <appname>.metered.live/<room_name>
Implementing join room
We first need to call the joinRoom() method, to join the user to the meeting room.
<script>
    	// Creating the meeting object
        const meeting = new Metered.Meeting();
        (async function() {
            // calling the join method
            await meeting.join({
                roomURL: "yourappname.metered.live/screensharing-demo"
            });
        })();
</script>
Now as soon as the user open's our application's webpage, the user will join the meeting.
Sharing the screen
To implement screen sharing, we will add an event handler to the "Share Screen" button and call the startScreenShare() method of the Metered SDK.
document.getElementById("share-screen").addEventListener("click", async () => {
    await meeting.startScreenShare();
});
Stopping the screen share
To stop the screen share we will call the stopVideo() method of the Metered SDK. We will add click event handler to the "Stop Screen Sharing" button.
document.getElementById("stop-screen-share").addEventListener("click", async () => {
	await meeting.stopVideo();
});
Display the local video
Now we want to display the local video, so that the users can preview what they are sharing with the other participants.
To show the preview we will listen to the localTrackStarted and localTrackUpdated events of the Metered Video SDK.
 meeting.on("localTrackStarted", async (trackItem) => {
    const mediaStream = new MediaStream();
    mediaStream.addTrack(trackItem.track);
    document.getElementById("local-video").srcObject = mediaStream;
});


meeting.on("localTrackUpdated", async (trackItem) => {
    const mediaStream = new MediaStream();
    mediaStream.addTrack(trackItem.track);
    document.getElementById("local-video").srcObject = mediaStream;
});
In the event handler we will create a MediaStream object, add the MediaStreamTrack to the MediaStream object with is the track property of the trackItem.
And we assign this value to the srcObject attribute of the local-video tag.
Sharing microphone
To share the microphone, we will call the startAudio() method. We will add the click event listener to the "Share Microphone" button, this will share the user's microphone with rest of the participants in the meeting.
document.getElementById("share-microphone").addEventListener("click", async () => {
    await meeting.startAudio();
});
Muting the microphone
Now, if the user decides they no longer want to share their microphone, then we can mute the microphone by calling stopAudio() method.
document.getElementById("stop-microphone").addEventListener("click", async () => {
    await meeting.stopAudio();
});
Show screen of remote participants
Now let's handle remote participants joining the meeting, and sharing their screen and microphone.
When the participants share their screen or microphone, remoteTrackStarted event is triggered, and when the participant leaves the meeting or stop sharing their screen or microphone remoteTrackStopped event is triggered.
We will listen to these two events. when remoteTrackStarted event is triggered we will add a video tag to the page to display the user's screen.
And, when remoteTrackStopped event is triggered then we will use it to clean up, and remove the video tag from the screen.

meeting.on("remoteTrackStarted", async (trackItem) => {
    var mediaStream = new MediaStream();
    mediaStream.addTrack(trackItem.track);
    var videoTag = document.createElement("video");
    videoTag.autoplay = true;
    videoTag.srcObject = mediaStream;
    videoTag.id = trackItem.streamId;
    videoTag.style.maxWidth = "1920px";
    if (trackItem.type === "video") {
        /**
         * If it is a video stream then set it to muted.
         * */
        videoTag.muted = true;
    } else {
        videoTag.controls = true;
    }
    document.getElementById("remote-video-container").appendChild(videoTag);
});

meeting.on("remoteTrackStopped", async (trackItem) => {
    document.getElementById(trackItem.streamId).remove();
});
As you can see in the above code snippet, we are listening to the remoteTrackStarted event, when the event is triggered we are creating a MediaStream object.
We are calling mediaStream.addTrack(trackItem.track) method and assign the MediaStreamTrack of the remote participant to the Media Stream.
Next, we are creating a html video tag, setting autoplay property to true and if the trackItem is a video then muting it, because there is no audio in the video track, the audio is present only in the audio track.
We can check if the track is a audio track or a video track by checking the type property of trackItem object.
One important thing we are doing here is assigning streamId as value of id attribute of the video tag, this makes it very easy to clean up as we can see in the event handler for remoteTrackStopped.
In the event handler for remoteTrackStopped we are fetching the element that has the id equals to the streamId of the track that was stopped, and removing it from the DOM.
Putting it all together
Putting everything all together, this is how our final index.html file looks like:
<!DOCTYPE html>
<html lang="en">
<head>
    <meta charset="UTF-8">
    <meta http-equiv="X-UA-Compatible" content="IE=edge">
    <meta name="viewport" content="width=device-width, initial-scale=1.0">
    <title>WebRTC - Screen Sharing Demo</title>
    <!-- Google Fonts -->
    <link rel="stylesheet" href="https://fonts.googleapis.com/css?family=Roboto:300,300italic,700,700italic">

    <!-- CSS Reset -->
    <link rel="stylesheet" href="https://cdnjs.cloudflare.com/ajax/libs/normalize/8.0.1/normalize.css">

    <!-- Milligram CSS -->
    <link rel="stylesheet" href="https://cdnjs.cloudflare.com/ajax/libs/milligram/1.4.1/milligram.css">

    <script type="text/javascript" src="https://cdn.metered.ca/sdk/video/1.4.5/sdk.min.js"></script>
</head>
<body>
    <div class="container">
        <h1>WebRTC Screen Sharing Demo</h1>
        <hr>
        <div class="row">
            <div class="column">
                <button id="share-screen">Share Screen</button>
            </div>
            <div class="column">
                <button id="share-microphone">Share Microphone</button>
            </div>
        </div>
        <div class="row">
            <div class="column">
                <button id="stop-screen-share" class="button-outline">Stop Screen Sharing</button>
            </div>
            <div class="column">
                <button id="stop-microphone" class="button-outline">Stop Microphone</button>
            </div>
        </div>
        <div class="row">
            <div class="column">
                <h3>Remote Video</h3>
                <div id="remote-video-container">

                </div>
            </div>
        </div>
        <div class="row">
            <div class="column">
                <h3>Local Video</h3>
                <video src="" muted autoplay id="local-video" style="max-width: 800px"></video>
            </div>
        </div>
    </div>

    <script>
        const meeting = new Metered.Meeting();
        (async function() {
            await meeting.join({
                roomURL: "yourappname.metered.live/screensharing-demo"
            });
        })();


        document.getElementById("share-screen").addEventListener("click", async () => {
            await meeting.startScreenShare();
        });

        document.getElementById("stop-screen-share").addEventListener("click", async () => {
            await meeting.stopVideo();
        });

        document.getElementById("share-microphone").addEventListener("click", async () => {
            await meeting.startAudio();
        });

        document.getElementById("stop-microphone").addEventListener("click", async () => {
            await meeting.stopAudio();
        });

        meeting.on("localTrackStarted", async (trackItem) => {
            if (trackItem.type === "video") {
                const mediaStream = new MediaStream();
                mediaStream.addTrack(trackItem.track);
                document.getElementById("local-video").srcObject = mediaStream;
            }
        });


        meeting.on("localTrackUpdated", async (trackItem) => {
            if (trackItem.type === "video") {
                const mediaStream = new MediaStream();
                mediaStream.addTrack(trackItem.track);
                document.getElementById("local-video").srcObject = mediaStream;
            }
        });

        meeting.on("remoteTrackStarted", async (trackItem) => {
            debugger
            var mediaStream = new MediaStream();
            mediaStream.addTrack(trackItem.track);
            var videoTag = document.createElement("video");
            videoTag.autoplay = true;
            videoTag.srcObject = mediaStream;
            videoTag.id = trackItem.streamId;
            videoTag.style.maxWidth = "1920px";
            if (trackItem.type === "video") {
                /**
                 * If it is a video stream then set it to muted.
                 * */
                videoTag.muted = true;
            } else {
                videoTag.controls = true;
            }
            document.getElementById("remote-video-container").appendChild(videoTag);
        });

        meeting.on("remoteTrackStopped", async (trackItem) => {
            document.getElementById(trackItem.streamId).remove();
        });

    </script>
</body>
</html>
With roughly ~60 lines of code we have built a screen sharing application where multiple users can simultaneously share their screen and microphone with each other.
Adding ability to Join any room
In the application that we have built above, we have hard-coded the roomURL. Let modify our application a little and add the ability so that users can join any room by entering the roomURL themself.
<div id="join-area" class="row">
    <div class="column">
        <label for="">Room URL</label>
        <input id="room-url" type="text" placeholder="<app-name>.metered.live/<room-name>" />
        <button id="join-room">Join Room</button>
    </div>
</div>
Adding click event listener to the join-room button
document.getElementById("join-room").addEventListener("click", async() => {
            var roomURL = document.getElementById("room-url").value;
            if (!roomURL) {
                alert("Please specify room url")
            }
            try {
                await meeting.join({
                    roomURL: roomURL
                });
                document.getElementById("join-area").style.display = "none";
                document.getElementById("main-area").style.display = "block";
            } catch (ex) {
                alert("Invalid room url");
            }

        });
In the event handler, we are calling the join() method and passing the roomURL entered in the text box.
If room joining is successful then we are hiding the join controls and showing the screen sharing controls.
Final Code
Here is our final index.html complete with the ability to join any room
<!DOCTYPE html>
<html lang="en">
<head>
    <meta charset="UTF-8">
    <meta http-equiv="X-UA-Compatible" content="IE=edge">
    <meta name="viewport" content="width=device-width, initial-scale=1.0">
    <title>WebRTC - Screen Sharing Demo</title>
    <!-- Google Fonts -->
    <link rel="stylesheet" href="https://fonts.googleapis.com/css?family=Roboto:300,300italic,700,700italic">

    <!-- CSS Reset -->
    <link rel="stylesheet" href="https://cdnjs.cloudflare.com/ajax/libs/normalize/8.0.1/normalize.css">

    <!-- Milligram CSS -->
    <link rel="stylesheet" href="https://cdnjs.cloudflare.com/ajax/libs/milligram/1.4.1/milligram.css">

    <script type="text/javascript" src="https://cdn.metered.ca/sdk/video/1.4.5/sdk.min.js"></script>
</head>
<body>
    <div class="container">
        <h1>WebRTC Screen Sharing Demo</h1>
        <hr>
        <div id="join-area" class="row">
            <div class="column">
                <label for="">Room URL</label>
                <input id="room-url" type="text" placeholder="<app-name>.metered.live/<room-name>" />
                <button id="join-room">Join Room</button>
            </div>
        </div>
        <hr>
        <div id="main-area" style="display: none;">
            <div class="row">
                <div class="column">
                    <button id="share-screen">Share Screen</button>
                </div>
                <div class="column">
                    <button id="share-microphone">Share Microphone</button>
                </div>
            </div>
            <div class="row">
                <div class="column">
                    <button id="stop-screen-share" class="button-outline">Stop Screen Sharing</button>
                </div>
                <div class="column">
                    <button id="stop-microphone" class="button-outline">Stop Microphone</button>
                </div>
            </div>
            <div class="row">
                <div class="column">
                    <h3>Remote Video</h3>
                    <div id="remote-video-container">

                    </div>
                </div>
            </div>
            <div class="row">
                <div class="column">
                    <h3>Local Video</h3>
                    <video src="" muted autoplay id="local-video" style="max-width: 800px"></video>
                </div>
            </div>
        </div>

    </div>

    <script>
        const meeting = new Metered.Meeting();


        document.getElementById("join-room").addEventListener("click", async() => {
            var roomURL = document.getElementById("room-url").value;
            if (!roomURL) {
                alert("Please specify room url")
            }
            try {
                await meeting.join({
                    roomURL: roomURL
                });
                document.getElementById("join-area").style.display = "none";
                document.getElementById("main-area").style.display = "block";
            } catch (ex) {
                alert("Invalid room url");
            }

        });

        document.getElementById("share-screen").addEventListener("click", async () => {
            await meeting.startScreenShare();
        });

        document.getElementById("stop-screen-share").addEventListener("click", async () => {
            await meeting.stopVideo();
        });

        document.getElementById("share-microphone").addEventListener("click", async () => {
            await meeting.startAudio();
        });

        document.getElementById("stop-microphone").addEventListener("click", async () => {
            await meeting.stopAudio();
        });

        meeting.on("localTrackStarted", async (trackItem) => {
            if (trackItem.type === "video") {
                const mediaStream = new MediaStream();
                mediaStream.addTrack(trackItem.track);
                document.getElementById("local-video").srcObject = mediaStream;
            }
        });


        meeting.on("localTrackUpdated", async (trackItem) => {
            if (trackItem.type === "video") {
                const mediaStream = new MediaStream();
                mediaStream.addTrack(trackItem.track);
                document.getElementById("local-video").srcObject = mediaStream;
            }
        });

        meeting.on("remoteTrackStarted", async (trackItem) => {
            debugger
            var mediaStream = new MediaStream();
            mediaStream.addTrack(trackItem.track);
            var videoTag = document.createElement("video");
            videoTag.autoplay = true;
            videoTag.srcObject = mediaStream;
            videoTag.id = trackItem.streamId;
            videoTag.style.maxWidth = "1920px";
            if (trackItem.type === "video") {
                /**
                 * If it is a video stream then set it to muted.
                 * */
                videoTag.muted = true;
            } else {
                videoTag.controls = true;
            }
            document.getElementById("remote-video-container").appendChild(videoTag);
        });

        meeting.on("remoteTrackStopped", async (trackItem) => {
            document.getElementById(trackItem.streamId).remove();
        });

    </script>
</body>
</html>
Demo
You can test out the webrtc screen sharing demo here: https://www.metered.ca/static-content/webrtc-screensharing-demo/
Github
You can find the Github repo for the project here: https://github.com/metered-ca/webrtc-screen-sharing
Metered Global TURN servers
- Global Geo-Location targeting: Automatically directs traffic to the nearest servers, for lowest possible latency and highest quality performance.
- Servers in 12 Regions of the world: Toronto, Miami, San Francisco, Amsterdam, London, Frankfurt, Bangalore, Singapore,Sydney
- Low Latency: less than 50 ms latency, anywhere across the world.
- Cost-Effective: pay-as-you-go pricing with bandwidth and volume discounts available.
- Easy Administration: Get usage logs, emails when accounts reach threshold limits, billing records and email and phone support.
- Standards Compliant: Conforms to RFCs 5389, 5769, 5780, 5766, 6062, 6156, 5245, 5768, 6336, 6544, 5928 over UDP, TCP, TLS, and DTLS.
- Multi‑Tenancy: Create multiple credentials and separate the usage by customer, or different apps. Get Usage logs, billing records and threshold alerts.
- Reliability: 99.999% Uptime with SLA.
- Enterprise Scale: : With no limit on concurrent traffic or total traffic. Metered TURN Servers provide Enterprise Scalability
- 50 GB/mo Free: Get 50 GB every month free TURN server usage with the Free Plan
You can create an account on Metered website and get 50GB of Free TURN usage every month