Advanced SDK Guide
This page will help you get started with Metered. You'll be able to create your own video and voice calling applications.
Welcome to Metered, in this guide, we will walk you through the key methods and concepts for the Metered Javascript SDK so you can be quickly up and running building your amazing voice and video calling applications with Metered.
Key Concepts
Room: Represents a place where an audio/video meeting takes place. Each room has a unique URL and can have different settings like public or private etc.
Session: A meeting that happened in the room is the session. The session would contain the duration, the number of participants, etc. Each Room would have multiple sessions. and there would be only one session active at a time for each room.
Participant Session: When the user joins a meeting, a participant session is created for the user. The participant session would contain the participant's joinTime, leftTime, browser, os etc.
Prerequisite
To start using the Metered SDK you need to have a Metered account, if you don't have it then you can easily create a free account by visiting https://dashboard.metered.ca/signup
After you have created an account, come back here for the next steps.
1. Import the Metered Javascript SDK
<script src="//cdn.metered.ca/sdk/video/1.4.6/sdk.min.js"></script>
2. Create a Room
To have a group video meeting you would need a room.
You can create a room through the Metered Dashboard or through the REST API. Here we will show you examples for both methods:
a. Create room through the dashboard
You can create a room by going to https://dashboard.metered.ca, select the app you have created and press the "Create Room" button.
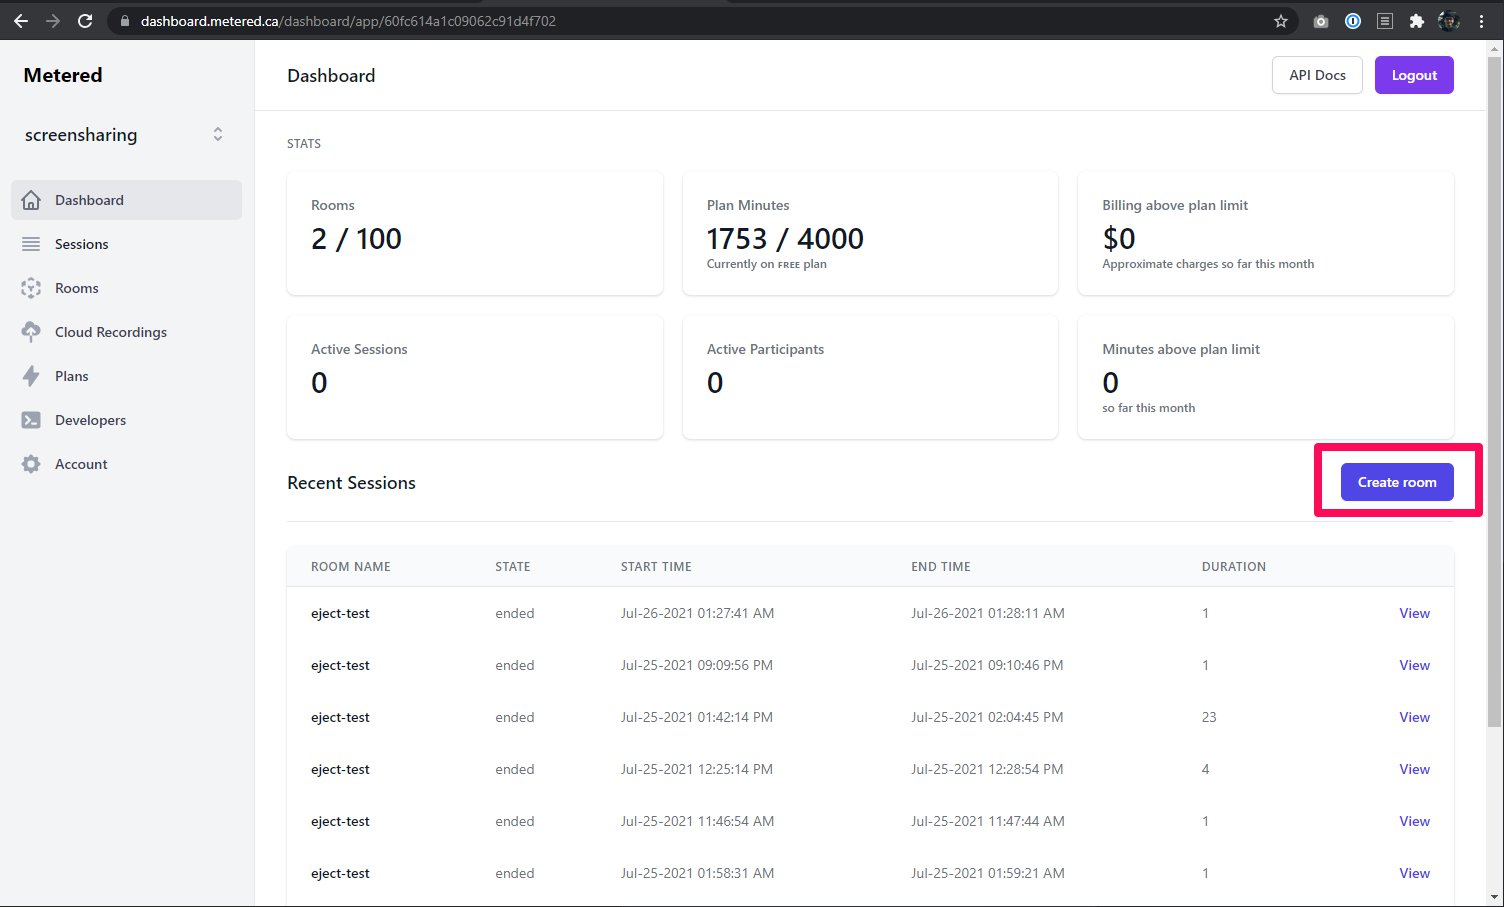 In the Metered dashboard, showing the location of Create Room button.
On the create room page, enter the "Room name" as meetup, you can enter anything you like here, but the room name has to be unique in your project.
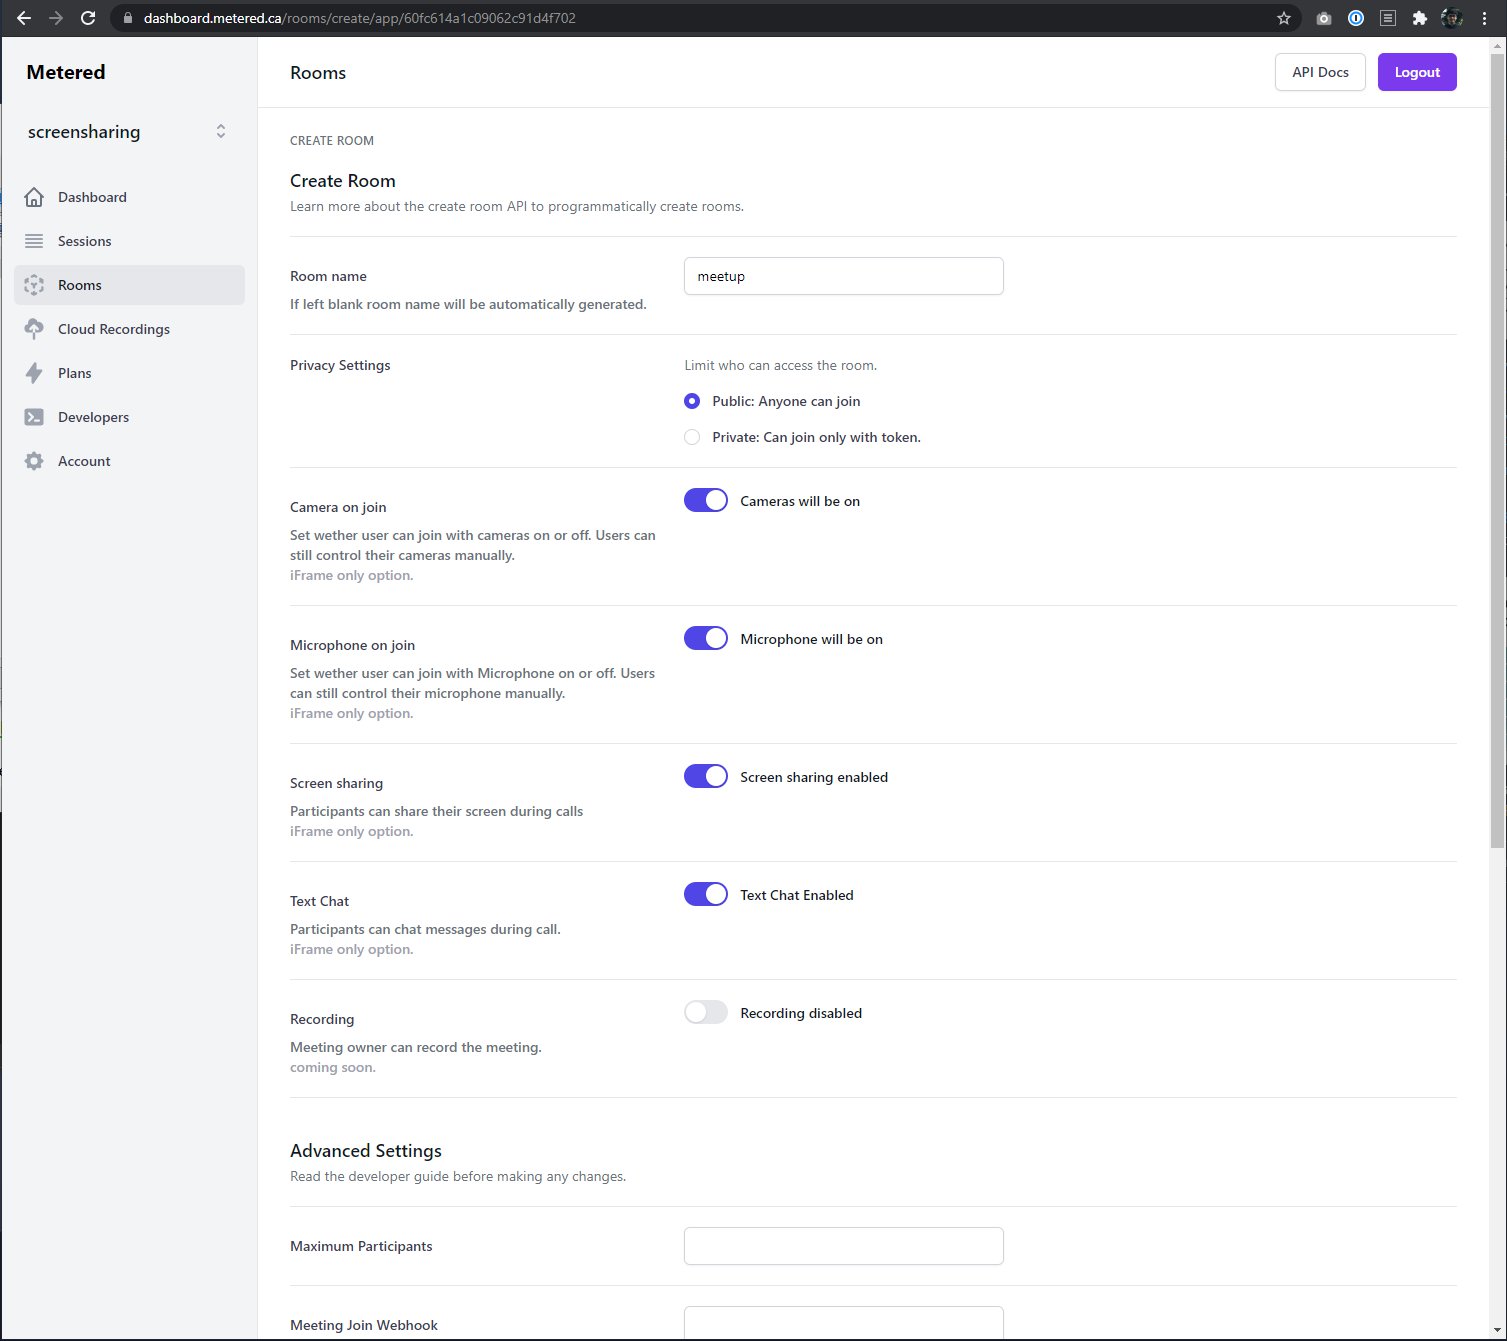 Create Room page on Metered Dashboard
You can also keep the room name blank and it will be automatically generated for you. This is especially useful when you are programmatically creating room through the API.
The create room page has a lot of options that you can set, most of them are self-explanatory, you can check out the documentation here for a detailed description of those options.
b. Create room through the REST API
To create a room through the REST API you would need to get the secret key.
You can grab your secret key from the dashboard, go to https://dashboard.metered.ca and then select your app and go to Developers page.
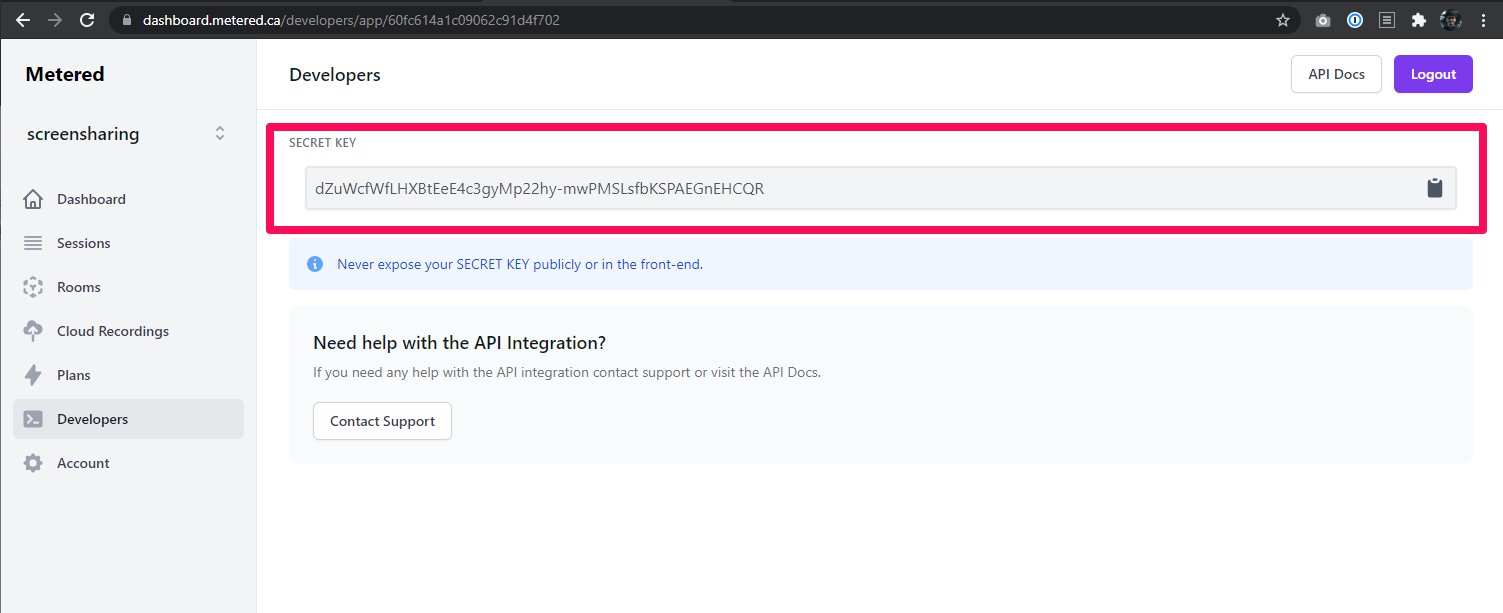 Metered dashboard showing secret key
Never expose your secret key to your public front-end interface or add it to your front-end code. Secret Key should always be used from the backend and never exposed publicly.
After you have the secret key, we can call the Metered REST API to create a room.
curl -X POST https://yourappname.metered.live/api/v1/room?secretKey=yoursecretkey \
    -H "Content-Type: application/json" \
    -d '{ "roomName": "meetup" }'
Replace yourappname with the name of your app that you have created in metered during signup,
Replace yoursecretkey with secret key that we have obtained from the previous step.
3. Join the Room
To join the room we will have to create a meeting object and then call the join method of the Metered SDK.
const meeting = new Metered.Meeting();
const meetingInfo = await meeting.join({
  roomURL: "yourappname.metered.live/meetup",
  name: "John Doe"
});
In the roomUrl replace yourappname with the name of your app and meetup is the name of the room that we have created in the previous step. The roomUrl is basically yourappname.metered.live/your-room-name
During the creation of our meeting room, we have not specified it as private hence anyone can join this room. If we have made the room private then we would need an auth token to join the room. You can read more about it here.
4. Sharing mic, camera and screen
Sharing the participant's camera, microphone, and the screen is very easy. Simply call the appropriate methods.
i. Sharing microphone
To allow other users to listen to what the user is saying we need to share the participant's microphone. When sharing the microphone the browser would request the participant to allow the microphone access.
You can add logic in your application so that when the user presses the unmute button or microphone button in your app, you would call the method below.
try {
  meeting.startAudio();
} catch (ex) {
  console.log("Error occurred whern sharing microphone", ex);
}
If the user does not have a microphone or the user has not approved the microphone permission then an exception would occur with the error message, which can be handled in the catch block.
ii. Sharing camera
To perform a video call, you would need to share the participant's camera. When sharing the camera the browser would request the participant to allow the camera access.
You can add a button in your application, that when pressed user's camera will be shared, and in onclick event of the button, you can call this method.
try {
  meeting.startVideo();
} catch (ex) {
  console.log("Error occurred when sharing camera", ex);
}
If the user does not have a camera or the user has not approved the camera permission then an exception would occur with the error message.
When the other/remote participants share their microphone, camera, or screen remoteTrackStarteds event is emitted, and in that event, the remote participant's video feed is sent. Continue reading and we will explain below how we will handle that.
ii. Sharing screen
You can also allow participants to easily share their screen. When the shareScreen method is called the user will be shown a popup to select which screen they would like to share.
The user could choose to share the entire screen, if they have multiple monitors they can select which monitor they would like to share or they can even select individual windows or tabs to share.
try {
    await meeting.startScreenShare();
} catch (ex) {
    console.log("Error occurred when sharing screen", ex);
}
iii. Showing participants their own video
When user share's their camera or screen, most video calling application shows the users their own camera or screen. You can also do this easily in your own application.
When user share their video, screen or microphone localTrackStarted event is emitted on the meeting object, with MediaStreamTrack.
You can then add theMediaStreamTrack into any video element on the page and show it to the user.
meeting.on("localTrackStarted", function(item) {
    if (item.type === "video") {
        /**
         * localTrackStarted event emits a MediaStreamTrack
         * but we cannot assign MediaStreamTrack into the html video tag
         * hence we are creating MediaStream object, a MediaStream
         * can be assigned to the html video tag.
         */
        var track = item.track;
        var mediaStream = new MediaStream([track]);
        /**
         * We have a video tag on the page with id
         * localvideo
         * e.g: <video id="localvideo" autoplay muted></video>
         * This video tag will show the user their own video
         */
        document.getElementById("localvideo").srcObject = mediaStream;
        document.getElementById("localvideo").play();
    }
});
5. Handling remote participants
Handling remote participants joining the meeting is quite simple. Events are emitted when other participant joins the meeting, leaves the meeting, and shares their camera, mic, or screen, we will go through all of them here.
i. Participant Joined Event
When a participant joins the room, the participantJoined event is emitted, this event can be used to indicate to other participants that a user has joined.
/**
 * participantInfo = {
 *       isAdmin: false
 *       meetingSessionId: "60fef02300f4a23904ab4861"
 *       name: "John Doe"
 *       roomId: "60fc7bcb1dc8562d6e4ab7b3"
 *       _id: "60fef02300f4a23904ab4862"
*  }
 */
meeting.on("participantJoined", function(participantInfo) {
  console.log("participant has joined the room", participantInfo);
});
ii. Showing other/remote participants audio/camera/screen
When a participant shares their microphone, camera, or screen a remoteTrackStarted event is emitted to all the other participants.
We can listen to this event to add a video tag to the page to view the participant's camera or screen, or to listen to the participant.
The remoteTrackStarted event is similar to localTrackStarted event as it contains the MediaStreamTrack along with the info about the participant.
/**
 * remoteTrackItem = {
 *   streamId: "eaa6104b-390a-4b0a-b8d1-66f7d19f8c1a",
 *   type: "video"
 *   participantSessionId: "60fef02300f4a23904ab4862"
 *   track: MediaStreamTrack,
 *   name: "Jane Smith"
 * }
 */
meeting.on("remoteTrackStarted", function(remoteTrackItem) {
    console.log("remoteTrackStarted", remoteTrackItem);
    // Converting MediaStreamTrack to MediaStream
    var track = remoteTrackItem.track;
    var stream = new MediaStream([track]);

    // Creating a videoTag to show the remote stream
    const videoTag = document.createElement("video");
    videoTag.autoplay = true;
    videoTag.srcObject = stream;
    videoTag.playsinline = true;
    // We are setting the id of the videoTag to the streamId
    // So that when this track is stopped we can remove the
    // videoTag from the page.
    videoTag.id = remoteTrackItem.streamId;
        // Setting the class name to participantSessionId so that when this participant
    // leaves we can easily remove all the video tags associated with this
    // participant.
    videoTag.class = remoteTrackItem.participantSessionId;

    // Adding the video tag to container where we will display
    // All the remote streams
    $("#remoteVideoContainer").append(videoTag);
});
iii. Removing elements when the other/remote participant stops sharing
When the remote participant stops sharing their camera or screen we would need to remove the video tag from the page, otherwise, it will show a frozen video on the app.
To remove the element just listen to remoteTrackStopped event.
/**
 * remoteTrackItem = {
 *   streamId: "eaa6104b-390a-4b0a-b8d1-66f7d19f8c1a",
 *   type: "video"
 *   participantSessionId: "60fef02300f4a23904ab4862"
 *   streamId: "eaa6104b-390a-4b0a-b8d1-66f7d19f8c1a"
 *   track: MediaStreamTrack,
 *   name: "Jane Smith"
 * }
 */
meeting.on("remoteTrackStopped", function(remoteTrackItem) {
    console.log("remoteTrackStopped", remoteTrackItem);
    document.getElementById(remoteTrackItem.streamId).remove();
});
iv. Participant Left Event
When the participant leaves the meeting the participantLeft event is emitted to all the participants in the meeting.
In this event, we can show the message to all the participants that the user has left.
Here we will also remove all the video tags associated with the participant.
/**
 * participantInfo = {
 *       isAdmin: false
 *       meetingSessionId: "60fef02300f4a23904ab4861"
 *       name: "John Doe"
 *       roomId: "60fc7bcb1dc8562d6e4ab7b3"
 *       _id: "60fef02300f4a23904ab4862"
 *  }
 */
meeting.on("participantLeft", function(participantInfo) {
  console.log("participant has left the room", participantInfo);

  // Just interating over all the video tags associate with the participant
  // and remove them
  Array.from(document.getElementsByClassName(participantInfo._id)).forEach(
    function(element) {
        element.remove();
    });
});
6. Leave Meeting
To leave or end the meeting we will call the leaveMeeting() method
meeting.leaveMeeting();
Calling this method would exit the participant from the meeting and would also stop the billing for the participant.
Closing the browser tab also makes the participant leave the meeting and stops the billing.
Conclusion
In the above document, we have described the basic methods that you can use to quickly create a group video calling application.
There are much more options, methods, and events available that you can further explore.
- Explore all the methods and events available in the Javascript SDK
- Explore Metered REST API
- Read about private meeting rooms and authenticating using Auth Tokens
If you have any other questions feel free to reach out to us via Chat, Email or Phone support.