Basic Guide
This is a basic guide to get you up and running quickly. For a more detailed overview of Metered Video please refer to Advanced SDK Guide.
In this guide we will:
- create a meeting
- show participants local video
- show remote participant's video
This is just going to be a quick tutorial to get you started on building using Metered Video, and will just share the camera.
Prerequisite
To start using Metered SDK you need to have Metered account. To create a free account go to https://dashboard.metered.ca/signup
1. Import the Metered JavaScript SDK
<script src="//cdn.metered.ca/sdk/video/1.4.6/sdk.min.js"></script>
2. Creating a Room
To have a group video call you need a room.
You can create a room through the Metered Dashboard or through REST API.
Here we will be creating a room through the dashboard, to learn more about how to create a room through api visit the Advanced SDK Guide.
a. Create room through the dashboard
You can create a room by going to https://dashboard.metered.ca, select the app you have created and press the "Create Room" button.
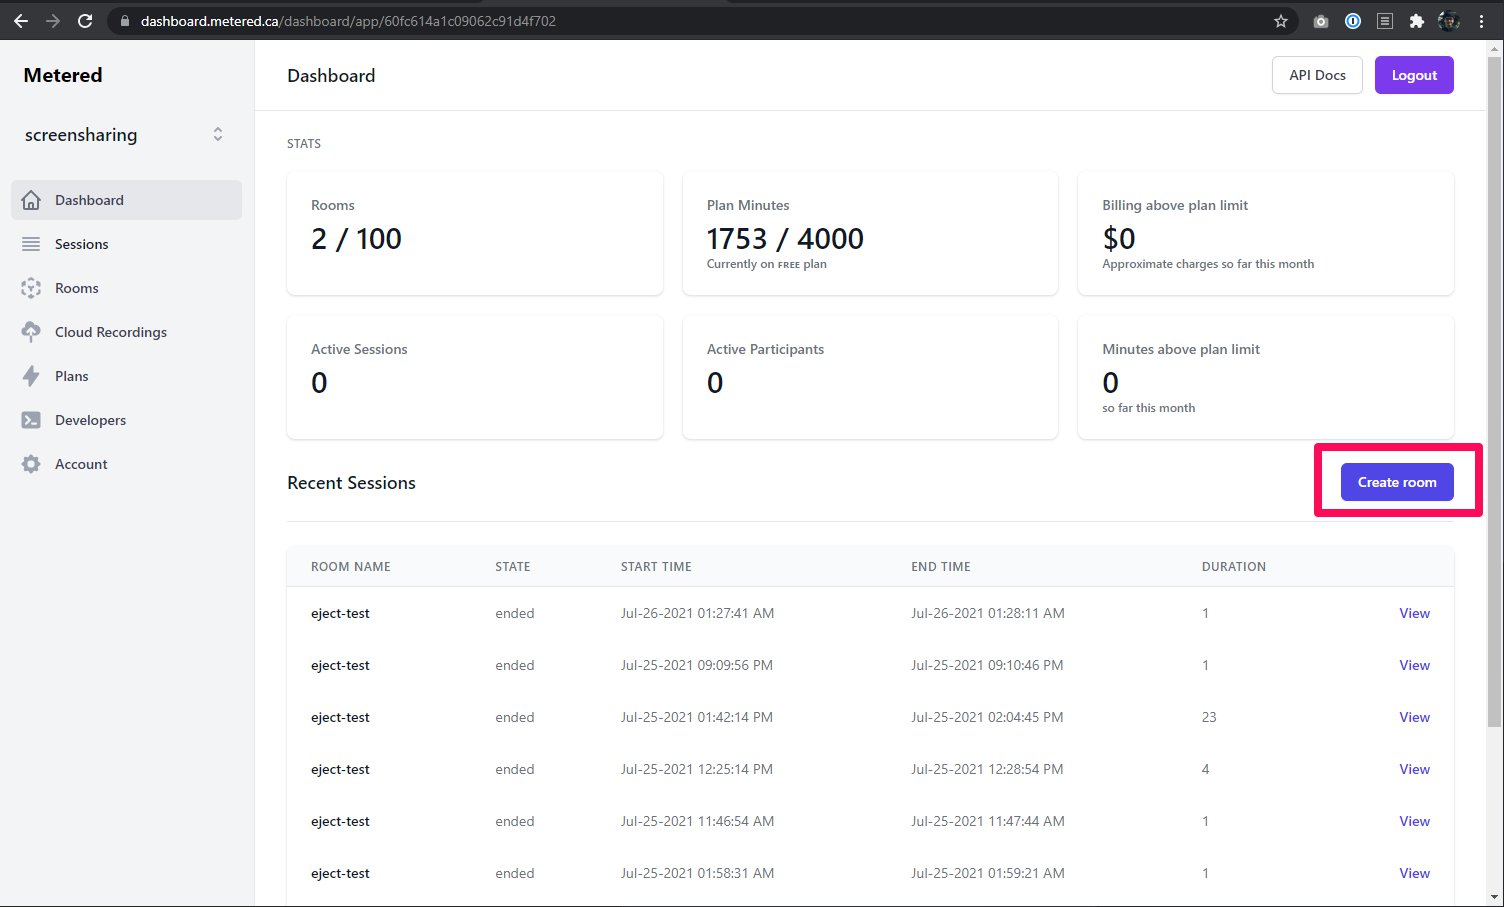 In the Metered dashboard, showing the location of Create Room button.
On the create room page, enter the "Room name" as meetup, you can enter anything you like here, but the room name has to be unique in your project.
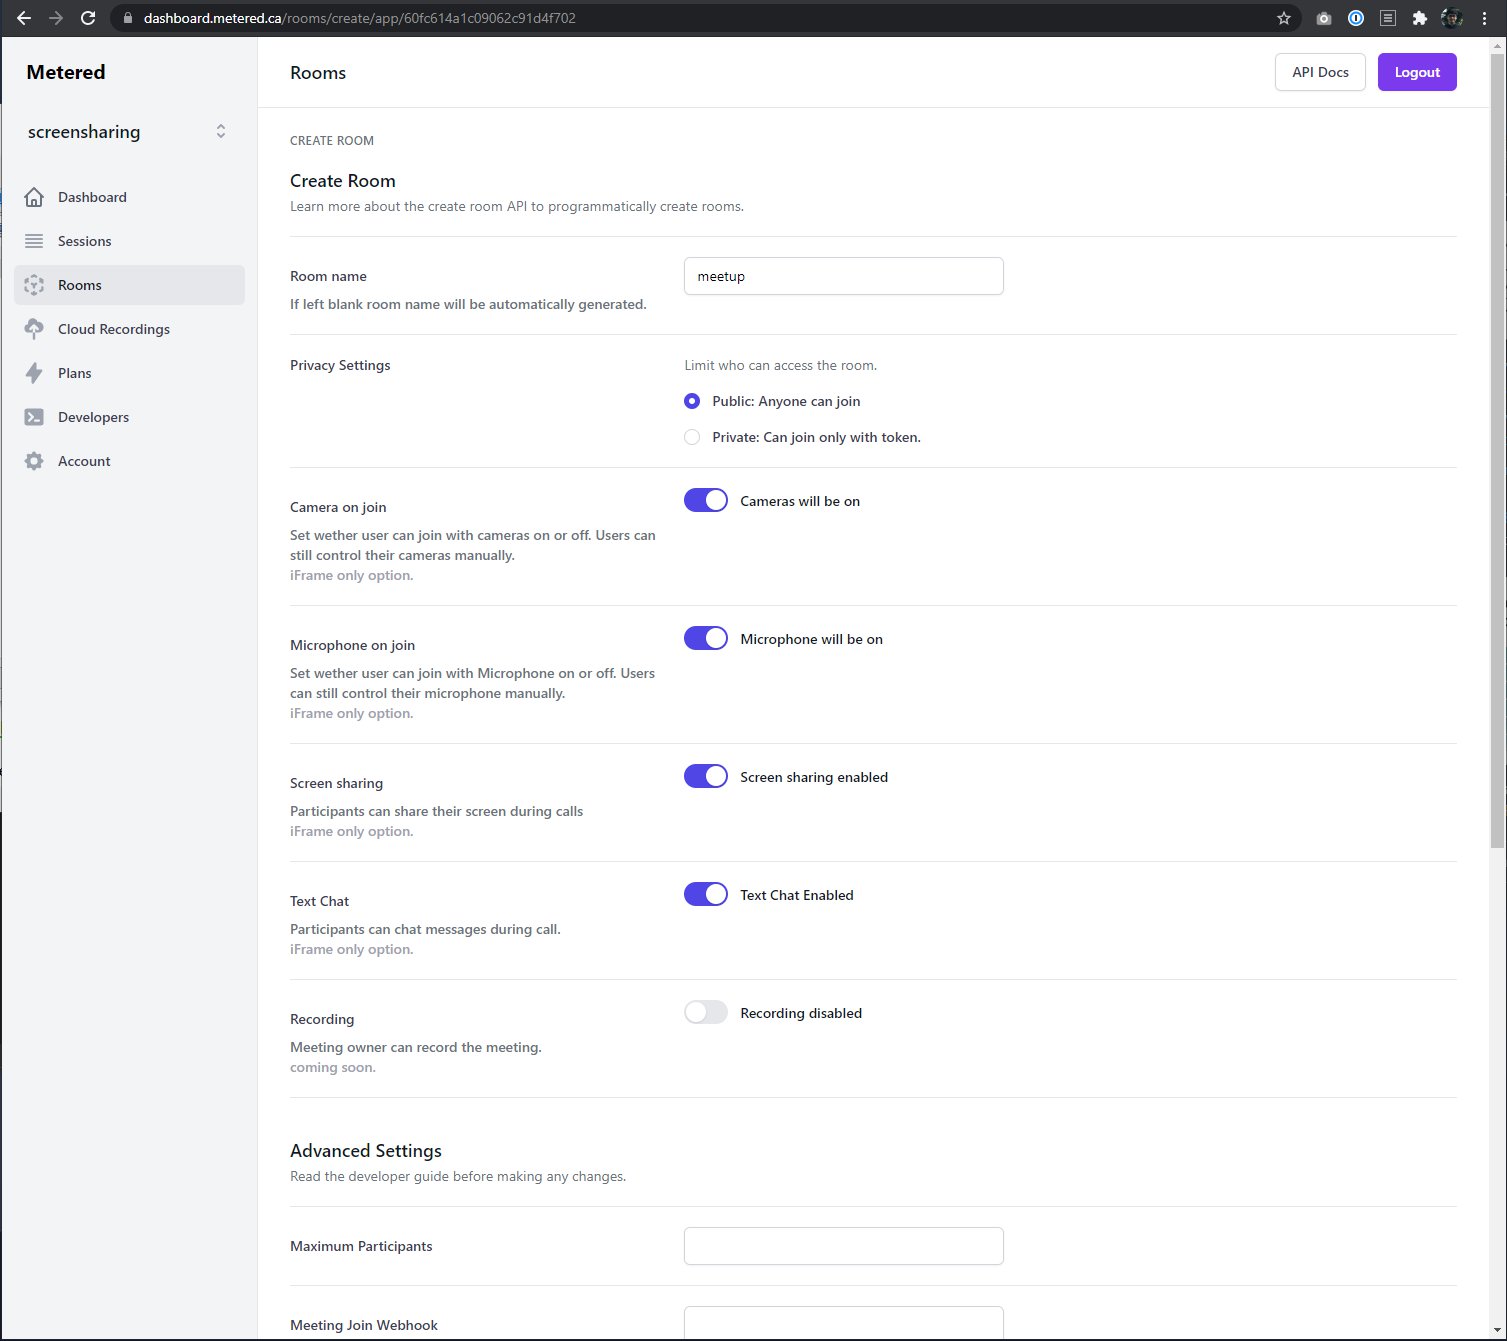 Create Room page on Metered Dashboard
You can also keep the room name blank and it will be automatically generated for you. This is especially useful when you are programmatically creating room through the API.
The create room page has a lot of options that you can set, most of them are self-explanatory, you can check out the documentation here for a detailed description of those options.
3. Join the Room
To join the room we will have to create a meeting object and then call the join method of the Metered SDK.
    const meeting = new Metered.Meeting();
    const meetingInfo = await meeting.join({
    roomURL: "yourappname.metered.live/meetup",
    name: "John Doe"
    });
In the roomUrl replace yourappname with the name of your app and meetup is the name of the room that we have created in the previous step. The roomUrl is basically yourappname.metered.live/your-room-name
ii. Sharing camera
To perform a video call, you would need to share the participant's camera. When sharing the camera the browser would request the participant to allow the camera access.
You can add a button in your application, that when pressed user's camera will be shared, and in onclick event of the button, you can call this method.
try {
  meeting.startVideo();
} catch (ex) {
  console.log("Error occurred when sharing camera", ex);
}
If the user does not have a camera or the user has not approved the camera permission then an exception would occur with the error message.
When the other/remote participants share their microphone, camera, or screen remoteTrackStarteds event is emitted, and in that event, the remote participant's video feed is sent. Continue reading and we will explain below how we will handle that.
iii. Showing participants their own video
When user share's their camera or screen, most video calling application shows the users their own camera or screen. You can also do this easily in your own application.
When user share their video, screen or microphone localTrackStarted event is emitted on the meeting object, with MediaStreamTrack.
You can then add theMediaStreamTrack into any video element on the page and show it to the user.
meeting.on("localTrackStarted", function(item) {
    if (item.type === "video") {
        /**
         * localTrackStarted event emits a MediaStreamTrack
         * but we cannot assign MediaStreamTrack into the html video tag
         * hence we are creating MediaStream object, a MediaStream
         * can be assigned to the html video tag.
         */
        var track = item.track;
        var mediaStream = new MediaStream([track]);
        /**
         * We have a video tag on the page with id
         * localvideo
         * e.g: <video id="localvideo" autoplay muted></video>
         * This video tag will show the user their own video
         */
        document.getElementById("localvideo").srcObject = mediaStream;
        document.getElementById("localvideo").play();
    }
});
5. Handling remote participants
Handling remote participants joining the meeting is quite simple. Events are emitted when other participant joins the meeting, leaves the meeting, and shares their camera, mic, or screen, we will go through all of them here.
i. Participant Joined Event
When a participant joins the room, the participantJoined event is emitted, this event can be used to indicate to other participants that a user has joined.
/**
 * participantInfo = {
 *       isAdmin: false
 *       meetingSessionId: "60fef02300f4a23904ab4861"
 *       name: "John Doe"
 *       roomId: "60fc7bcb1dc8562d6e4ab7b3"
 *       _id: "60fef02300f4a23904ab4862"
*  }
 */
meeting.on("participantJoined", function(participantInfo) {
  console.log("participant has joined the room", participantInfo);
});
ii. Showing other/remote participants camera.
When a participant shares their microphone, camera, or screen a remoteTrackStarted event is emitted to all the other participants.
We can listen to this event to add a video tag to the page to view the participant's camera or screen, or to listen to the participant.
The remoteTrackStarted event is similar to localTrackStarted event as it contains the MediaStreamTrack along with the info about the participant.
/**
 * remoteTrackItem = {
 *   streamId: "eaa6104b-390a-4b0a-b8d1-66f7d19f8c1a",
 *   type: "video"
 *   participantSessionId: "60fef02300f4a23904ab4862"
 *   track: MediaStreamTrack,
 *   name: "Jane Smith"
 * }
 */
meeting.on("remoteTrackStarted", function(remoteTrackItem) {
    console.log("remoteTrackStarted", remoteTrackItem);
    // Converting MediaStreamTrack to MediaStream
    var track = remoteTrackItem.track;
    var stream = new MediaStream([track]);

    // Creating a videoTag to show the remote stream
    const videoTag = document.createElement("video");
    videoTag.autoplay = true;
    videoTag.srcObject = stream;
    videoTag.playsinline = true;
    // We are setting the id of the videoTag to the streamId
    // So that when this track is stopped we can remove the
    // videoTag from the page.
    videoTag.id = remoteTrackItem.streamId;
        // Setting the class name to participantSessionId so that when this participant
    // leaves we can easily remove all the video tags associated with this
    // participant.
    videoTag.class = remoteTrackItem.participantSessionId;

    // Adding the video tag to container where we will display
    // All the remote streams
    $("#remoteVideoContainer").append(videoTag);
});
Demo
1. show participant's local video
2. show remote participant's video
Create a html page and name it
index.htmland create a<h1>and name the headingMetered Demo. Then create avideoelement and name give it anidoflocalVideoIn thisvideoelement we will show the participant's local video.create a
buttonelement and add aonclickthat calls thejoinMeeting()function. Then add another video element withidremoteVideo. In this video element we will be showing remote participants videoImport the metered sdk with a simple script tag.
<!DOCTYPE html>
<html>
    <head>

    </head>
    <body>
        <script src="https://cdn.metered.ca/sdk/video/1.4.6/sdk.min.js"></script>
        <h1>Hello world</h1>

        LocalVideo:
        <video id="localvideo" autoplay muted></video>

        <button onclick="joinMeeting()">Join Meeting</button>

        Remote Video:
        <video id="remoteVideo" autoplay muted></video>
    </body>
</html>
- Click on the file to open it on the web browser of your choice. You can also run the application using
http-server.
Open the file in the browser by clicking on it or if you are rendering it through a local server always open it through localhost. Metered sdk needs https to run.
- Create a script tag and then inside the script tag create a
asyncfunction with the namejoinMeeting()
We have already created a room by going to the dashboard. The room
idof our room is:ffpyr0hc5cHere we are creating a new meeting by creating a new Meeting object, then joining the meeting room with participant name
John Doe. This has been described in the "Join the Room" section above.Then once we have joined the meeting we are calling
meeting.startVideo()to start sharing camera.When the camera is shared the
localTrackStartedevent is emitted. We listen to this event and send theMediaStreamto the video tagSimilarly, when a remote participant joins the meeting the
remoteTrackStartedevent is emitted. We listen to this even and pass theMediaStreamto the video element with idremoteVideoThere will not be any audio in the application as we have not written to code to handle audio. (for a complete tutorial visit the Advanced SDK guide and Building a Group Video Calling application articles.) Refer to the below code for details:
<script>


     async function joinMeeting(){

            const meeting = new Metered.Meeting();
            const meetingInfo = await meeting.join({
            roomURL: "aliasgher.metered.live/ffpyr0hc5c",
            name: "John Doe"
            });
            console.log("Meeting joined", meetingInfo);

        try {
            meeting.startVideo();
            } catch (ex) {
            console.log("Error occurred when sharing camera", ex);
            alert('share camera not working')
            }

            meeting.on("localTrackStarted", function(item) {
            if (item.type === "video") {
                /**
                 * localTrackStarted event emits a MediaStreamTrack
                 * but we cannot assign MediaStreamTrack into the html video tag
                 * hence we are creating MediaStream object, a MediaStream
                 * can be assigned to the html video tag.
                 */
                var track = item.track;
                var mediaStream = new MediaStream([track]);
                /**
                 * We have a video tag on the page with id
                 * localvideo
                 * e.g: <video id="localvideo" autoplay muted></video>
                 * This video tag will show the user their own video
                 */
                document.getElementById("localvideo").srcObject = mediaStream;
                document.getElementById("localvideo").play();
            }
        });

            /**
                 * participantInfo = {
                 *       isAdmin: false
                 *       meetingSessionId: "60fef02300f4a23904ab4861"
                 *       name: "John Doe"
                 *       roomId: "60fc7bcb1dc8562d6e4ab7b3"
                 *       _id: "60fef02300f4a23904ab4862"
                *  }
                */
                meeting.on("participantJoined", function(participantInfo) {
                console.log("participant has joined the room", participantInfo);
                });


                /**
                 * remoteTrackItem = {
                 *   streamId: "eaa6104b-390a-4b0a-b8d1-66f7d19f8c1a",
                 *   type: "video"
                 *   participantSessionId: "60fef02300f4a23904ab4862"
                 *   track: MediaStreamTrack,
                 *   name: "Jane Smith"
                 * }
                 */
                meeting.on("remoteTrackStarted", function(remoteTrackItem) {
                    console.log("remoteTrackStarted", remoteTrackItem);
                    // Converting MediaStreamTrack to MediaStream
                    var remoteTrack = remoteTrackItem.track;
                    var remoteStream = new MediaStream([remoteTrack]);

                    document.getElementById("remoteVideo").srcObject = remoteStream;
                    document.getElementById("remoteVideo").play();
                });
    }


        // use localhost to run the video on your local server.  do not use the http ip address given by http-server because the metered video application needs https to run

</script>
Here is what the final code looks like:
<!DOCTYPE html>
<html>
    <head>

    </head>
    <body>

        <h1>Room ID: ffpyr0hc5c</h1>

        <div>
            <button onclick="joinMeeting()">Join Meeting</button>
            <hr />
            Local Video:
            <video id="localvideo" autoplay muted></video>

            Remote Video:
            <video id="remoteVideo" autoplay muted></video>
        </div>


        <script src="https://cdn.metered.ca/sdk/video/1.4.6/sdk.min.js"></script>
        <script>

      async function joinMeeting(){

            const meeting = new Metered.Meeting();
            const meetingInfo = await meeting.join({
            roomURL: "aliasgher.metered.live/ffpyr0hc5c",
            name: "John Doe"
            });
            console.log("Meeting joined", meetingInfo);

        try {
            meeting.startVideo();
            } catch (ex) {
            console.log("Error occurred when sharing camera", ex);
            alert('share camera not working')
            }

            meeting.on("localTrackStarted", function(item) {
            if (item.type === "video") {
                /**
                 * localTrackStarted event emits a MediaStreamTrack
                 * but we cannot assign MediaStreamTrack into the html video tag
                 * hence we are creating MediaStream object, a MediaStream
                 * can be assigned to the html video tag.
                 */
                var track = item.track;
                var mediaStream = new MediaStream([track]);
                /**
                 * We have a video tag on the page with id
                 * localvideo
                 * e.g: <video id="localvideo" autoplay muted></video>
                 * This video tag will show the user their own video
                 */
                document.getElementById("localvideo").srcObject = mediaStream;
                document.getElementById("localvideo").play();
            }
        });

            /**
                 * participantInfo = {
                 *       isAdmin: false
                 *       meetingSessionId: "60fef02300f4a23904ab4861"
                 *       name: "John Doe"
                 *       roomId: "60fc7bcb1dc8562d6e4ab7b3"
                 *       _id: "60fef02300f4a23904ab4862"
                *  }
                */
                meeting.on("participantJoined", function(participantInfo) {
                console.log("participant has joined the room", participantInfo);
                });


                /**
                 * remoteTrackItem = {
                 *   streamId: "eaa6104b-390a-4b0a-b8d1-66f7d19f8c1a",
                 *   type: "video"
                 *   participantSessionId: "60fef02300f4a23904ab4862"
                 *   track: MediaStreamTrack,
                 *   name: "Jane Smith"
                 * }
                 */
                meeting.on("remoteTrackStarted", function(remoteTrackItem) {
                    console.log("remoteTrackStarted", remoteTrackItem);
                    // Converting MediaStreamTrack to MediaStream
                    var remoteTrack = remoteTrackItem.track;
                    var remoteStream = new MediaStream([remoteTrack]);

                    document.getElementById("remoteVideo").srcObject = remoteStream;
                    document.getElementById("remoteVideo").play();
                });
    }


        // use localhost to run the video on your local server.  do not use the http ip address given by http-server because the metered video application needs https to run


</script>
    </body>
</html>
Open the index.html in two web browsers and then click on the join meeting button on both, you will see 2 video tags playing one is the local video and another is the remoteVideo.
Now we have create a video call between 2 participants. Do not try to open more than two tabs as we are not rendering the video element dynamically to handle multiple participants.
This demo is just a quick win to get you to start building Metered video.
You can read the Advanced SDK Guide for a detailed guide on the metered sdk. Also,refer to the Build a group Video calling application article on how to build a complete application with Metered